A First Campaign of MekHQ
We recommend reading the Against the Bot Starter Guide, located in the docs/AtB Stuff folder, and using it to get started with MekHQ. This holds true even if you are not playing an Against the Bot campaign, as that is our most up to date document on setting up and running MekHQ.
A First Campaign of non-Against the Bot MekHQ in 0.44.0
Prefix: This tutorial was written for 0.44.0, and is thus somewhat out of date for the current version of MekHQ.
In this step-by-step tutorial, I outline how to start up a very simple MekHQ campaign, assign units and pilots, and run a first scenario. For this example, I am going to go classic and run a Refusal War campaign as Clan Wolf that is loosely based on the excellent The Falcon and the Wolf scenario pack.
- When you first start up MekHQ, choose
Start a New Campaign. You will then be presented with a dialog to choose the start date of your campaign. Since I will be playing the Refusal War, I will start my campaign on 24 September 3057. - You will now be presented with several different preset campaign types from which you can select an option. These campaign types will set many of the game options for you, although you will still have the opportunity to customize as you like later. For this tutorial, we are going to choose the
Simple Presetsoption so that we can get going quickly.

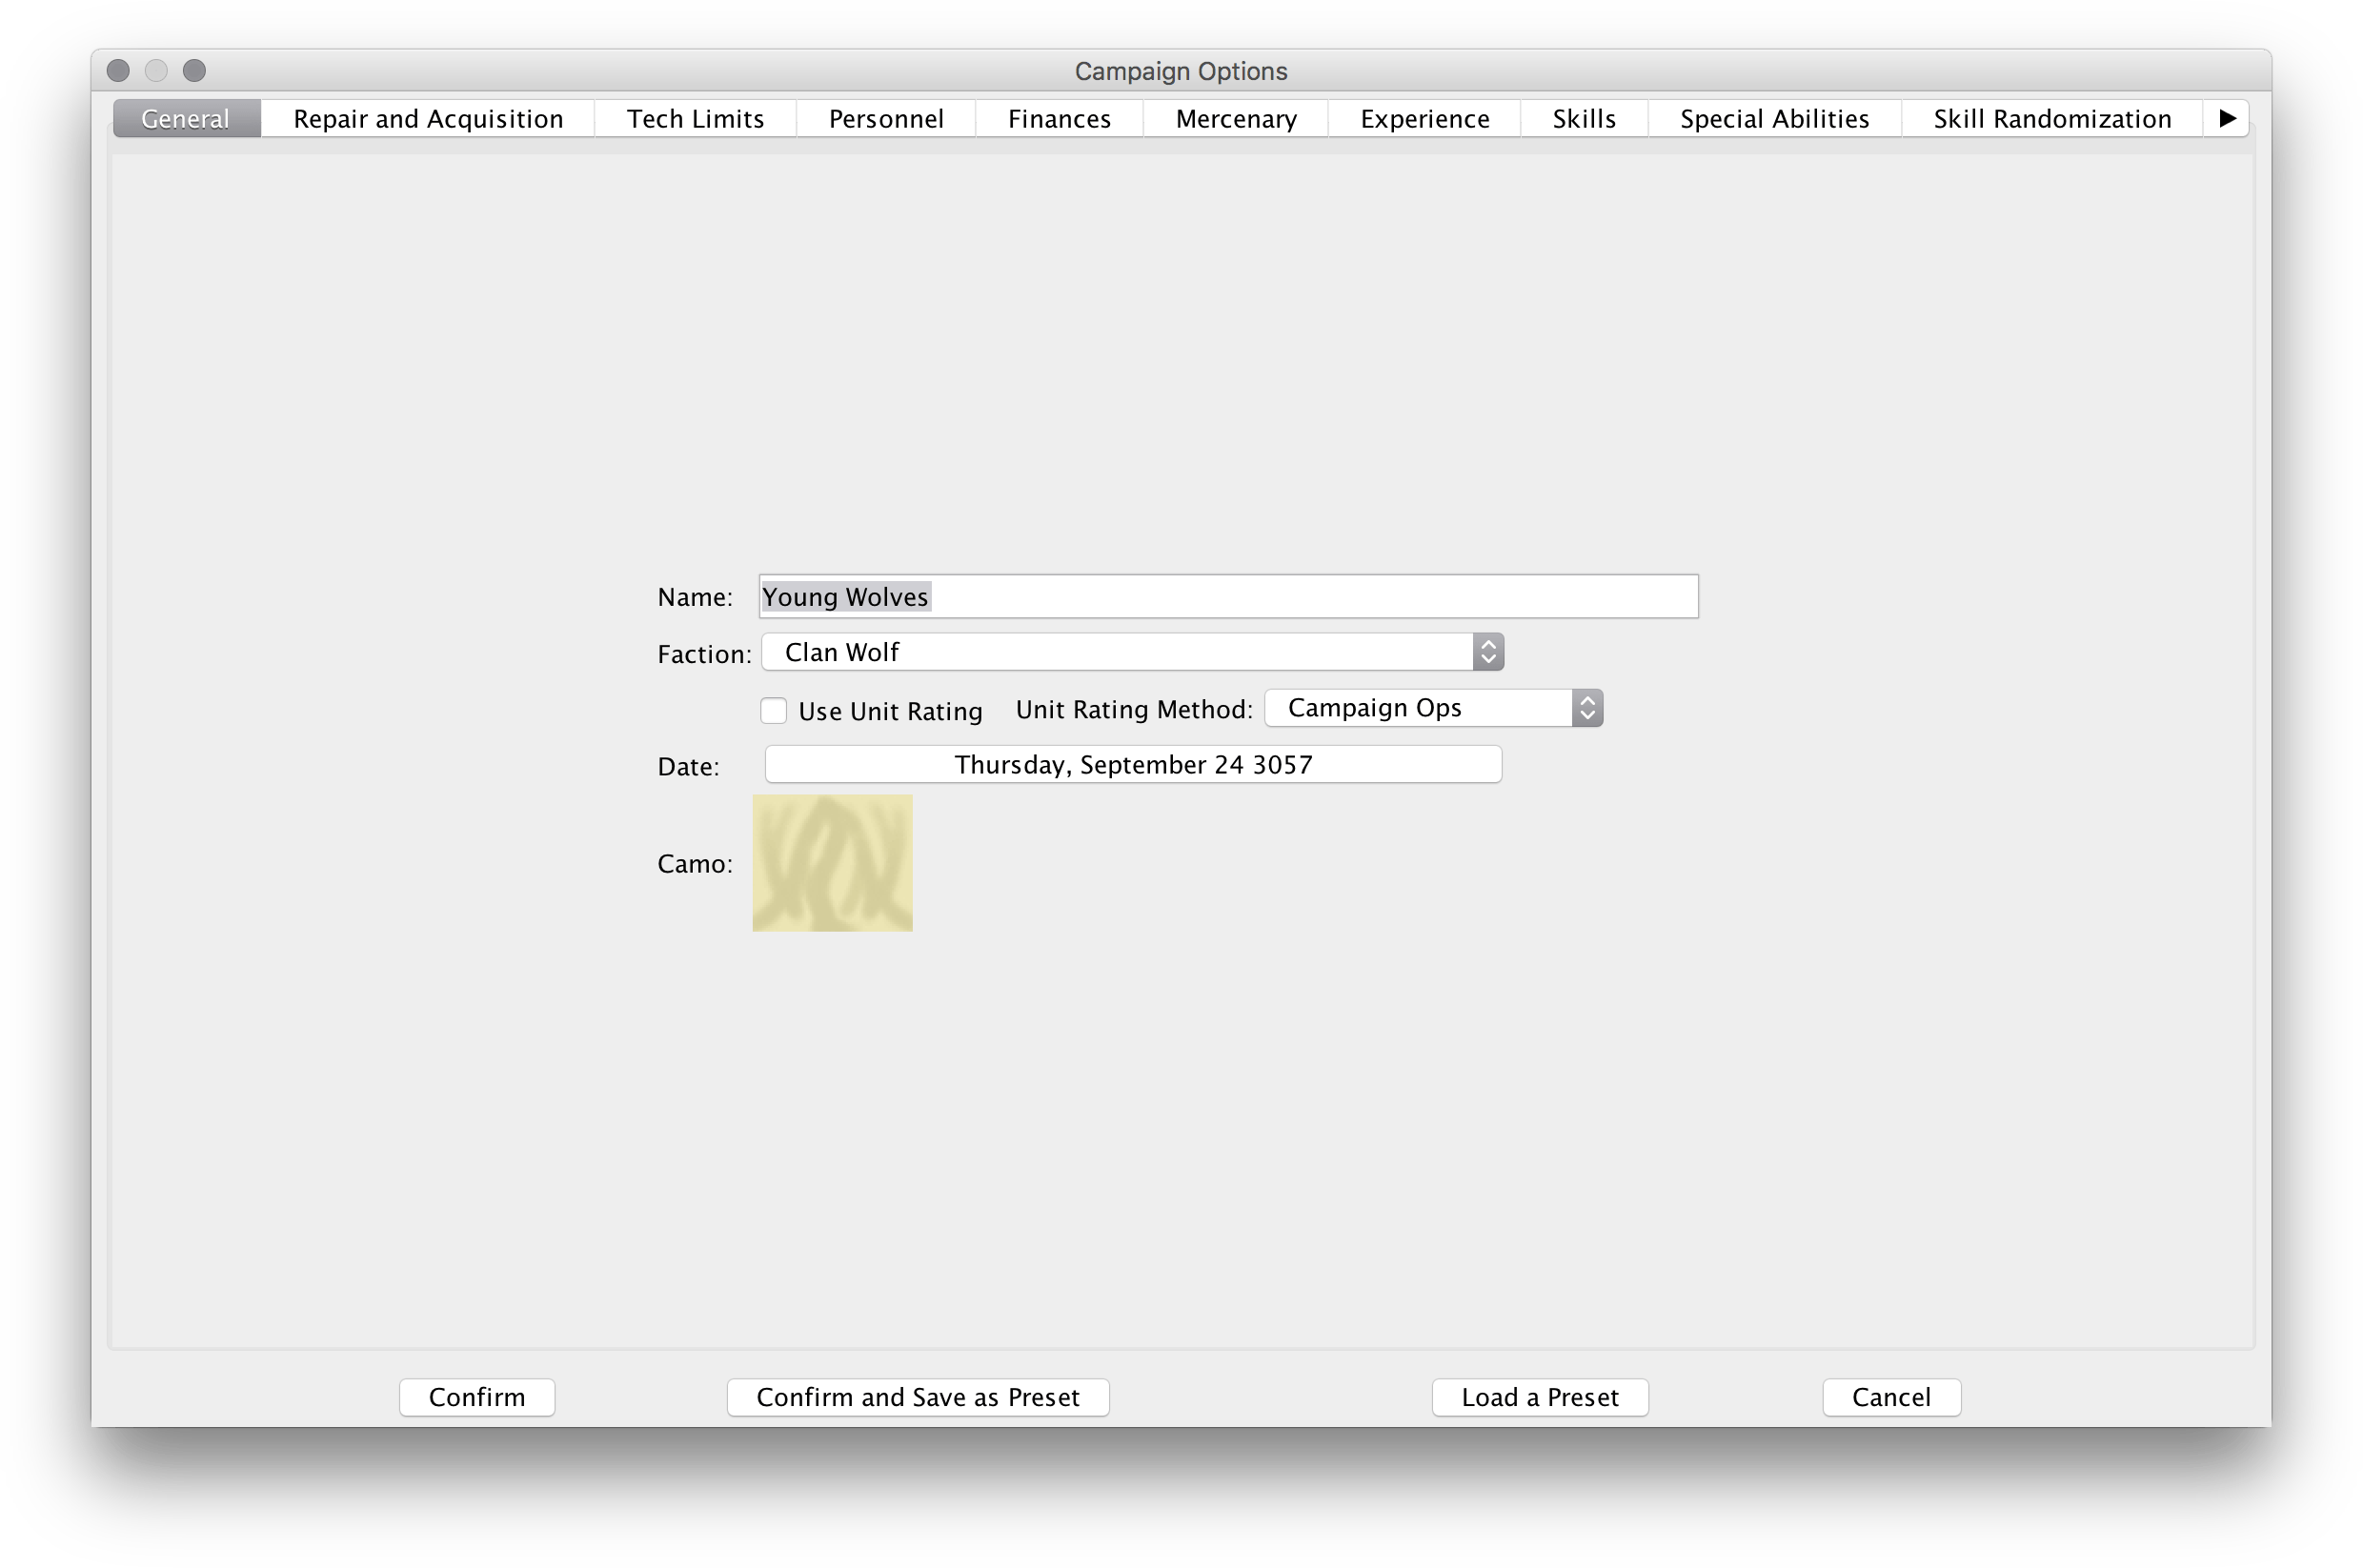
- You will now be presented with a dialog that gives you a multitude of options to customize the campaign to your liking. On the first tab, you will want to assign a name for your campaign, select a faction, and select a camo. I have also made a few other minor tweaks that are not essential.
- On the Repair and Acquisition tab, I lowered the minimum transit time for deliveries to zero so that parts I acquire are instantly available.
- On the personnel tab, I de-selected
Capture Prisoners in scenariobecause I don’t want to bother with the extra management of bondsmen. - On the Rank System tab, I chose the
Clan rank system. - On the Name and Portrait Generation tab, I de-selected automatic portrait generation for MekWarriors, because I want to choose my own portraits.
- You will now be presented with the main MekHQ application which contains many tabs and a lot of functionality. I am going to start by adding my meks and pilots, and then I will organize them into a TO&E for a scenario. First, I turn
GM Modeon with the button in the upper right. This will allow me to take certain actions that I wouldn’t be able to do otherwise. - I can hire my MekWarriors as a group by going to the
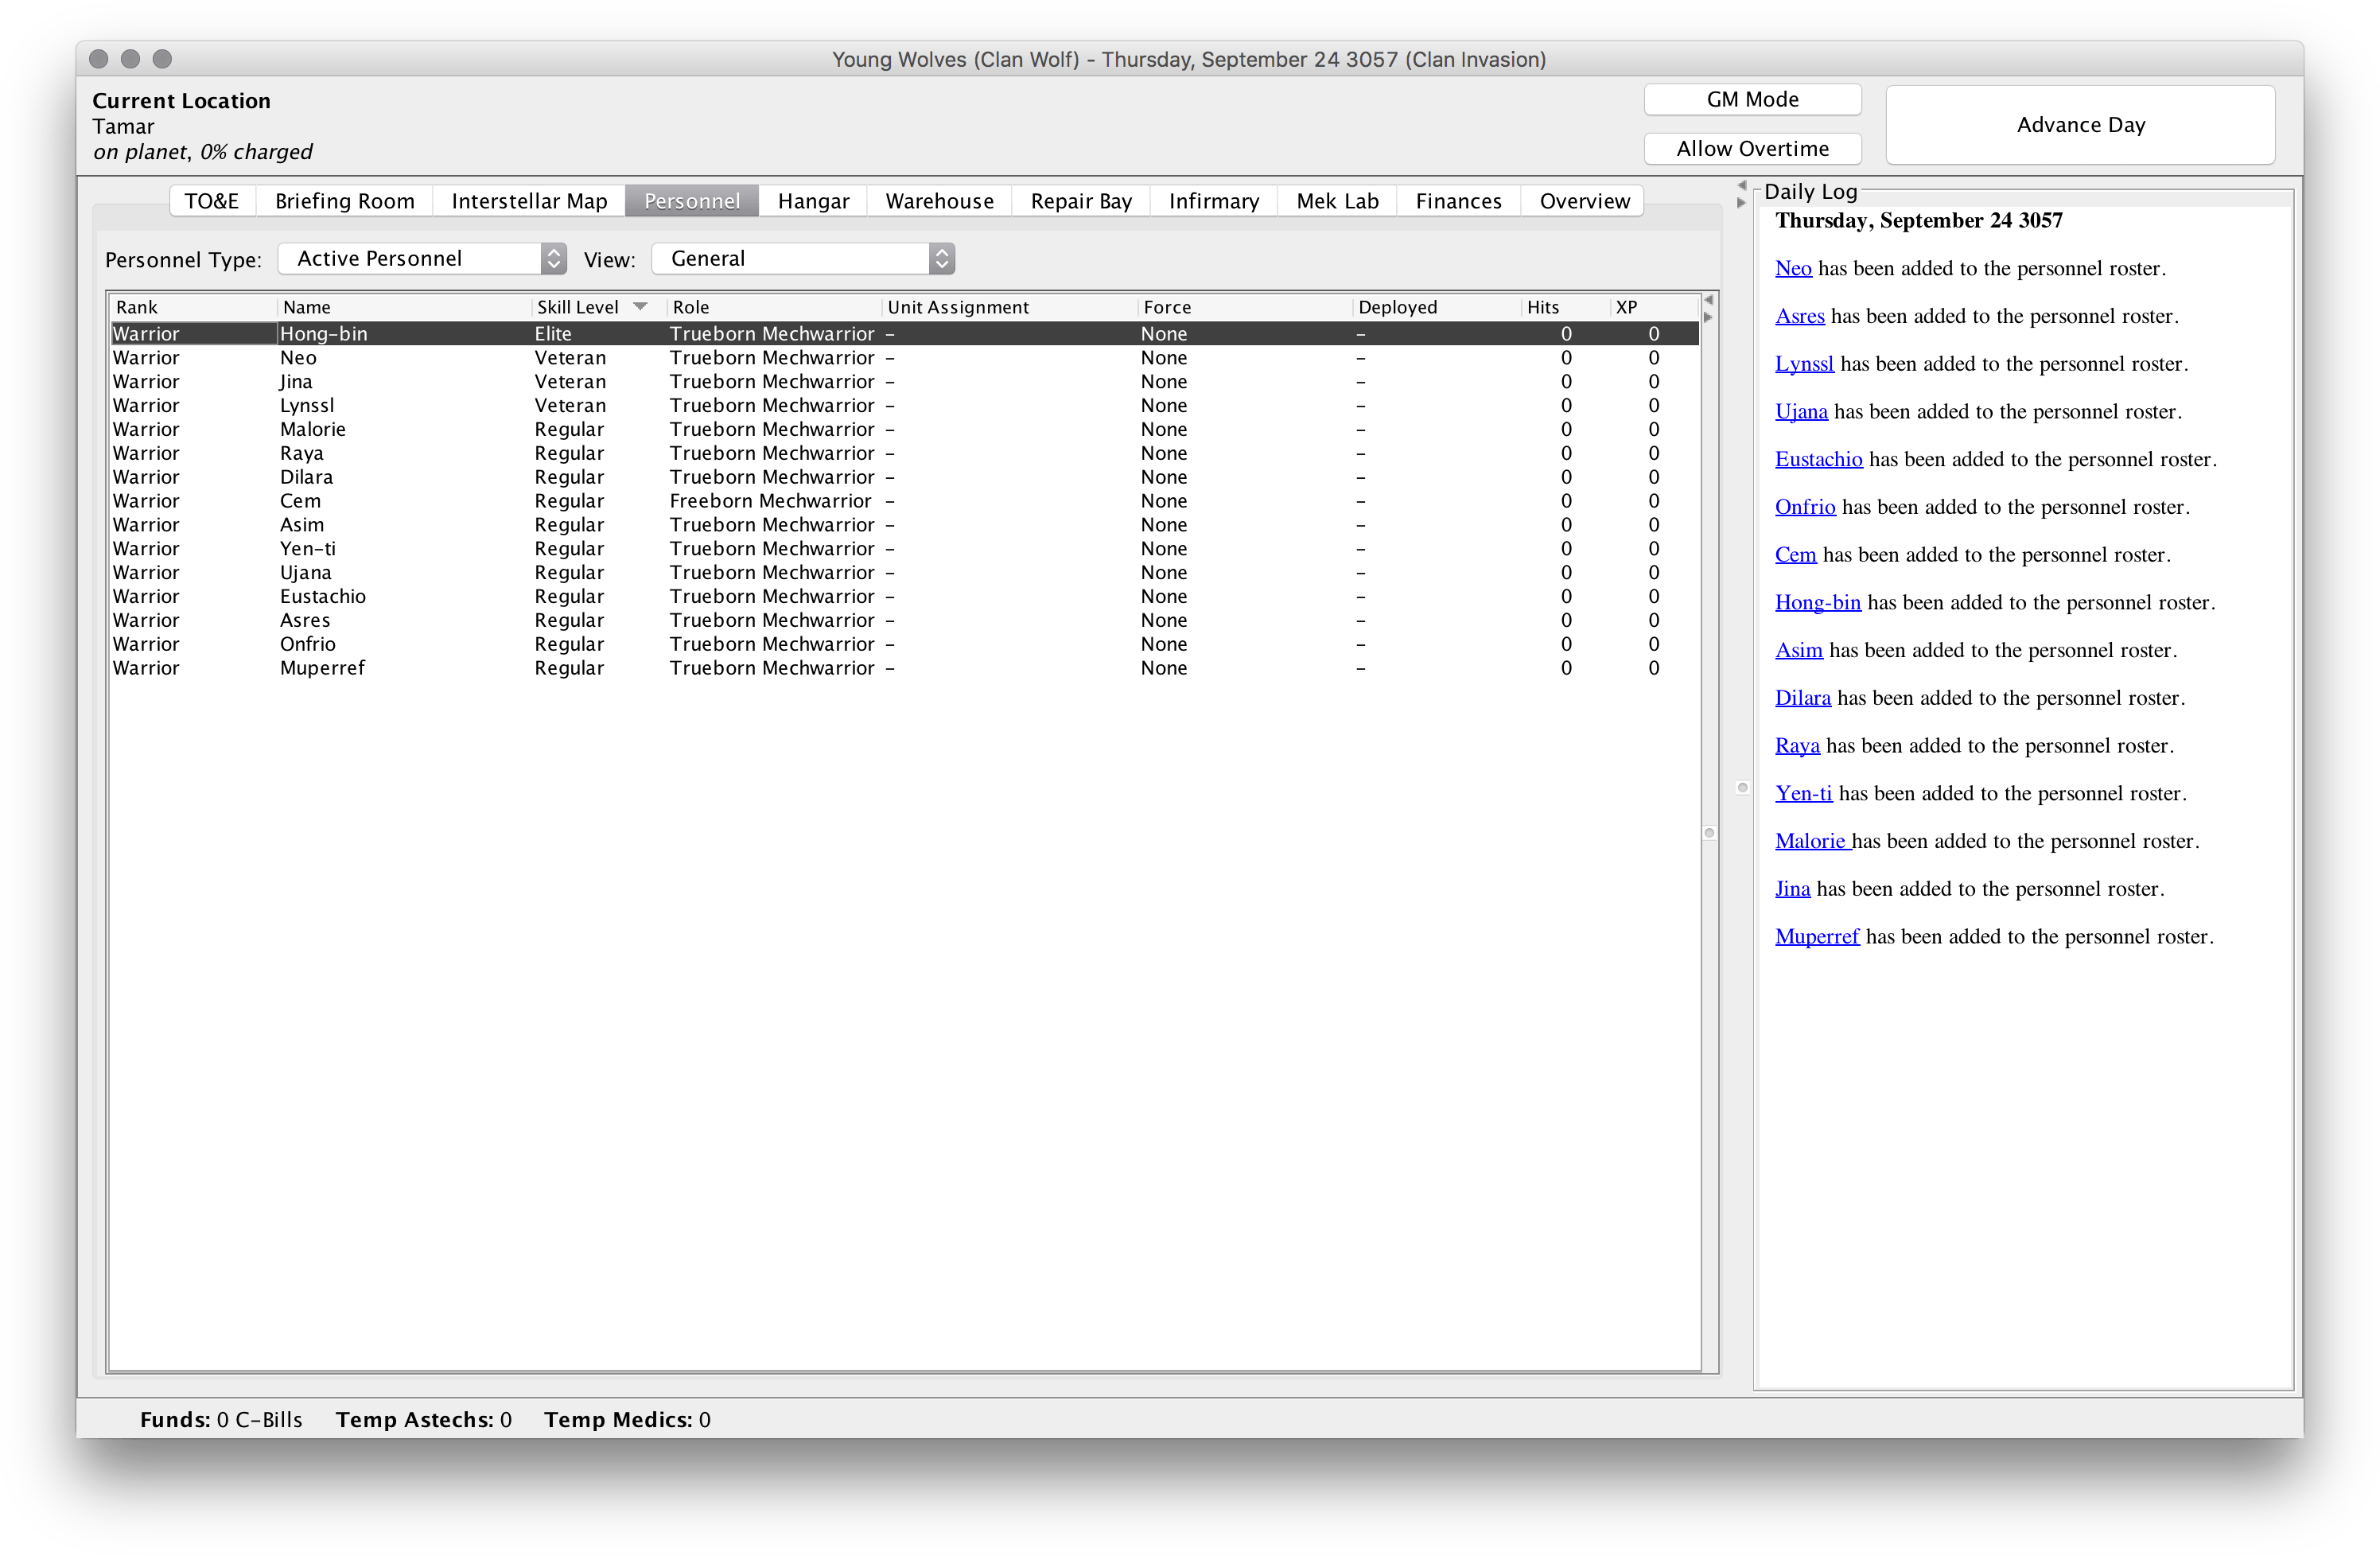
Marketplace > Hire Personnel in Bulkmenu item. Since i will run a full trinary, I need fifteen MekWarriors. I start them all at the rank of Warrior. MekHQ will randomize their skill levels using the random generations guidelines set up in the campaign options.
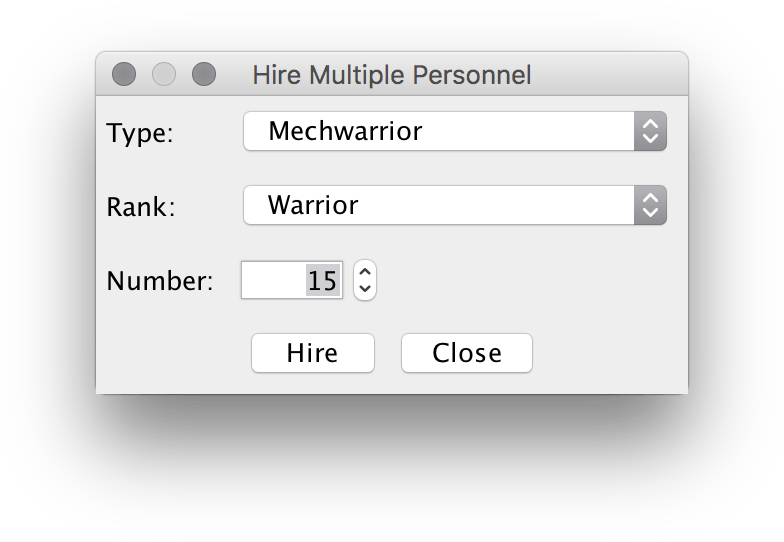 Once you hit
 Hire, a report about the new MekWarriors will appear in the daily log to the right. All important happenings are shown in this daily log. If I move over to thePersonnel tab, I can see my fifteen new MekWarriors.
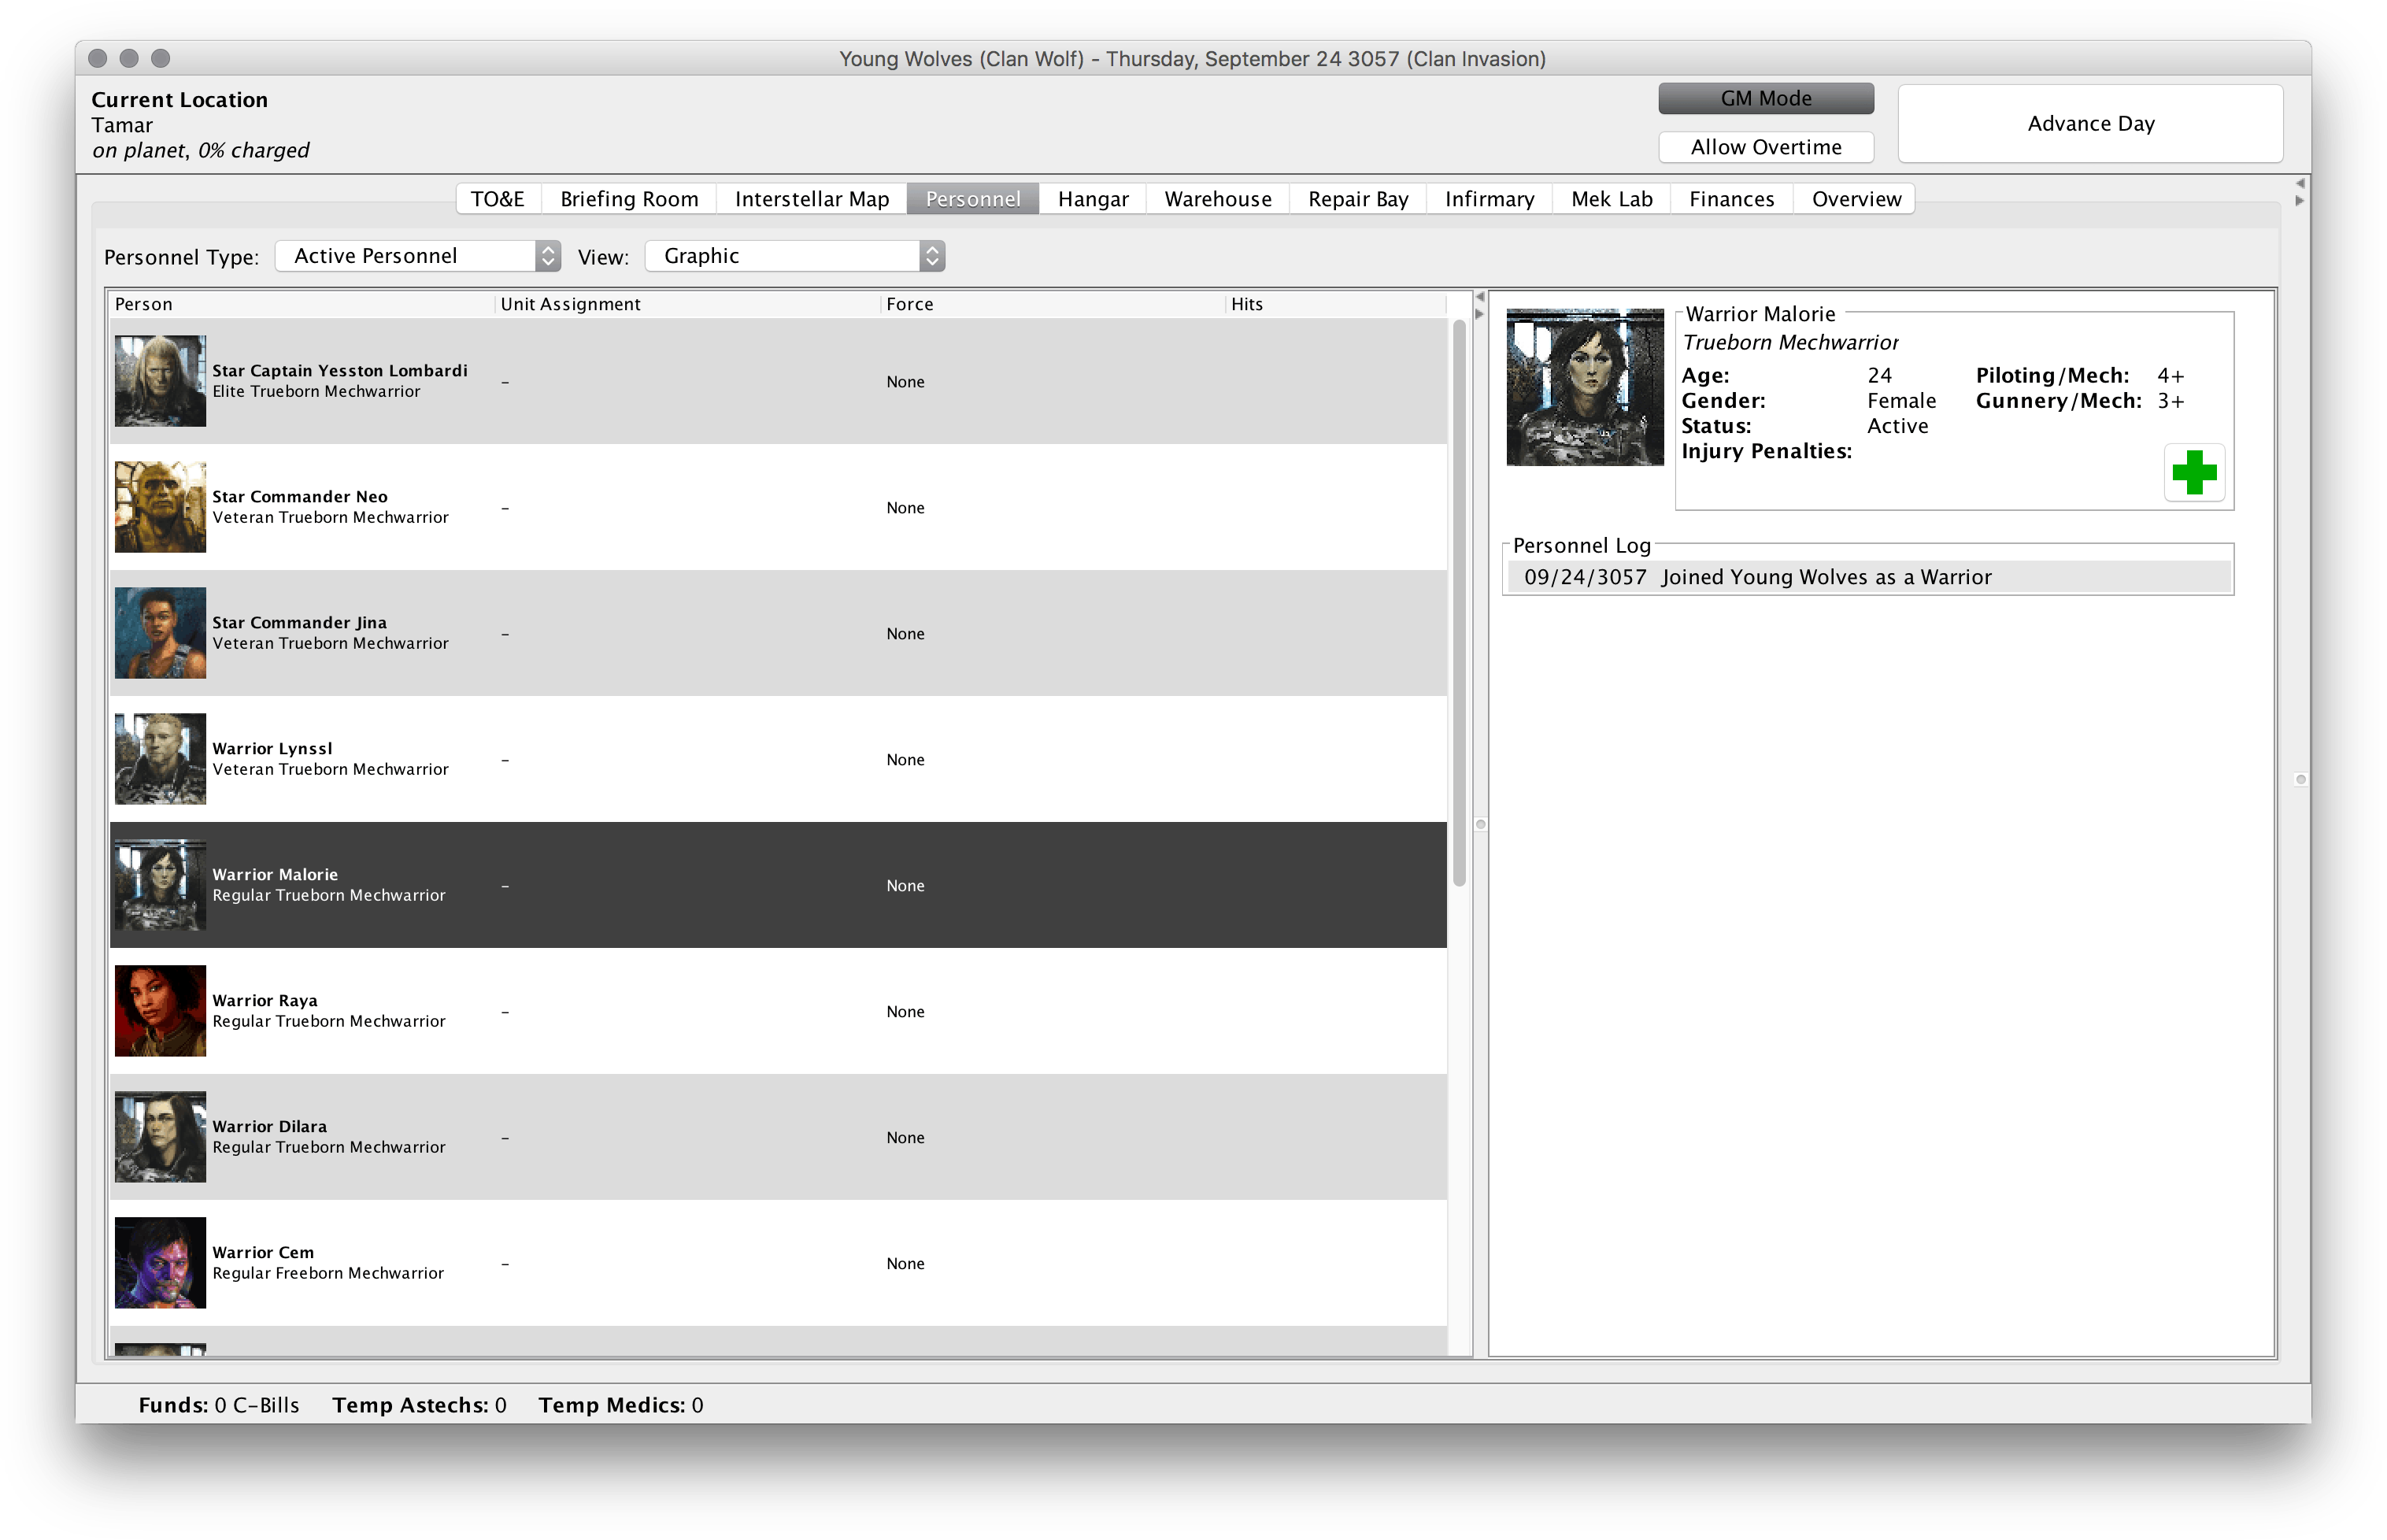
- I sort my MekWarriors by skill level and make my most skilled MekWarriors the officers. I can do this by right-clicking on a person, which brings up a context menu with a lot of options. I want to use the
Rankselection option at the top to change ranks. I also want my Star Captain to have the same name used in the canon The Falcon and The Wolf scenario pack. To do that, I right-click again and go all the way down toGM Modeat the bottom and then toEdit.... From the pop-up dialog, I can change any characteristic about my personnel, including their name. Finally, I use theChange Portraitoption from the right-click menu to give portraits to all of my MekWarriors. Note that the portraits I am using here are not included with MekHQ and are from my own collection. However, you can find a lot of useful portrait packs in the community for your own use. I can also use theGraphicView at the top to get a nice view fof my team.
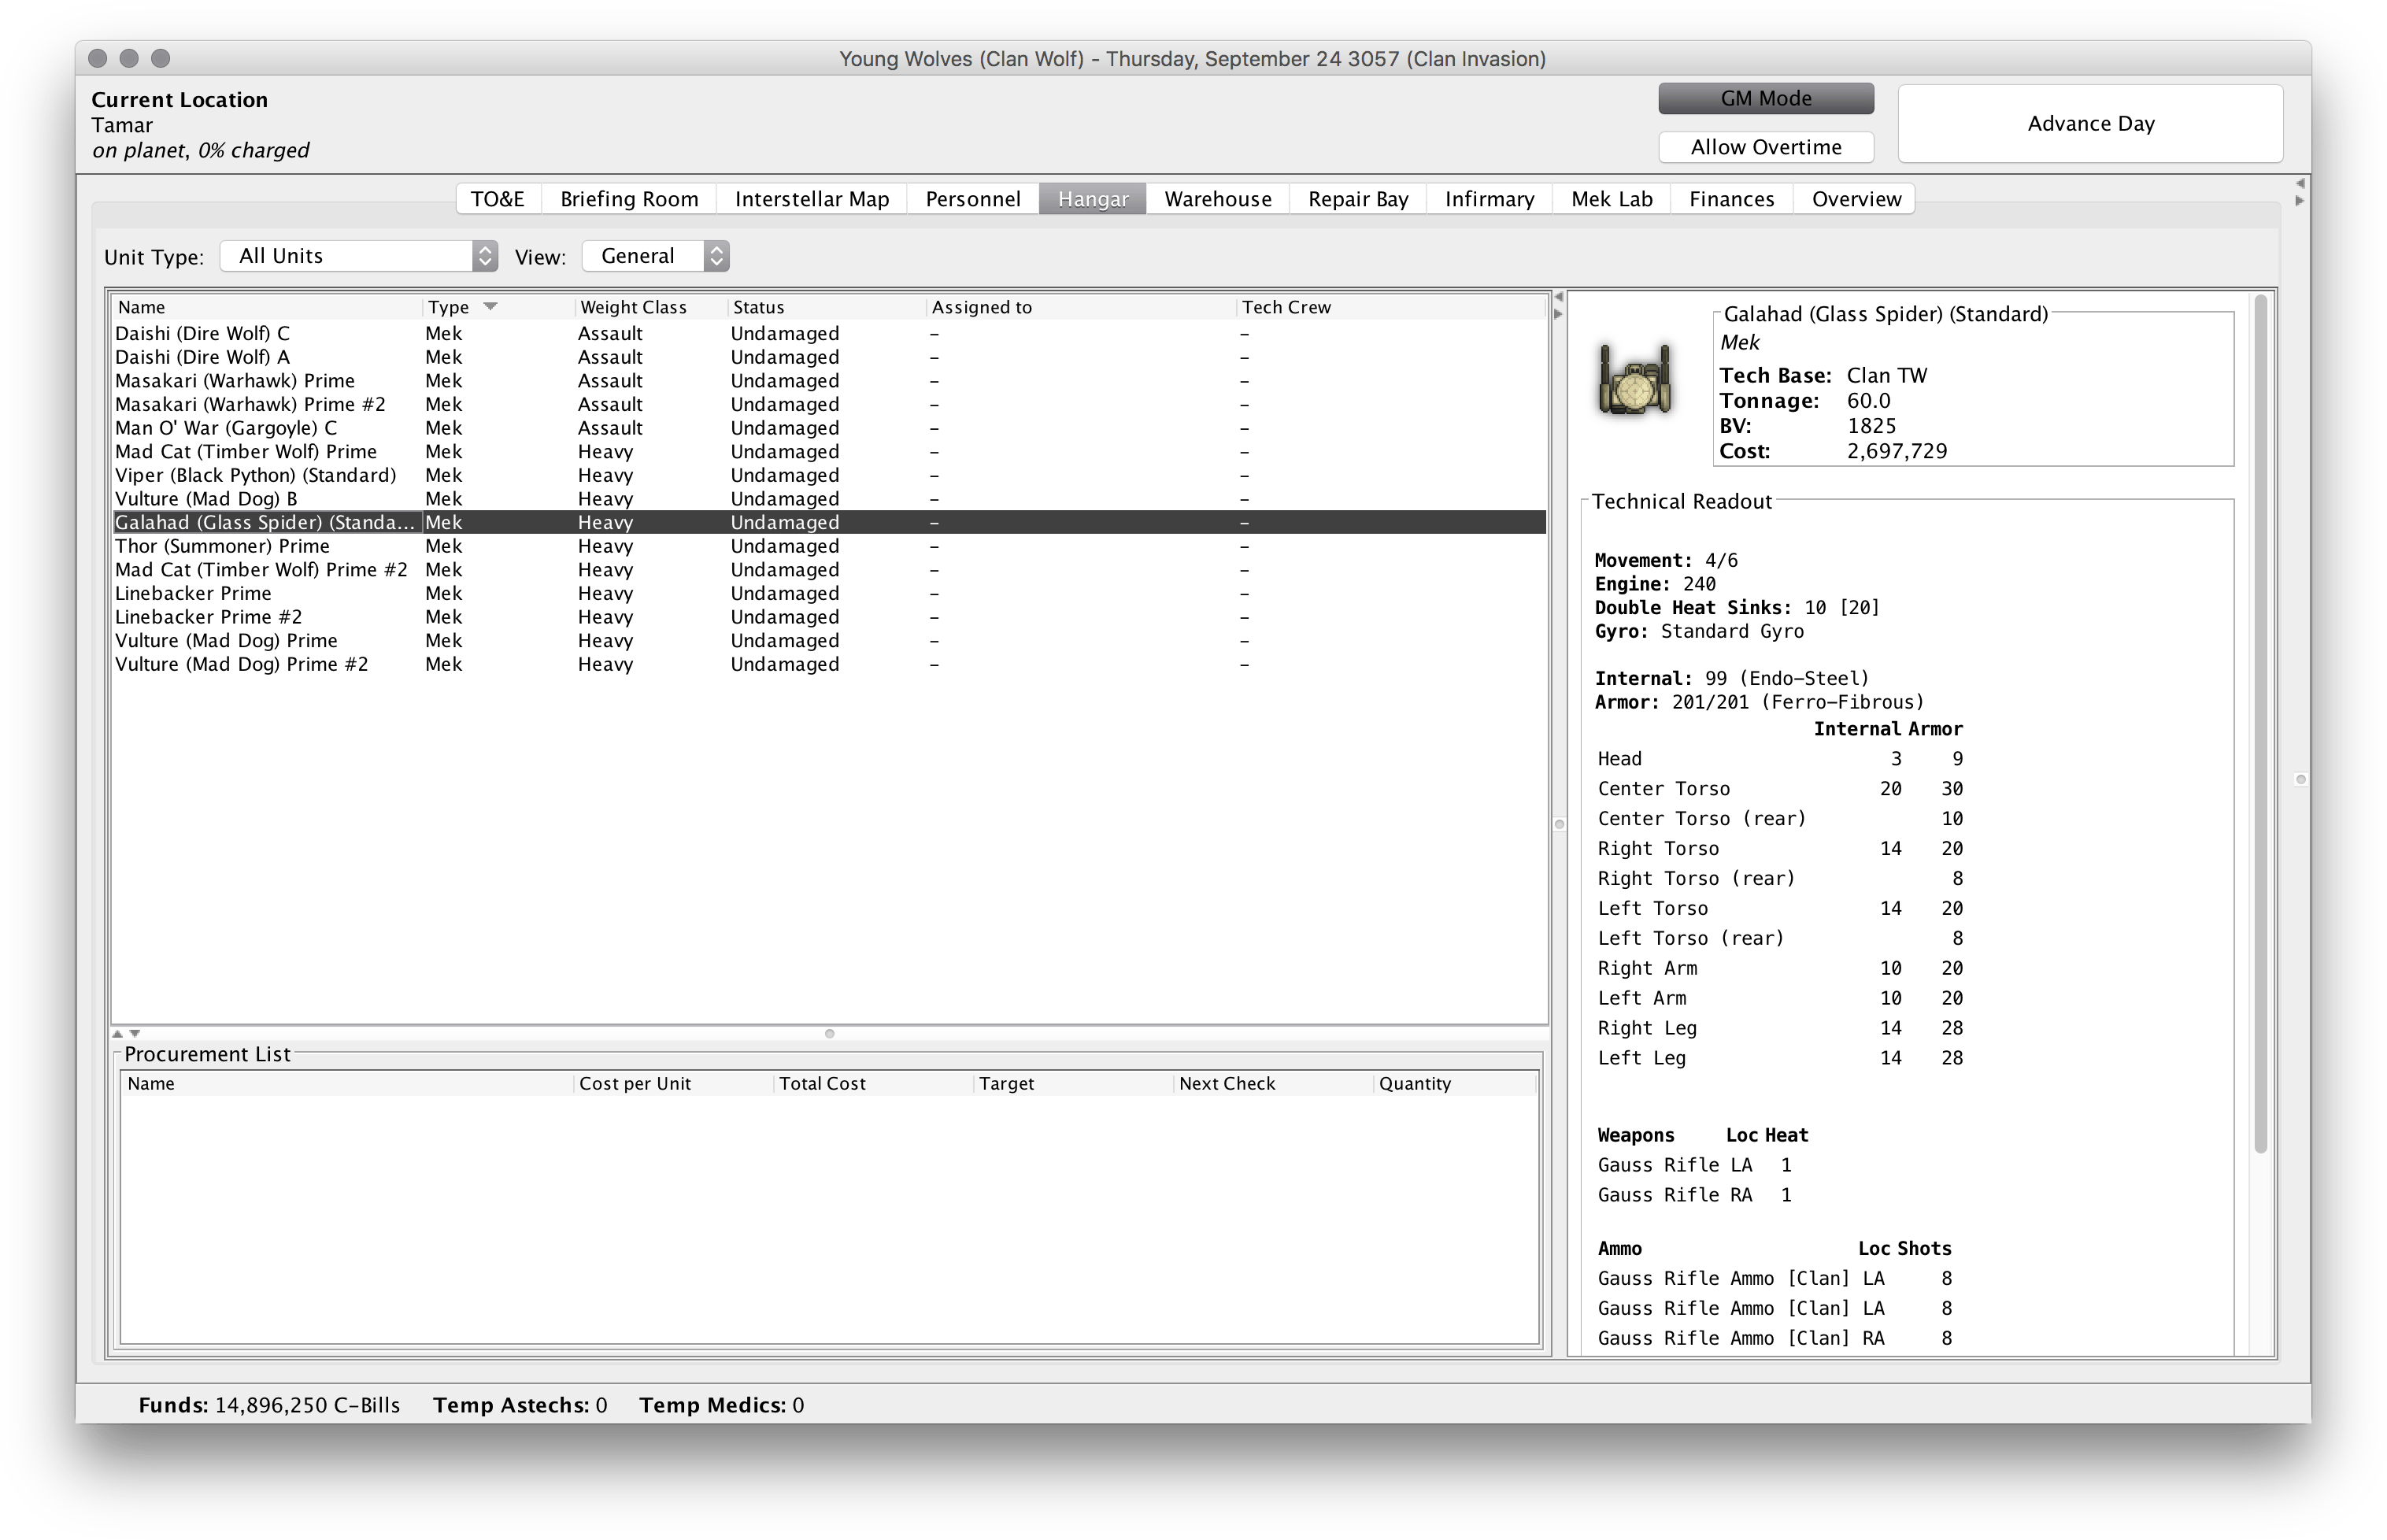
- Now, lets get these MekWarriors some meks! Go to
Marketplace > Purchase Unit. From this dialog, you can find and select units. You can use theBuyoption to acquire units, but this may force you to make an acquisition roll, spend money, and wait for delivery depending on your game option settings. Alternatively, you can use theAdd (GM)button to just add the unit directly, bypassing all of the acquisition rules. Since, I have generated a trinary of meks by hand based on the rules in The Falcon and The Wolf scenario pack, I will use the GM button to add my units. Once you are finished, you can close this dialog. Your new units will appear in theHangar tab.
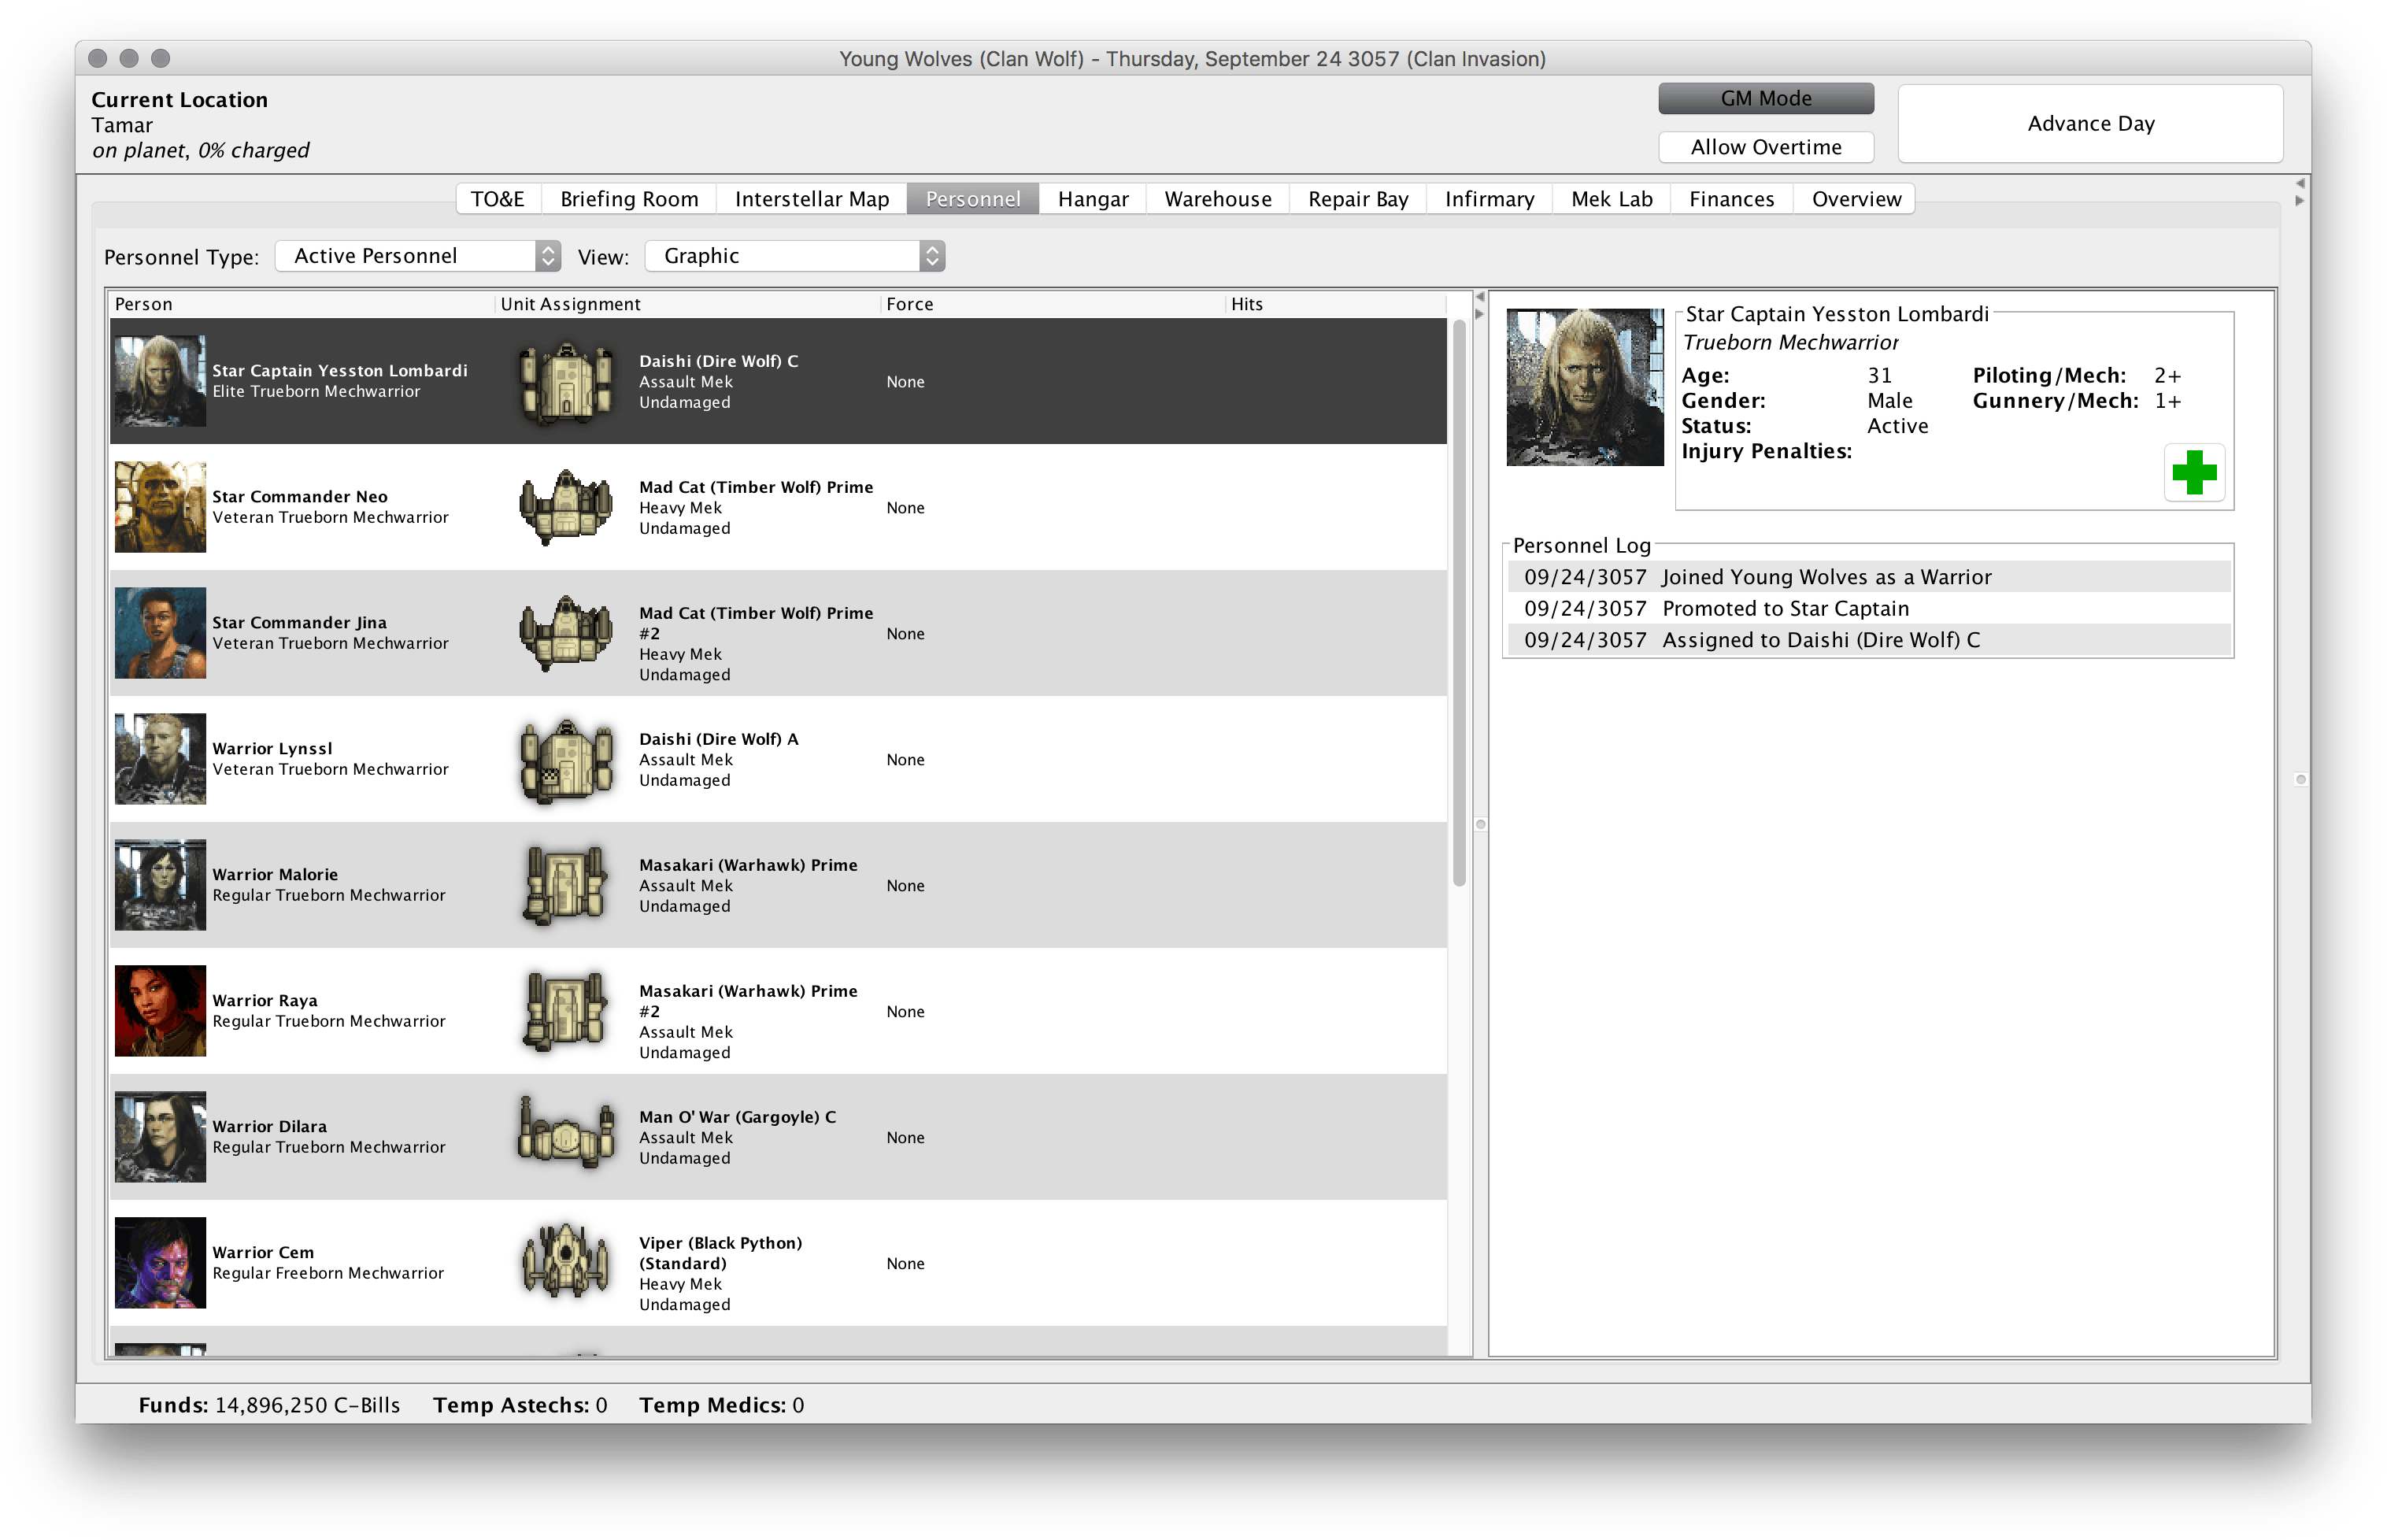
- I can now assign pilots to each mek. I do this from the
Personnel tab. Right click on a pilot and then chooseAssign to Unitand pick the unit you want. Continue until all pilots are assigned a mek. The personnel tab view is looking pretty complete now.
- We can now build the TO&E. Lets go over to the
TO&E tab. The top level force here says “My Campaign.” Right-click on that to change the name. I am going to start my organization at the Galaxy level even though I only have a trinary, just for the flavor. So I name this top level force “Beta Galaxy.” I also change the icon using the right-click menu. Luckily, there was already an icon for Clan Wolf Beta Galaxy. You can add your own icons by placing them in thedata/images/forcedirectory. - I now want to add a new sub-force. I right-click on my top force and choose
Add New Force. I name this force “352nd Assault Cluster.” Now, if I double-click on the top level organization, it will open up my full TO&E. I add an additional sub-force to the 352nd Assault Cluster for my trinary. Then within the trinary, I add three different stars. You can also play around with building force icons fromLayered Iconsfor a slick military look.

- Now that I have my organization set up, I can drop units into the specific Stars. Just right-click on a given force and choose
Add Unitto bring up a list of currently unassigned units. Assign all of your units and you will have a complete TO&E.

- We are ready for action. This is probably a good time to save my campaign from the
File > Save Campaignmenu option. MekHQ will save your save games in thecampaignsdirectory. It will automatically choose a name based on the campaign name and the date of the campaign, but you can change the file name if you like. - Now I can go to the
Briefing Room taband set up a scenario. First, I need to add a new mission. Missions are collections of scenarios that might be tied together in some way, such as part of a mercenary contract or planetary assault. Since my first scenario will be during the trial of possession over the planet of Colmar, I set “Colmar” as my first mission name and location. Then I use theAdd Scenariobutton to add the scenario “Cutting Teeth” to this mission. I could also add some narrative text here for flavor, but I won’t do that right now.
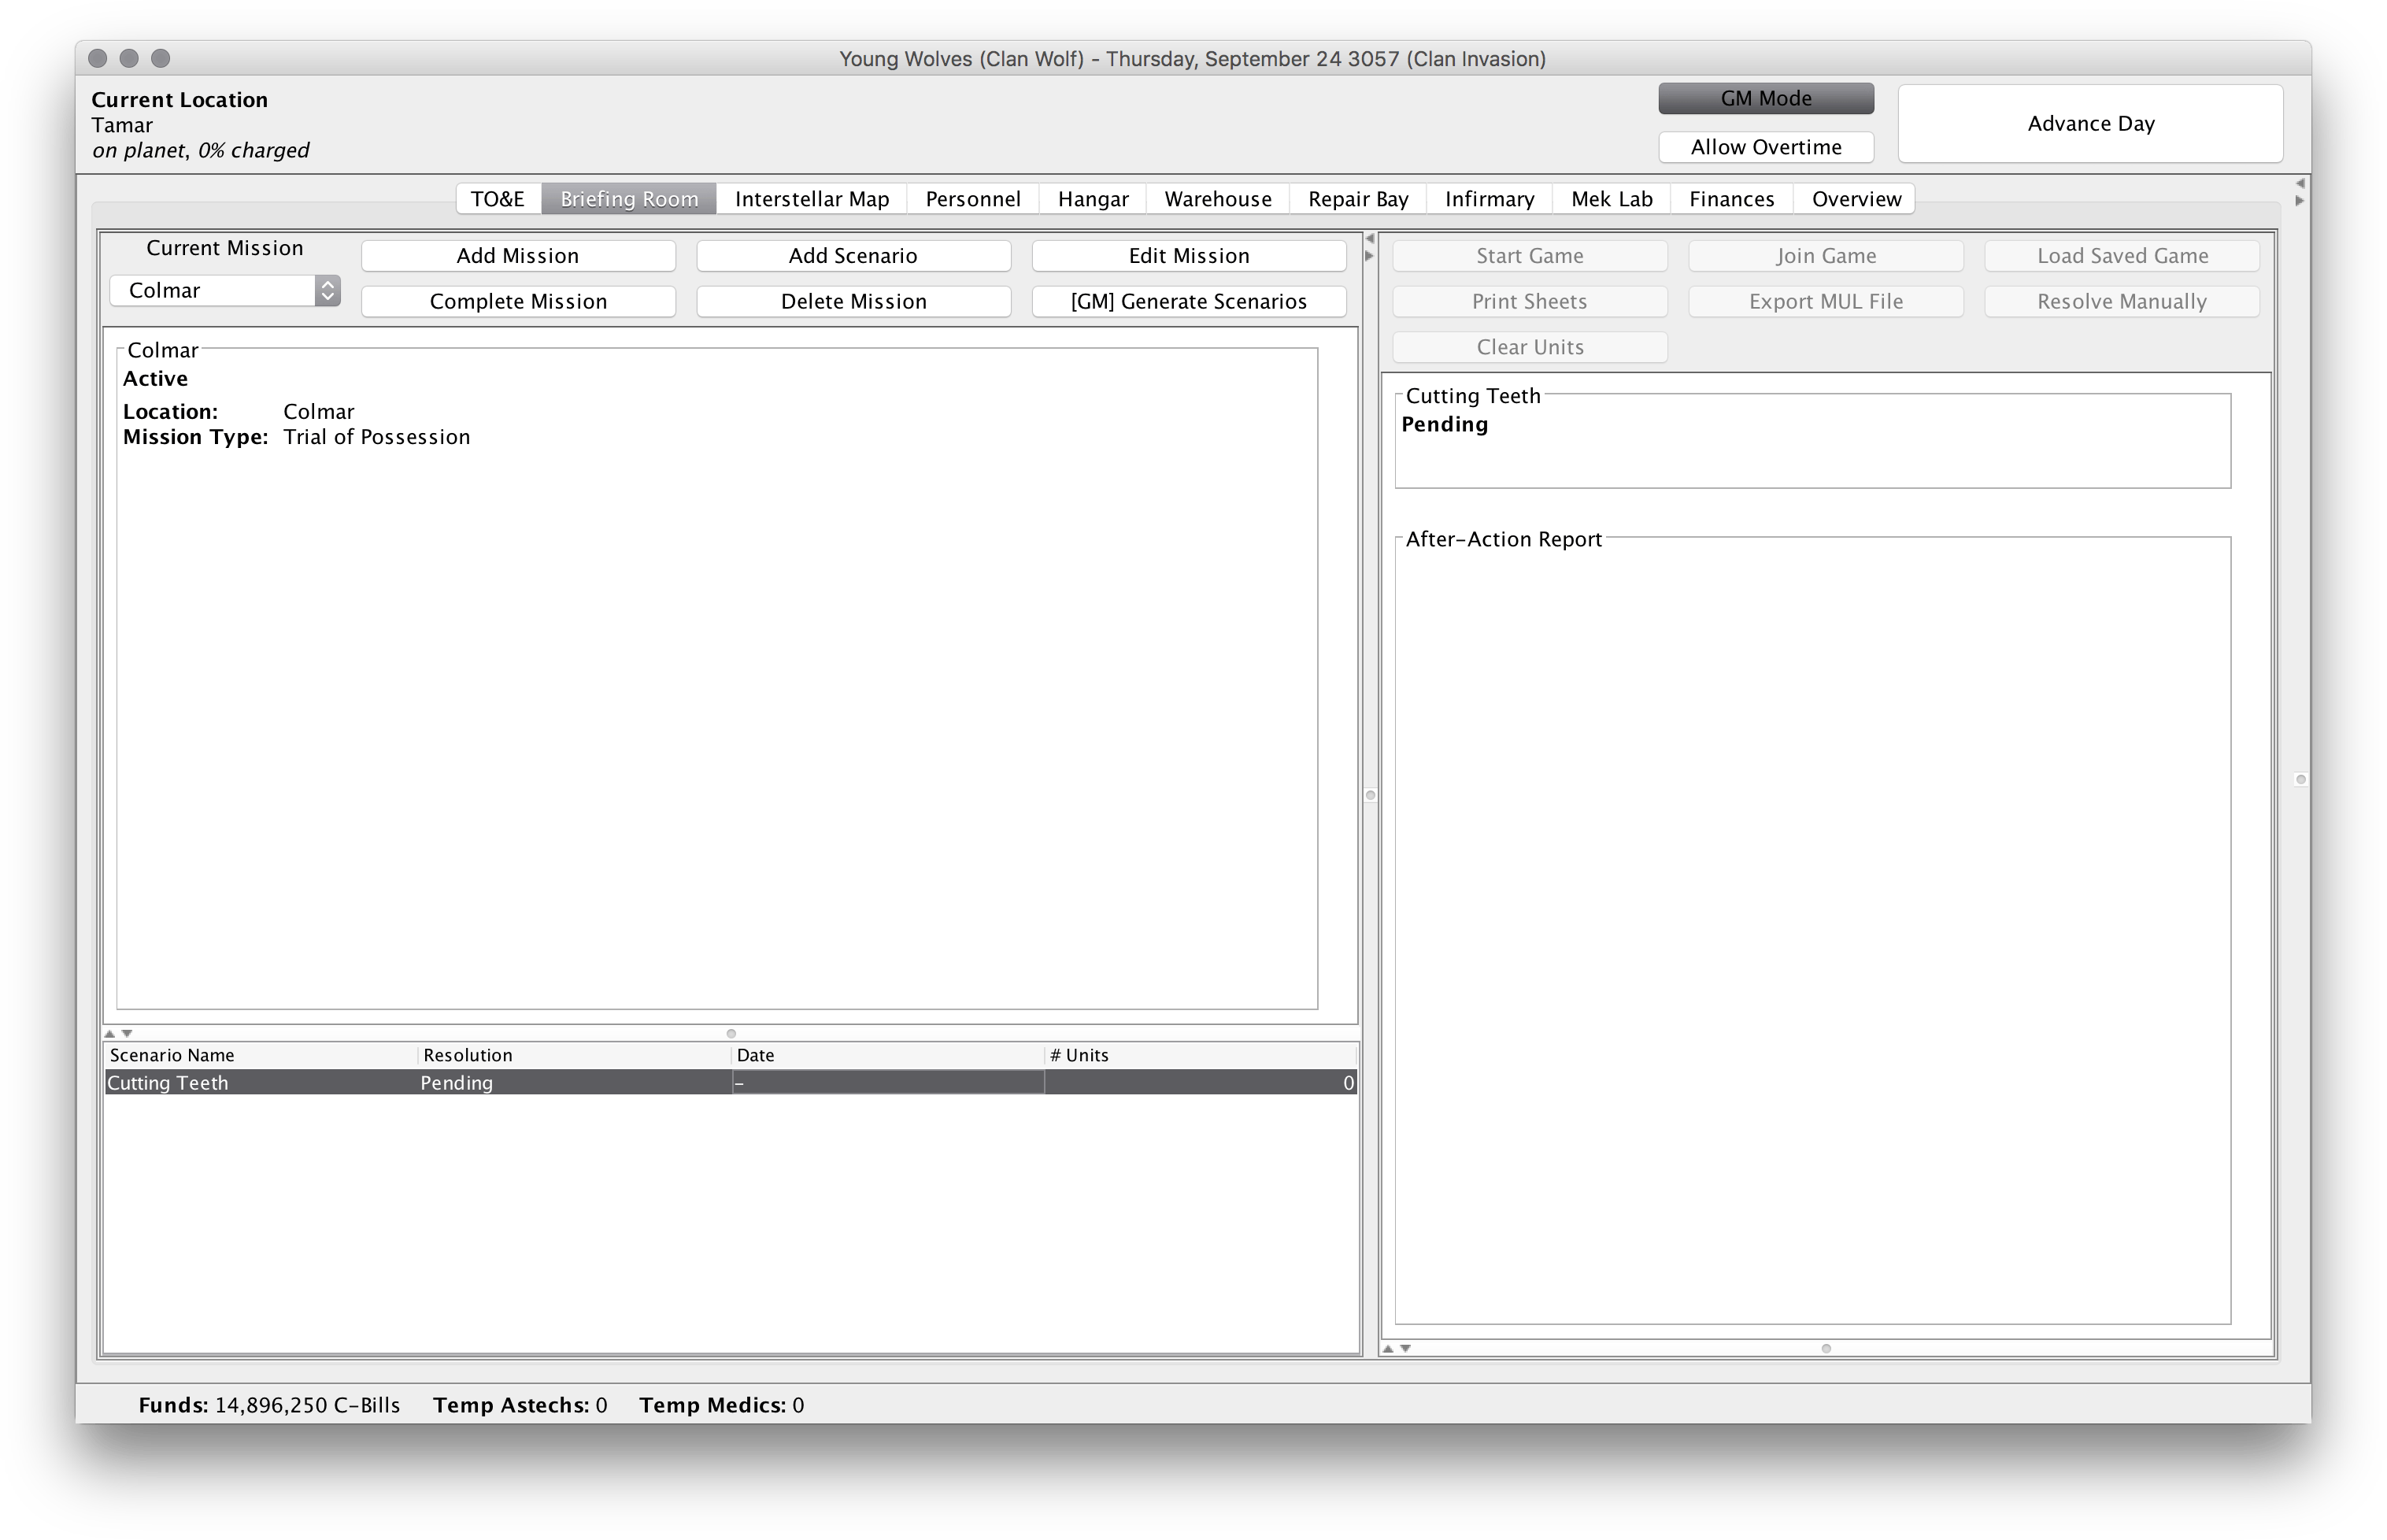
- I need to assign units to my scenario. To do this, I move back over to the
TO&E tab. I can choose any force or individual unit on the TO&E and right-click on them. Then I use theDeploy Forceoption to deploy my force to the scenario. If you return to theBriefing Room tab, you will see the forces listed for the scenario. - Now I can start the game. I have two options here:
- Use the
Start Game. This will open up a game of MegaMek and assign my deployed forces into the game. From there I can assign OpFor and play against the bot or another human player. If I save my game and quit, I will be able to use theLoad Saved Gameto start up MegaMek from within MekHQ at a later time. - Use the
Export MUL fileoption to export my forces to a separate file that can be loaded into MegaMek from theLoad Unit Listbutton in the lobby. This is useful if you want to play on a dedicated server.
- Use the
- Once I am finished with my game and have declared either victory or defeat, I will be able to resolve the scenario in MekHQ. If you are running MegaMek from within MekHQ, then scenario resolution will automatically begin once you reach the victory screen in MegaMek. If you played on MegaMek separately, then you will be given an option to save your final file in MegaMek. You can then use the
Resolve Manuallybutton in MekHQ to load this file and begin scenario resolution. - Scenario resolution will ask you if you controlled the battlefield. This is used to determine whether you have access to all of that nice salvage smoking away on the battlefield. You will then be taking through a variety of dialogs that give you the status of your units, personnel, and salvage. You can edit any information here to your liking.
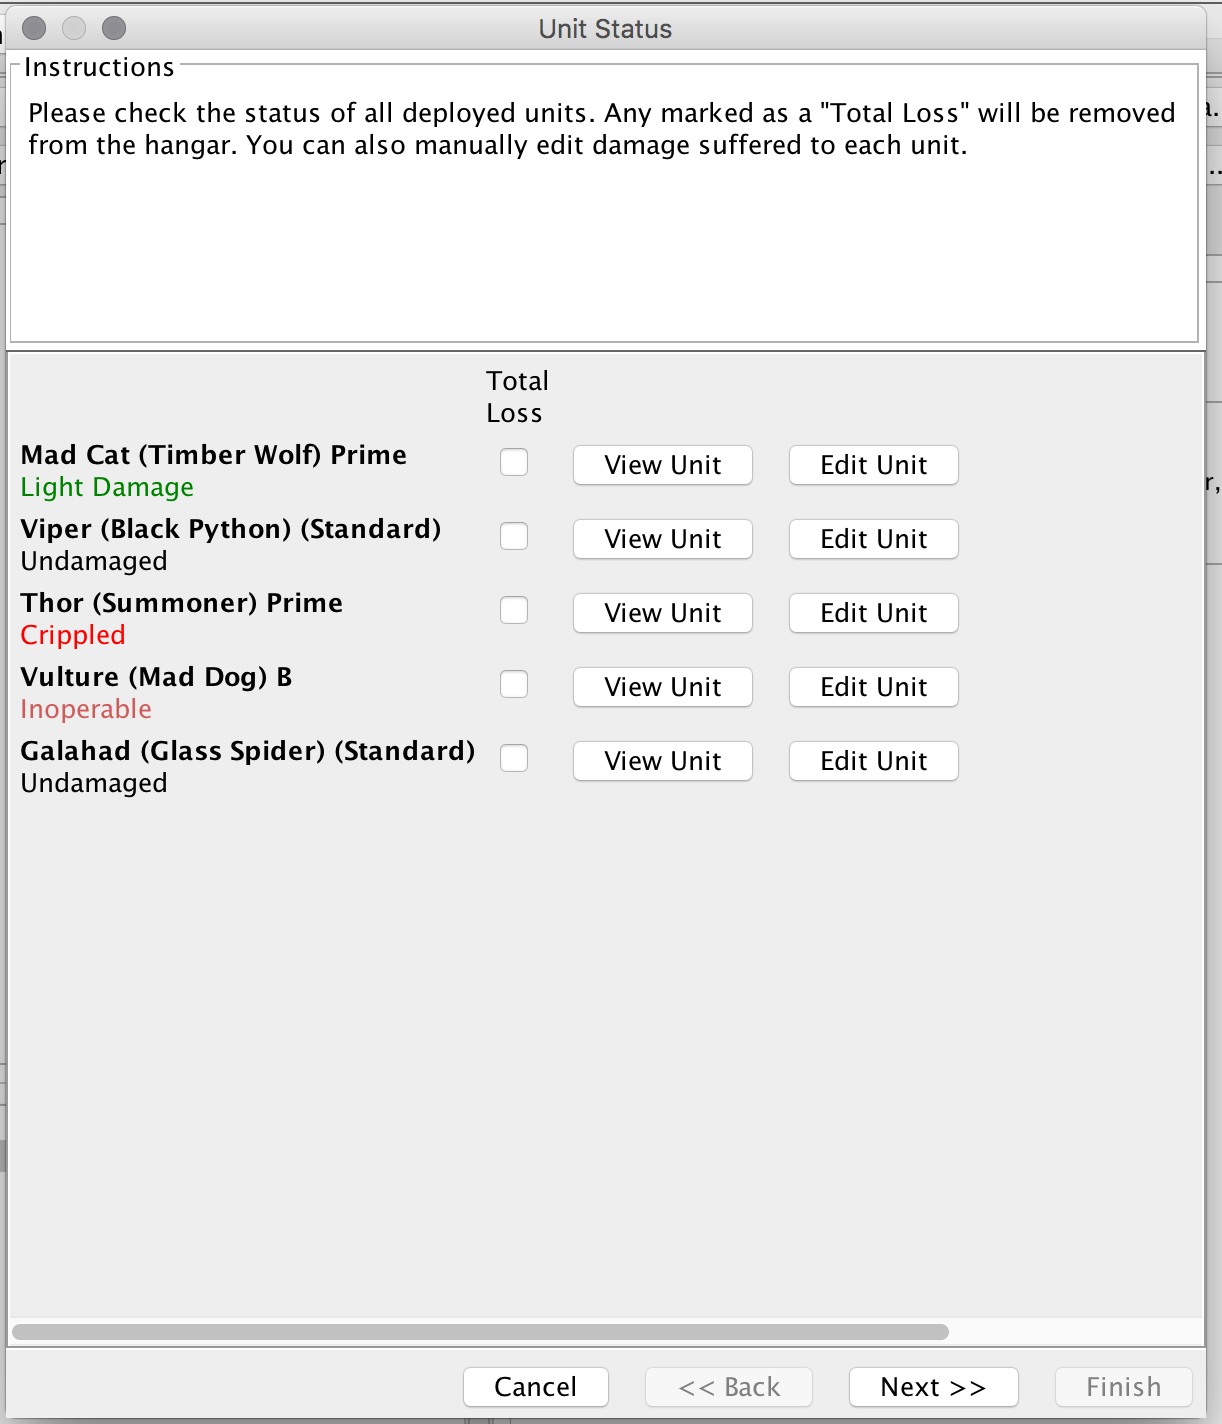
- I have completed my first scenario. However, my units got pretty beat up. I should probably get them fixed up. I will need to add some MekTechs to my campaign in order to repair my units. I can use the same
Marketplace > Hire Personnel in Bulkmenu item to hire fifteen MekTechs. Each of those techs requires a team of six assistant techs (astechs) to be effective. I could hire a bunch of astechs to solve that problem. However, I can also hire a pool of temporary astechs that I don’t need to track as separate personnel. To do this, I use the menu to go toMarketplace > Astech Pool > Bring All Tech Teams to Full Strength. On the bottom of the screen, the total number of temporary astechs will now be showing. Finally, I will need to use theAdvance Daybutton to assign available minutes of work to my tech teams. - I can now move over to the
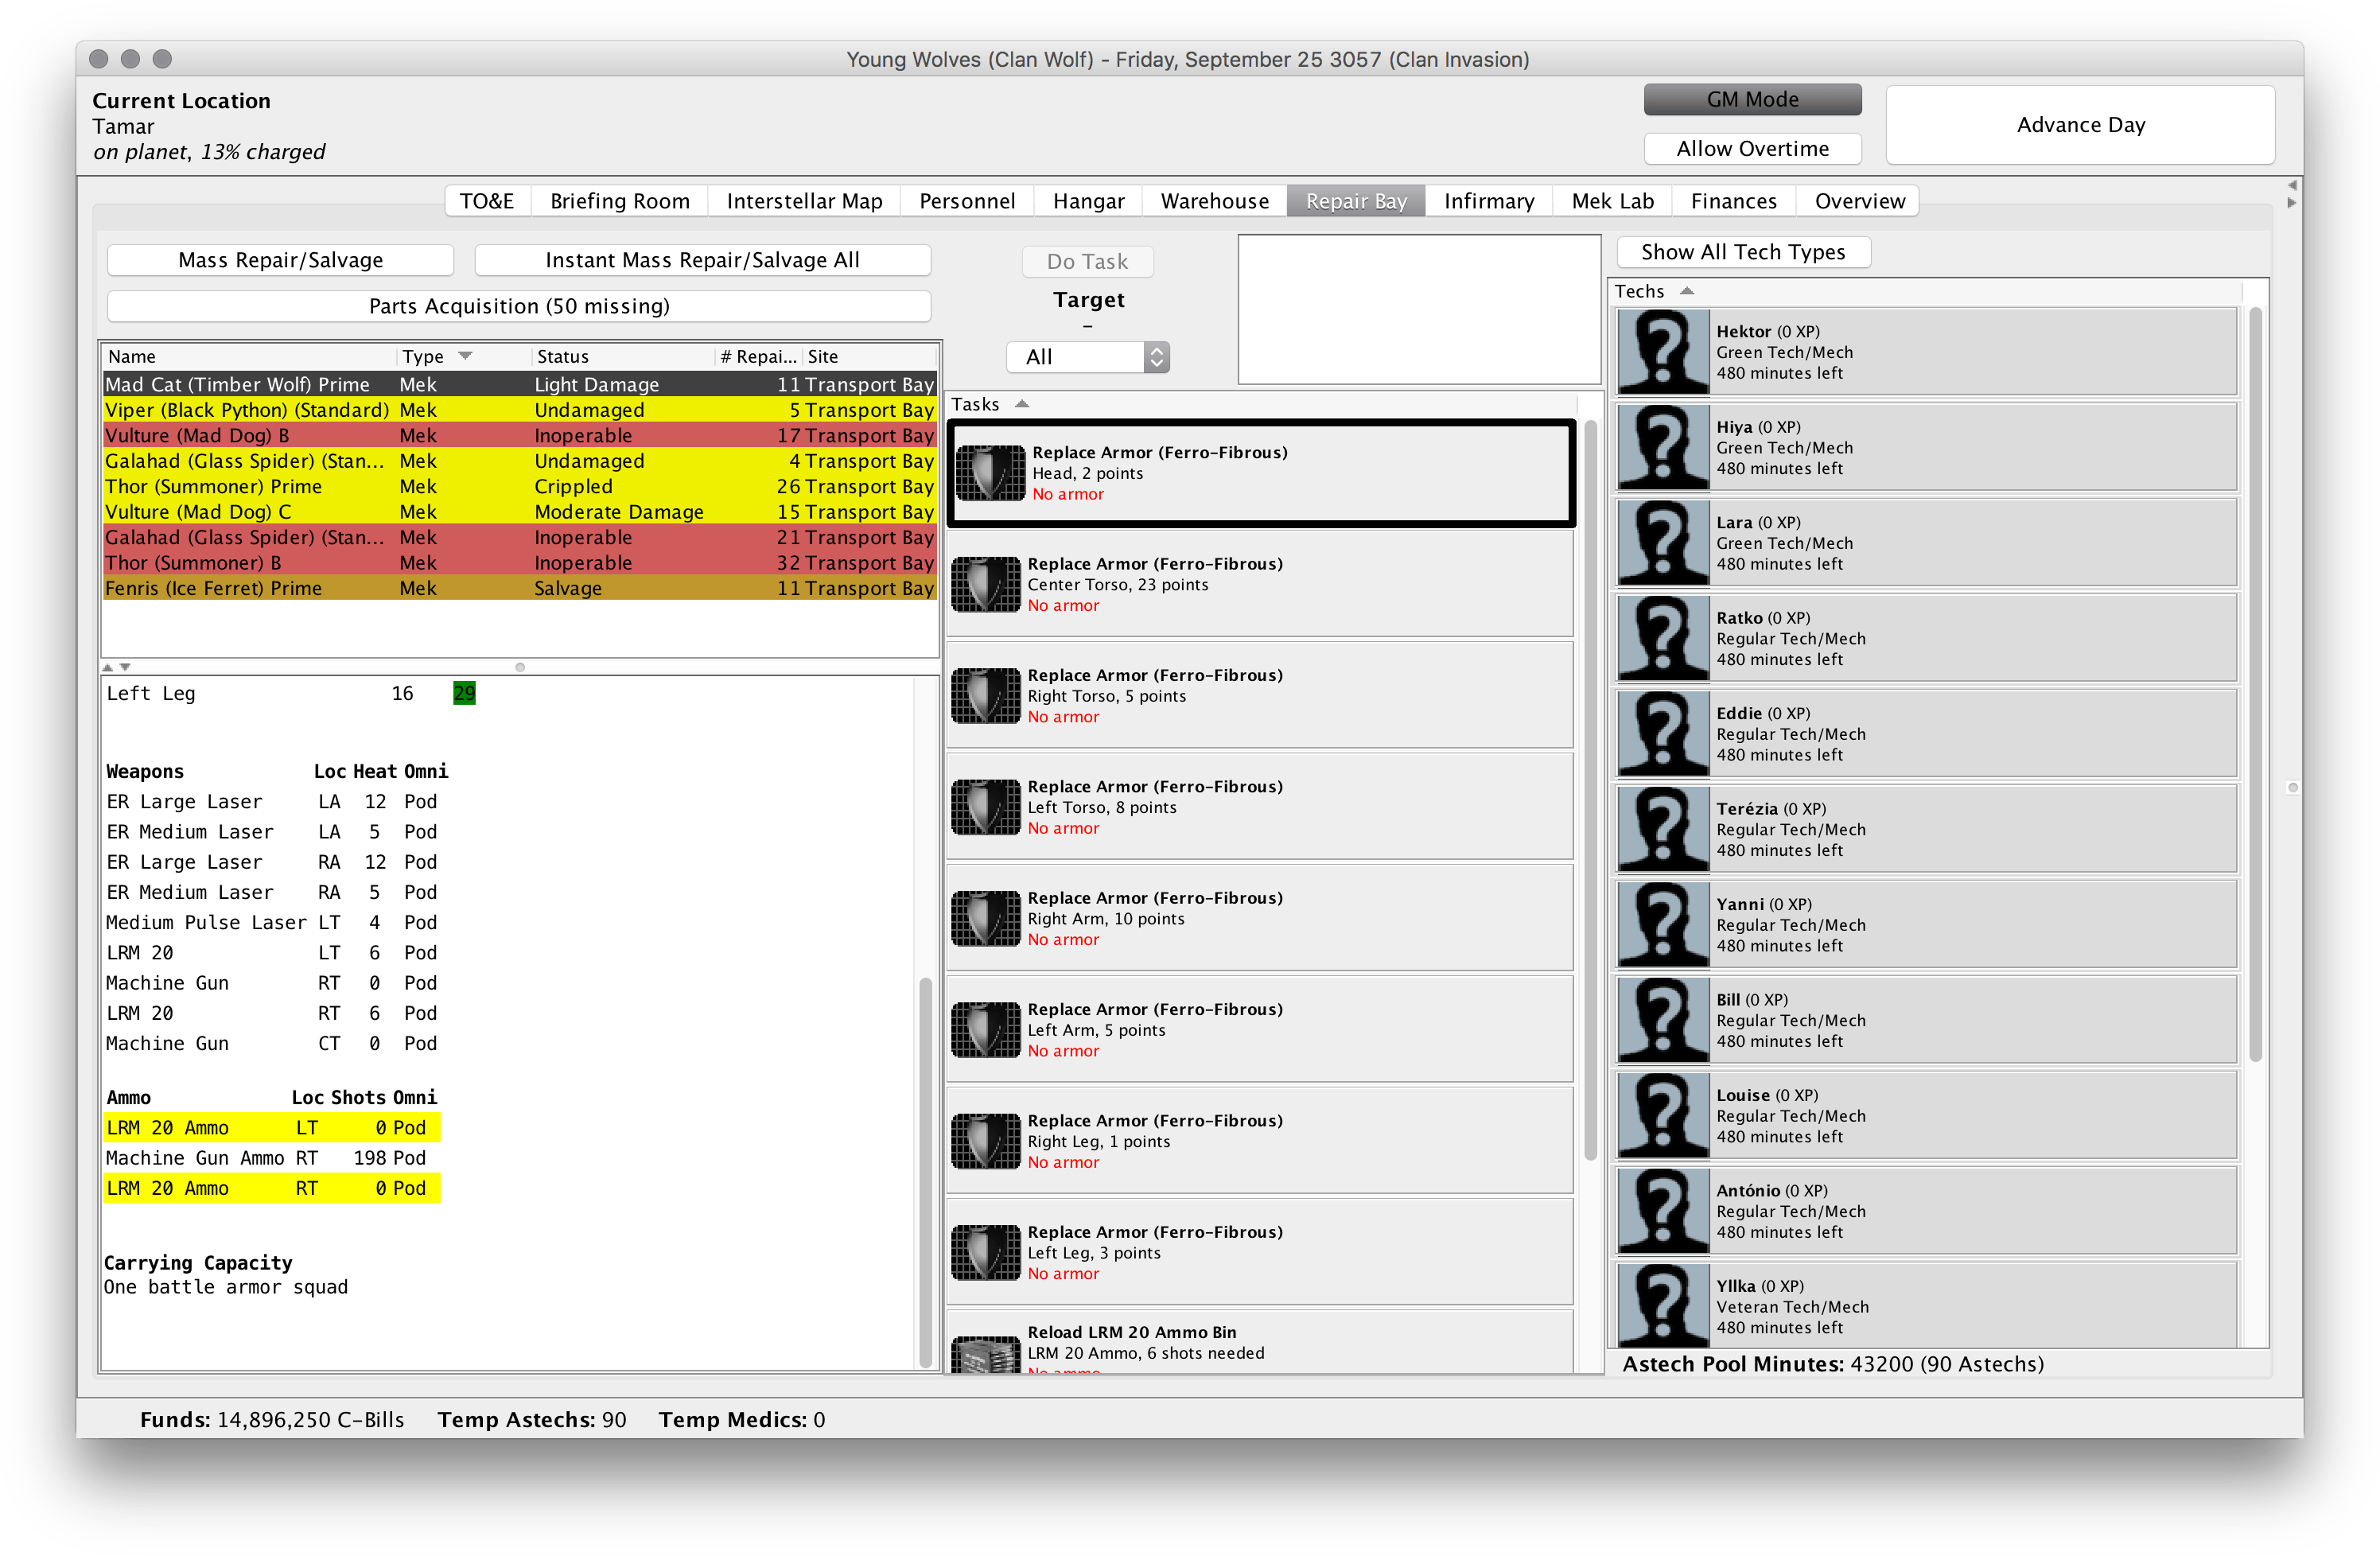
Repair Bay tabwhere I will see a list of all my damaged units. Selecting a unit will bring up an overview of the unit and a list of all the repair tasks that need to be completed in order to fix up this unit.
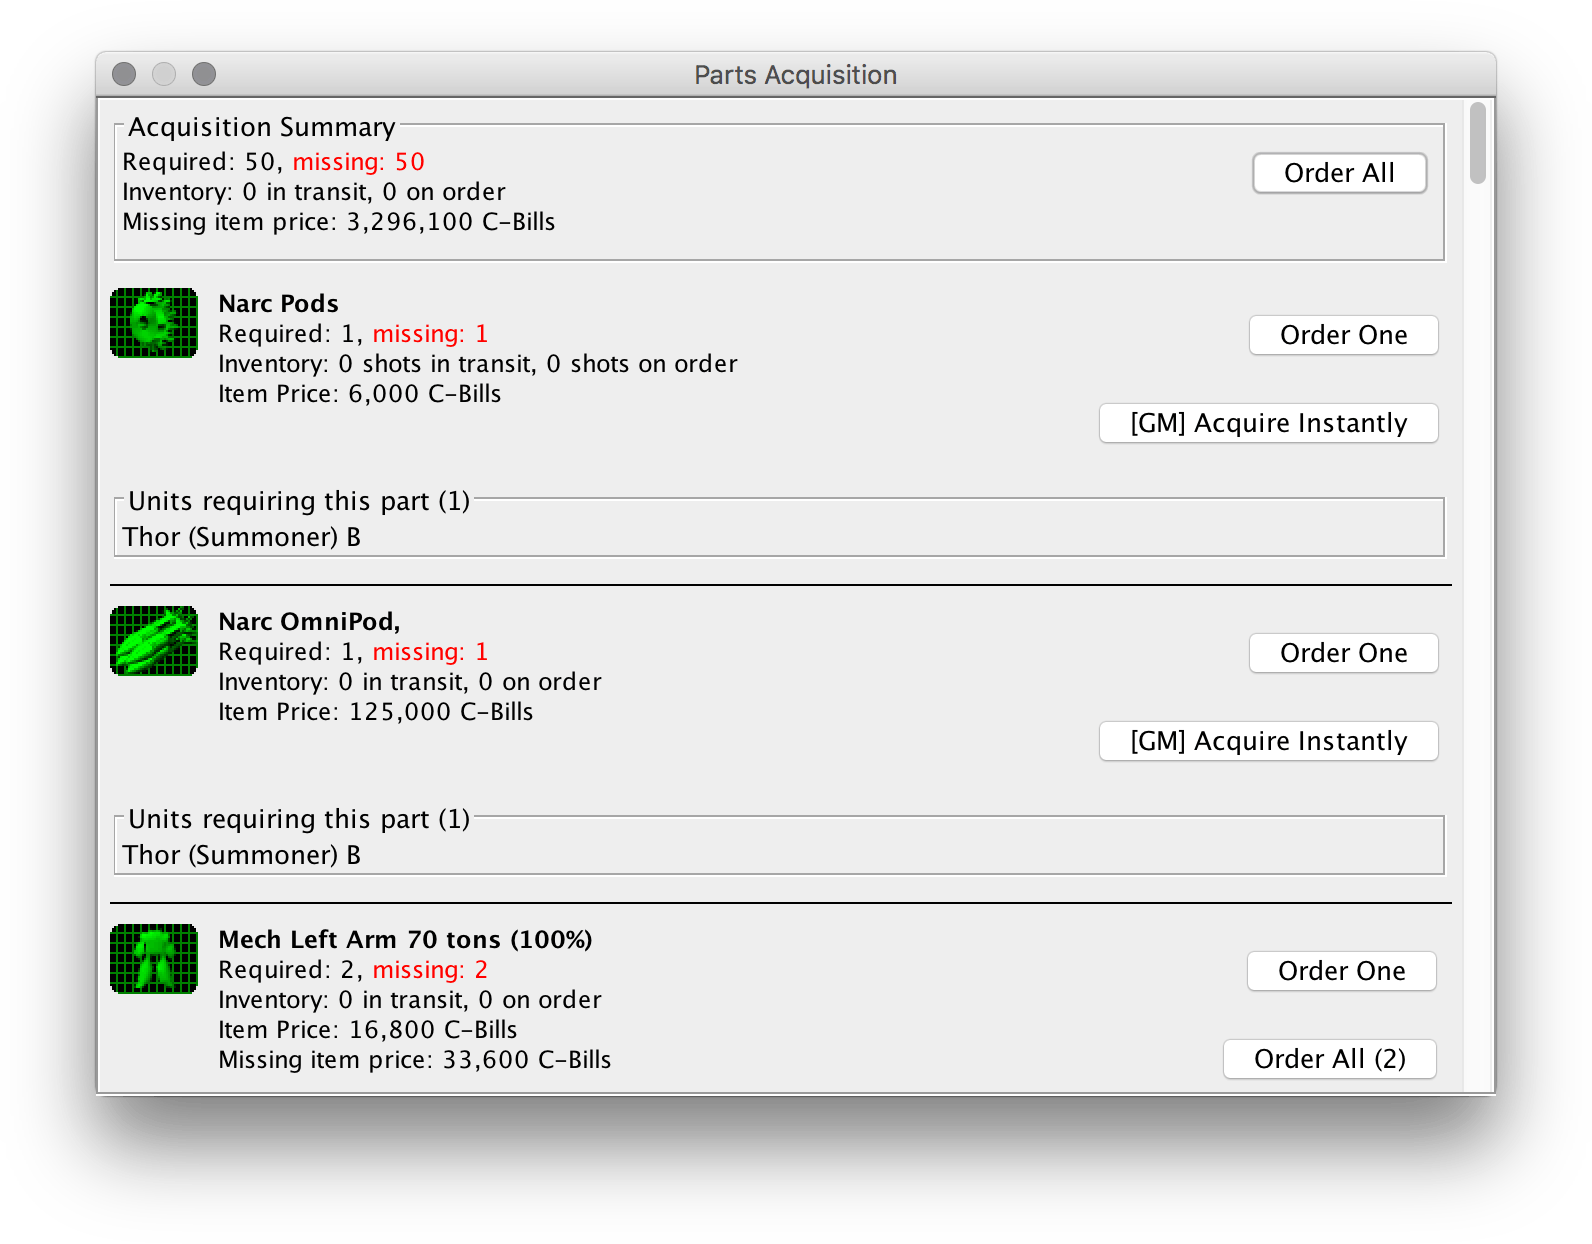
- Unfortunately, all of my tasks are greyed out because I have no available supplies for repairs. To get supplies, I click on the
Parts Acquisitionbutton. This will bring up a dialog that shows all of the various parts required in order to complete repairs, with various options about how to acquire them. Since I have set up automatic and instantaneous acquisition, I will just select theOrder Allbutton. Depending on how you have set up your game options, parts ordering could require successful acquisition rolls, cost money, and take time for delivery. Remember to plan ahead!
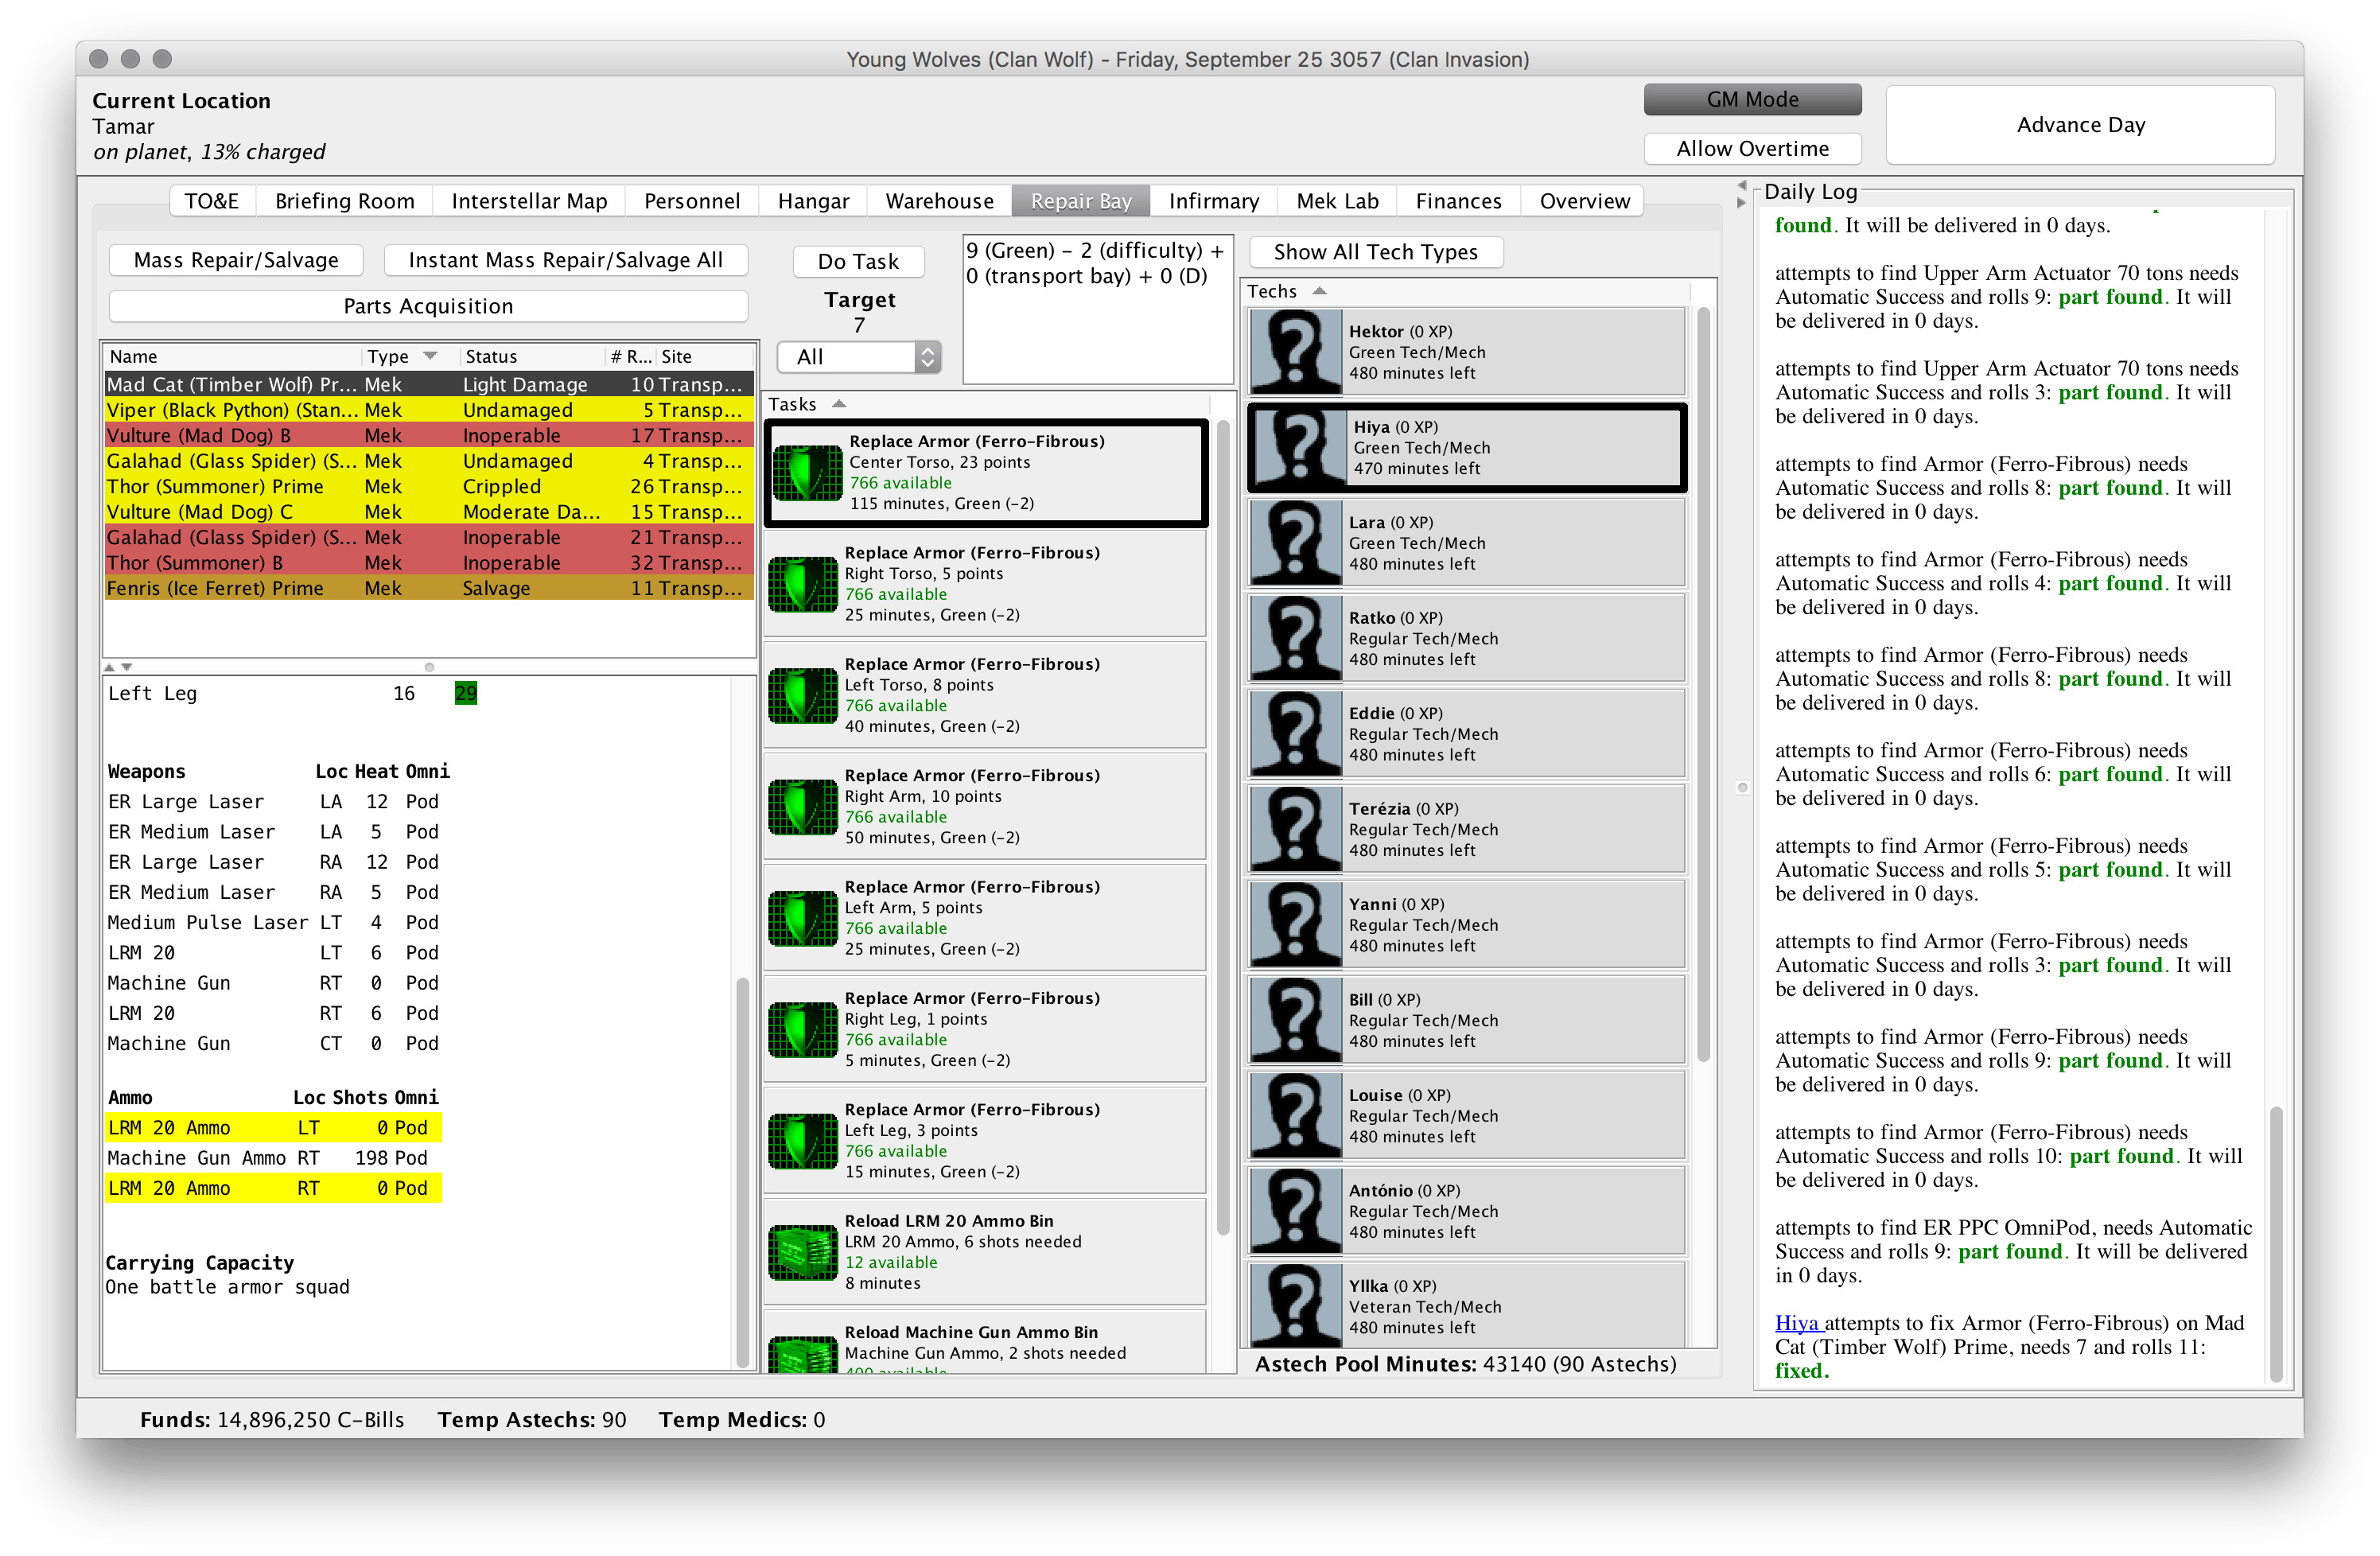
- When I return to the
Repair Bay tab, I will now be able to complete repairs with my new parts. When you select a repair task and a tech, you will be shown the target number and modifiers for successfully completing the task. HitDo Taskto attempt the repair. Keep in mind that, under the standard rules, if a tech of a certain skill level fails a repair then that repair can only be done by a tech of a higher level. Also keep an eye on how much time each repair takes and how much time your tech has left. If a tech takes on a repair without sufficient time, it will not be completed until the next day. You can also right-click on a task to explore options to reduce time and/or the target number.
- I focus first on getting my units fit for the next battle and then I can focus on salvaging or repairing any enemy units. Once everything is fixed, I am ready for the next battle of the campaign!