Learning the Ropes:
a Guide to Setting up MekHQ and Playing Your First Campaign
v. 0.20.1 for MekHQ v0.50.10 (03.11.2025)
As per official website: MekHQ is a campaign management tool that provides an immersive experience in managing a BattleTech mercenary unit. It integrates with MegaMek for battles and MegaMekLab for unit customization, covering personnel, finances, and logistics.
MekHQ is more of a tabletop simulator than a video game. As much as it automates many Game Master (GM) tasks—such as contract generation, personnel management, and scenario tracking—MekHQ serves primarily as a storytelling tool, empowering players to craft and control their own narratives. No decision made by the program is final, players are free to fine-tune the experience to whatever tells the best story. E.g. Players might manually change a generated contract employee to better fit the narrative, resurrect a character who should have had plot armor, or resolve a mission as a success even when it was barely so. "It's your game your way".
This text covers the basics of how to start using the program to play a campaign against (or with the aid of) a computer. This guide assumes you have some knowledge of BattleTech universe and core mechanics, it is not aimed at teaching how to play BattleTech either at Campaign or Tactical level.
For that, I suggest reading the official Rulebooks available from Catalyst Game Labs. Otherwise, a lot of functions and core concepts of MekHQ and MegaMek won’t make sense. Total Warfare covers the majority of the battle related rules. Tactical Operations extend on it with optional rules and more details on tricky rulings. Campaign Operations pertain more to the rules on logistics, contracts and managing of the company. TechManual is about units, their construction and equipment.
The majority of the mechanics that are not in the books, but are used in MekHQ and MegaMek, are well covered by the documentation available with every release of the suite, located in the ‘docs’ folder.
While this guide aims to help us understand how to use MekHQ to set up a campaign and create a functioning company in general, many of the functions of the software remain undiscussed. Most of the examples and recommendations provided here are personal preferences of the author, and in no way a strict requirement for normal play. I am confident that after reading this guide and playing a little bit, you will be able to set up your campaign in a way that is uniquely yours.
Table of Contents
3.1 Configuring Campaign Rules (MekHQ) 7
3.3 Configuring Battle Rules (MegaMek) (optional) 17
4. Starting your first company 19
4.4 Procurements and acquisitions 28
4.5 Maintenance, materiel, hardware, units 31
4.5.2 Equipment in use and spare parts 33
4.7 Organization of the Forces (TO&E) 40
4.7.1 Forces and Sub-forces 40
4.8.1 Command Center: Reputation, Cargo, Reports, Facilities 43
4.8.2 Progress and advancing time 44
5.1.1 Contract Market Table overview 46
5.3.1 Briefing, requirements, assignments 51
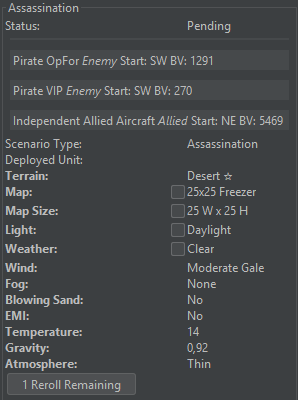
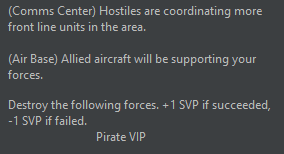
6.5.1 Location, conditions, objectives 60
6.5.2 Deploying to the scenario 62
7. MegaMek client settings and tips 72
7.1 Some useful client settings 72
7.2 Some useful shortcuts and commands 72
8. Final note and acknowledgements 73
This part of the guide covers installation on Windows machines. For other operating systems, please see here.
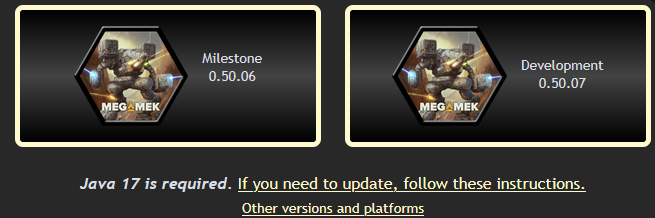
To install the MekHQ Suite (which also includes MegaMek and MegaMekLab), you simply download an appropriate archive from megamek.org and extract it into a suitable folder. I recommend a simple path, e.g. ‘C:\Games\MegaMek’. Please heed the instructions on installing Java 17, which are usually displayed in big letters on the website. Do not use the latest Java if you have a 32bit machine, as those are not supported anymore. 7-zip archiving tool is recommended over standard windows archiving software for the purposes of installing the software.
Milestone is a stable and reliable version, which is considered the most polished by the devs. Development is every other public release of the software that is feature-complete and includes novel and more extensive features, but can also contain (non-gamebreaking) bugs, oversights, etc. If you are not afraid of bugs and want to test-drive the newest features of the suite, you can download and install the ‘nightly builds’ from the Project’s GitHub page. If you do, make sure to participate on Discord and report bugs as well! If you are reading this guide, you would most likely benefit most from installing the latest Milestone or Development build.
After you have the files unzipped into the folder of choice, but before opening the program, you can (optionally) configure a couple of things:
You can check ‘sentry.properties’ and change the line from ‘false’ to ‘true’ if you would like to help the developers by sending anonymous data collected from your install when errors occur. You can also tweak .ini files if you want to increase the amount of memory that the software can use (more details are in website FAQ).
Executable files located in the folder are used to start MekHQ, MegaMek, and MegaMekLab, respectively.
The folder should also contain ‘docs’ folder, which contains plenty of documentation on the features of MekHQ. Those are especially important for features that are not described in the rule books, e.g. personnel turnover.
MegaMek suite is a labor of love of a large collective of developers, testers, artists, and players, each contributing to making the software more and more capable, interesting, and seamless. Despite this, bugs can appear from time to time, some features may seem lacking, some rules could remain unimplemented.
If you think you have found something that needs fixing or something that can be improved, you can contribute greatly to the project by issuing a report.
Discussing the bug or feature in question on discord prior to submission of a report is always helpful, as the developers might as well be already working on it meanwhile.
Follow these steps to report an issue or suggest an enhancement:
Feature Ideas: If you're suggesting an enhancement, include the "RFE" tag in the title so we know it's a request for a new feature. Your feedback fuels the battlefield – keep firing away!
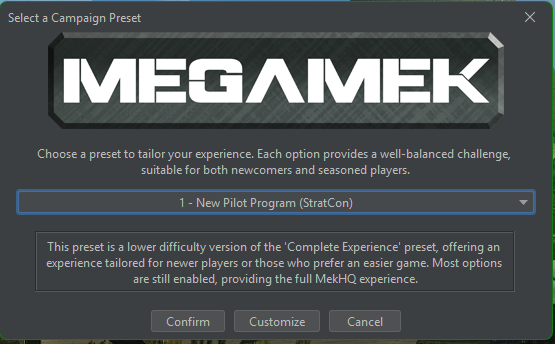
The first time you start up MekHQ, you will be greeted with the main menu. We would need to click on the “NEW CAMPAIGN” button. The game will briefly load the assets, and present a Campaign Preset selection.
In this guide, we are interested in playing against the computer, meaning that we need to select either the “New Player Preset” or the “Veteran Player Preset”. These options vary in depth of simulation and difficulty of rules, but both include StratCon. StratCon is an automated campaign system for MekHQ and MegaMek that allows for large-scale operational and strategic gameplay for a single player. Imagine StratCon is your digital GM for your campaign playthrough. In this guide, we will start with the Veteran Player Preset ruleset. This preset is carefully curated by the developers to be mostly compliant with Campaign Operations rule book and includes some new features that are not covered (or not completely) in the official books. We will tweak some options here and there mostly to showcase how it is done for the tutorial purposes.
If you play for the very first time and do not intend to learn about the myriads of various options and rules, you can select the New Player Preset — which is an experience that is easier to get into and does not use many of the complex mechanics. If you choose this option, you can skim over the next section of the guide and/or just click ‘confirm’ and skip to section 4 of the present guide.
If you click ‘Confirm’ on this screen (no matter which preset is chosen) – you will bypass fine-tuning of the options and will go directly to choosing the name for your company and the year of the campaign, and can immediately start setting up your company and play (See section ‘Starting your first company’). If you click customize – we can pick and choose some rule options for our campaign.
Note: Preset “Campaign Operations” follows CamOps rulebook as closely as possible but does not include StratCon. This preset is made for games with a human GM.
As you can imagine, the options are vast and offer enormous possibilities to form the gameplay of your campaign that will fit your expectations. If you need any details on what every checkmark and number do, most of the options have a mouse-over popup text describing it. Also make note that plenty of items here advise you on which ruleset or option is recommended or not.
The general section gives you pointers to the interface language of the system (including the icons, tooltips, etc), gives you directions to the official rulebooks, and allows you to start setting up your unit.
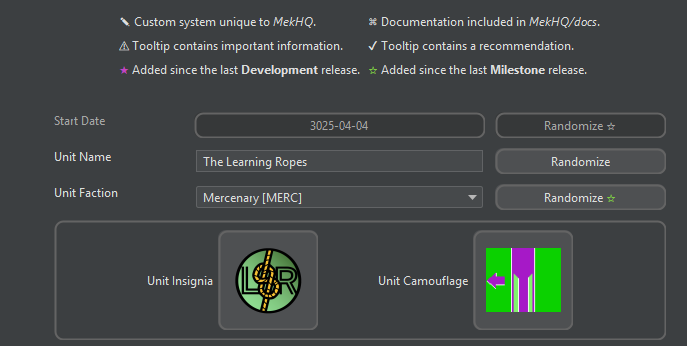
Start date is the date when your campaign starts. Clicking on the button will provide a calendar with some important ages of the BattleTech universe delineated clearly. If you are not extremely familiar with the lore of the setting and/or the gameplay rules yet, I suggest starting in the late succession wars. 3025 is an excellent year for the Chateau de Argeau for a campaign. There is no advanced technology with complicated gameplay rules (as it was lost in the previous cataclysmic wars, and has not been recovered yet), but a lot of political motions do happen in the following decades, making plenty of interesting story hooks for our merc company to be drawn into major power conflicts. Alternatively, the early 3040s are a good option too, if you want to extend your arsenal somewhat.
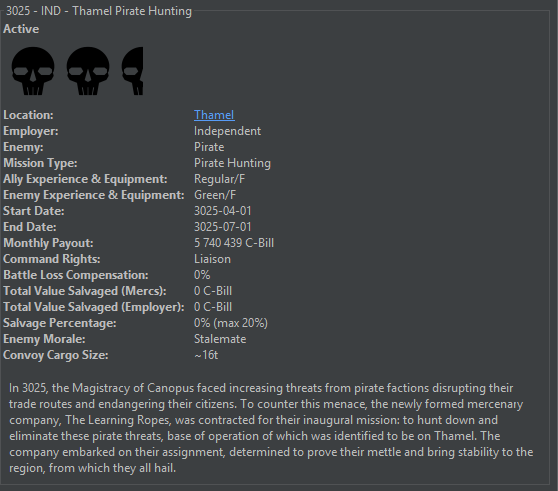
Unit name is up to the player to input or can be randomly generated. Our company will be called ‘The Learning Ropes’ (TLR) to reflect on the nature of this guide.
Unit Faction allows you to choose which faction you will represent. The majority of MekHQ functionality is geared towards playing mercenary. Playing as a unit within the great houses is possible, but is not as automated, and needs a lot of GM input. (See ‘Noble’ ruleset in the documentation, if the latter is of interest to you)
The reputation menu selects how the reputation of the unit is calculated. Reputation mostly affects contracts available to the unit. We can keep CamOps as this option. Manual modifier allows you to change the initial reputation of the unit. Making it higher, e.g. when roleplaying an established company, or lower. We will keep it at 0, since TLR are just starting out and are mostly harmless unknown. Three checkable options related to the reputation are here to limit the effect of a really large reputation score on payouts, which usually bears minimum effect on the young companies, and is mostly used to preclude the older, more advanced campaigns, from raking in unlimited funds from contacts.
Unit insignia and unit camo are customization options for the company. One mostly affects organizational structure icons, the other – how the units will look in-game. MekHQ provides quite a lot of pre-existing camos but also allows for custom sprites to be used. I quickly drew an icon for the unit in PowerPoint and saved it as a .png. I also drew a camo pattern in MS paint as an 84x72 pixel raster image. Those images need to be placed either in the game files directory (\data\images\force\Units for insignia and \data\images\camo for camos), or in the user folder (See Section ‘Campaign setup – Final Touches’ on how to configure one).
This section contains all the rule options for the management of personnel. The settings in this preset are already good, but we can go through notable options in every sub-tab.
Here, the most important aspects are the choice of edge and SPAs.
Edge is a system taken from ‘A Time of War’ — a Battletech rulebook for tabletop roleplay on individual level, usually with one character per player — those are the points that can be used in a deadly situation to avoid death or to re-roll some dice in an unfavorable outcome. These can be nice to save your ‘main characters’ in case they are on the receiving end of a traumatic freak accident on the battlefield, and you would not like them to die. Edge points are usually acquired from experience and/or from awards (see next section). If you would like more gritty realism for your campaign, keep edge off.
Special Pilot Abilities (SPAs) are abilities that enhance the performance of your personnel in life and on the battlefield in a way that just increasing their primary skills won’t do. Some examples include abilities to perform indirect attacks without a spotter or having an easier time navigating in bad weather. These are usually acquired via experience. SPAs do spice up the gameplay but sometimes they can feel overpowered. I recommend playing with SPA but enforcing a limit of SPAs (e.g. 2 per character).
This subtab describes rules related to the awarding of medals and similar. Defaults here are great, and do not affect the unit much. However, if you decide not to use edge, choose award bonuses to be only XP instead. If you prefer XP to be earned only from actual experience and not from (combat) achievements, you can make awards decorative only, granting no bonuses upon awarding.
Options here can be fine-tuned if you find your doctors over- or under-performing, or personnel getting injured way too much. Here, you can also define how many patients (beds) each doctor can care for, and how many each MASH theater can provide space for (if used). Advanced Medical includes traumas, illnesses, amputations, etc. Default options are well balanced.
These options define how the statistics on your crew are collected. Settings as they are in the preset are good. I also recommend ticking on all the ‘tracking’ and ‘logging’ options. It may slow down the game for larger units (think more than 200 people, depending on your computer), but for a small merc unit it works fine. It’s just fun seeing how much your personnel made money and earned XP while with your company.
For prisoners, Capture Style ‘MekHQ’ is a ruleset that requires you to deal with guards, hiring security forces, and adds quite a bit of roleplay, e.g. by generating events when the prisoners try to escape. Even if you run a small company, and do not intend to take prisoners, using MekHQ style still provides some roleplay value in the form of various events. Prisoners system is well explained in docs files.
For civilians, I recommend unchecking “random addition”. Usually, civilians arrive for story-related reasons anyway, e.g. a child of a newly hired tech tags along, even without this option being on.
This table denotes how much you will pay personnel depending on their profession and XP. If you want to roleplay an extremely small merc unit, where everyone carries multiple roles (e.g. your accountant is also an aerospace fighter pilot in his spare time), I recommend ticking ‘disable secondary role salaries’. However, the effect of this is still minimal.
This subtab has a lot of different options, mostly pertaining to roleplay. The settings of the preset here are fine, and notable toggles will now be covered. If you want some characters to have clan origins (for various reasons) there is an appropriate option in Backgrounds tab. In education tab – make sure you have ‘education module’ enabled if you want to send your unit’s personnel into bootcamps, re-education camps, and universities, instead of just applying XP to get a skill in an abstract learning process. I find that the education module provides a lot of roleplay value, e.g. your mektechs need to go to a university to get a better grip on how to deal with lostech you just found, while the rest of the tech team goes overtime and struggles without their help. The education module is extensively documented in the ‘docs’ folder.
Another notable subtab is Rank Systems. Here you can choose what your unit is modeled after rank-wise. Default is SLDF, which is straightforward and resembles most modern real-life ranks. You can choose something else to fit the roleplay reasons. For example, The Learning Ropes were formed in the periphery nation of Magistracy of Canopus and thus decided to adopt the Magistracy Armed Forces system. A Custom Ranking system can also be created, if you want to make your own.
Here are the options on how we play out relationships between our personnel. Standard options from the preset are fine, if you want the personnel to marry, divorce, and procreate at all. I recommend switching on ‘Determine Father at Birth’ and ‘Log Name Changes’ to keep your civil registry records on point.
Fatigue – fatigue is a system that models personnel getting tired and exhausted from various sources, but mostly deployment. If you find it hard to manage during play, you can disable it here. I find it adds depth to the game and recommend leaving it on.
Turnover — defines when and how often your personnel decides to quit the merc life the unit. E.g. this module simulates how low salary and slow promotion, lack of HR and R&R, fatigue and losses will lead to people leaving the company. My recommendation for a new player would be to keep the system in place, but to decrease the frequency of these checks, quarterly is good, annually is much easier. Also, check ‘Hide Loyalty’ if you would like to not know who is much likely to stay in the unit, I think it adds some realism and intrigue. Is this mek-jock joining us just for the money and will be gone after the contract ends, or will they stay pursuing glory as they say?
Like all the other features, it is well documented in the ‘docs’ folder of the game.
Here, a number of settings for randomized personnel can be fine-tuned. I suggest you keep the numbers as they are for the moment. XP awards system can be tricky to understand, but if you don’t want your force to get overpowered fast, keep the options as they are. If you want to experience relatively fast XP growth – you can adjust the Advancement Multiplier, which governs XP costs of skills and abilities, to 0.5 (50%),
Here, the way skills are used, acquired and tallied up is set up. I suggest for your first couple of campaigns – leave everything as it is. Except, perhaps, Edge if you play with it, some find 100XP to be a steep price for 1 Edge in intense campaigns.
Here, you can select which Special Pilot Abilities (SPA) will be available, what their prerequisites would be (if any), and their XP cost. I suggest you keep all checked. If you want, you can uncheck unofficial ones – although they are quite balanced — if you're more of a rules purist.
These options can significantly affect how hard it is to keep your unit in combat ready conditions. Maintenance hits especially hard if your unit is not adequately catered to in this aspect, and the campaign settings are set too hard.
Acquisitions and Deliveries — Here, the default delivery time scale is months (as is prescribed by CamOps rulebook). While realistic, it is hard to plan for, so for our first campaign, I suggest switching to weeks. This will make faster re-supplies. Although, there is a way around the long waiting time (see below).
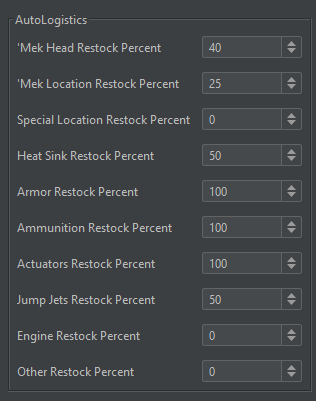
Autologistics is an automation feature, which allows your support staff to keep your warehouse padded with the goods needed to keep machines operational, both for maintenance and repairs. Default values will generate orders for a lot of replacement parts (good!) but will use up a lot of cargo space (bad, if you keep track of cargo) and use a lot of money if not controlled (also bad!). After all, hopefully you don’t need so many mek heads and legs? I suggest setting everything to some non-zero amount (25-50% for parts is good, see Figure), and armor and ammo to set it to 100 or more. The latter items are used up all the time, even in the smallest companies. Keep in mind that everything can be manually acquired anyway, and thus these settings are not crucial for the operation of the company. They do make it easier to keep stocks up, especially considering that deliveries can take some months of time and procurement behind enemy lines is extremely hard. The precise auto-orders can be fine-tuned while the campaign is ongoing both for the whole categories of items in this Campaign Options menu (e.g. mek heads) or individual parts (e.g. AC/10 ammo) in ‘the parts in use’ window. For example, we might want to increase the number of 20t mek lower limbs automatically procured each week, in case you find that you keep needing to replace these damn Locust’s legs on this deployment. Notably, weapons fall into the ‘Other’ category. We will go into more on autologistics details will be discussed later.
In Planetary Acquisitions – I recommend turning ‘Use Planetary Acquisitions’ on. While sometimes it makes acquisitions harder (and makes MekHQ load times slower) – it gives more realism and flavor to the game. It is hard to buy a piece of advanced technology in the periphery after all.
In Tech Limits subtab, I recommend turning off “Allow Purchase of Clan Parts” if you don’t intend to play as clans. You can also select max tech level at an appropriate value you would like, depending on the amount and rarity of units you look for. Experimental covers about all available units for a given date.
Maintenance is usually the first obstacle faced by a new commander trying to keep the unit well equipped. Unexperienced techs keep ruining perfectly good machines and tend to break a weapon a day before an important battle. To make life easier, we can put the maintenance modifier to -2 for now, making all the maintenance rolls much easier. We can change it back to 0 later, when we are more comfortable with the maintenance system. Alternatively, we can change the maintenance cycle to more days than the default 7 days. While this eases maintenance, it does not change the core difficulty.
The same for repairs, if you find that your techs keep failing and keep destroying your machines, I suggest you untick “Use Era Modifiers’ and increase the margin of failure.
Keep in mind that if your units are always combat ready and are so easy to repair all the time, the challenge disappears, and there is no need to even simulate this aspect of the campaign. It makes for a good story when your lance jumps from an assignment to an assignment, your meks arrive lacking limbs, tanks have glaring holes in the side armor, and dropships arrive to the field still smoking from a near-miss intercept in low-orbit.
Ultimately, I suggest trying out the default options and seeing if you find maintenance and repairs hard before adjusting these campaign options appropriately.
Here, if you want to have a more hardcore accounting experience – tick Pay for Overhead, Pay for Maintenance, Recruitment. Those options increase the money sinks. If you find yourself low on money all the time, you might turn these off together with some other options, including taxes (don’t tell IRS). I prefer everything ticked.
The shares system is a bit unpolished. I usually play without it, but if you believe your unit needs to have everyone hold shares to promote synergies and empower the mercenary teamwork, try it out.
Here you can also adjust or disable rented facilities, such as MASH, field kitchens, etc possibly provided by your employee during contracts.
These options regulate systems that provide you with a choice of hirable recruits, purchasable units, and available contracts. In Contract markets – if you want a more realistic experience and a bit more of challenge, I recommend to lower max salvage to at least 50. Employees would rarely let you keep all the loot on the battlefield.
Personnel Market settings are good as default. You might want to tick ‘Hiring Halls only’ if you think it’s weird that random elite aerospace pilots are for hire on a forsaken periphery world and instead need to show up only at designated planets and the capitals. Unit market is refreshed once a month and allows you to buy units, as expected. If you like to do procurements exclusively as the CamOps prescribe, i.e. rolling acquisition for every unit that you want to find, you can disable this market.
Options in this tab control specific systems of the MekHQ suite, such as character attributes/traits as defined by A Time of War, evolution of your company’s Faction Standings, and Reputation as per CamOps rules.
General
This is an important screen if you want to play against the computer (or with the computer, depending on your outlook). The first checkbox – Enable StratCon – enables the digital GM that will allow you to play the game in single player mode with the contracts, missions, and scenarios being generated automatically. Most of the present guide deals with StratCon, and is indeed focused on single player campaigns involving the system.
Here also, you can choose to use advanced rules like Advanced Scouting (more on it later) or disable the stratcon map, if you care only about scenarios (battles) and not a strategic part of the game.
There are plenty of options, but notable ones are:
Difficulty. If you have never played MekHQ before, set it quite low. New Player Preset sets this to Ultra-Green, which is recommended for first-time players.
Unit ratios: if you want to play with more vehicles (as opposed to meks) in OpFor, you can tweak this number accordingly. 1:1:1 will generate mek forces, vehicle forces and forces containing both with equal probability, for example, and 0:0:1 will be only vehicle. The value of a number itself does not affect anything, only the ratio between them. Keep in mind, unit diversity will be also influenced by the contract and theater of operations.
‘Use Player Dropships’ option governs if generated scenarios with dropships (e.g. landed dropship defense) can use players dropship (if player has any) and not only random allied vessels. Use it only if you intend your dropships to partake in combat.
Map Generation: Weather conditions, light conditions, and planetary conditions (described in detail in TacOps and CamOps rulebooks) can be hard for the new players. You can turn these off if you want simpler gameplay with the battles. Note that these can be tweaked and turned off in every individual combat scenario instance too. While sometimes annoying, I find these conditions to be an excellent storytelling tool. Not all combat scenarios should be in clear skies and on dry ground, and not all the weather conditions should favor the player after all. New Player Preset has weather and planetary conditions set to off by default.
Also, here you can modify how morale is affected by wins/losses, and how battles can be autoresolved (if you want to).
With all the settings now selected according to our preferences and tastes, we are now almost done. I recommend saving the preset of the options we have just selected just in case (for example in your user folder), for example, in case you would like to start another campaign with the same settings. However, the save file for your campaign (which is generated on Save prompt, automatically every couple of days, and when you quit the software) will contain all the selected settings already. Loading up your old campaign save file will bring these options up for you anyway.
Now we can press ‘apply settings’. You will be brought directly into MekHQ interface together with a small disclaimer explaining what StratCon is (if you enabled it of course).
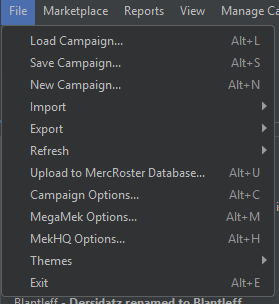
Note: these options can be accessed at any time through File → Campaign Options.
The last thing we want to set up for now is located in File → MekHQ options (or via the MekHQ starting screen → MekHQ settings).
Here you can customize the window itself and some behaviors of the MekHQ suite. We are interested in two options here. First – “Nag Options” – I recommend to untick all (so nag dialogs will always appear) as the nags are useful to learn various mechanics of the game and allow you to never accidentally skip or forget important routines in everyday life of the company. And in “New day options” tick everything on – those are quality of life features automating plenty of routines that we will set up later.
In ‘Autosave Options’, you can increase the number of autosaves to 10 and make sure to check options to save before scenario start and before mission conclusion. This will make sure your campaign is always safe and you can rollback should you need to.
And finally, in the Miscellaneous options you can select a User Files Directory. This is a folder that can contain your customizables – camo, unit icons, custom units, etc. Ideally this folder will be outside of your MekHQ folder (e.g. C:\Games\MegaMek_DATA). This will make sure that your custom units, sprites, camos, and so on can persist between the installs of the MekHQ/MegaMek suite, thus facilitating the migration between the versions, such as updates. You can set the user folder to cloud storage or a local drive.
Now we can (optionally) set the rules for the battlefield. Those are different rulesets that follow TacOps (and more) for more interesting combat, for example, or define the general way the game is played on the combat level, as opposed to campaign level. These rules are applied to MegaMek, i.e. the software that handles actual battles, and can be changed either in MegaMek itself when running instances of combat, or within MekHQ in File → MegaMek options. Those options will also be saved together with your campaign save file and persist in every battle in the campaign. And these options too can be saved as a preset to be used with another campaign, or to be shared.
There are a lot of options, and I refer you to the Tactical Operations (TacOps) Rulebook to learn more. All the options here are conveniently searchable using the Search tab.
Some of the rules that I think enhance the gameplay (as well as role play and storytelling value of battles) of the game are the following:
You can search for the word ‘blind’ and turn on “TacOps double Blind”, “TacOps Sensor Rules”, “Blind Drop”, and “No Double Blind Messages”. This will make combat more realistic; you will have to rely more on scouting and sensors. If you prefer more tabletop style of the game – leave double blind off, and you will always see how the opponent moves. Make sure to also disable ‘exclusive double blind deployment zones’ if you intend to play MekHQ with the digital DM; currently (v0.50.05), this option does not quite work with the way forces are deployed by the computer.
Again, I advise you to read TacOps book and check out the mouseover pop up tips of the options in MegaMek. Some are fun, some are more for challenge and realism. These options can also be changed at any time of the campaign.
Starting your first company can be done in various ways. CamOps has an extensive chapter on that, and I recommend reading it. There are random rolls, choices to be made, and plenty of fun. We will try to roughly follow the same Protocol.
If you want to get straight to business, the ‘Manage Campaign’ menu contains a tool called ‘Quick Start Company Generator’ that will allow you to create a lance, a company, and even larger forces in a quick fashion. This tool will generate units according to the chosen year, faction, etc. This tool will also generate all the personnel needed for the force, leftover funds, etc. If you choose to use this tool, please read the documentation on it, or just play around and see what is generated. This ready-made company is basically ready for play! Although, you should note that Company Generator is limited only to Mek Forces as of now, and if you want to play a combined arms force, you will need to use other methods described here. Overall, if you want a quick way to generate a force to start playing immediately, Quick Start Company Generator is a great tool for that.
On the other hand, you can create, roll, and arrange every aspect of your merc company yourself. Thus, we will go through all stages of setting up The Learning Ropes company.
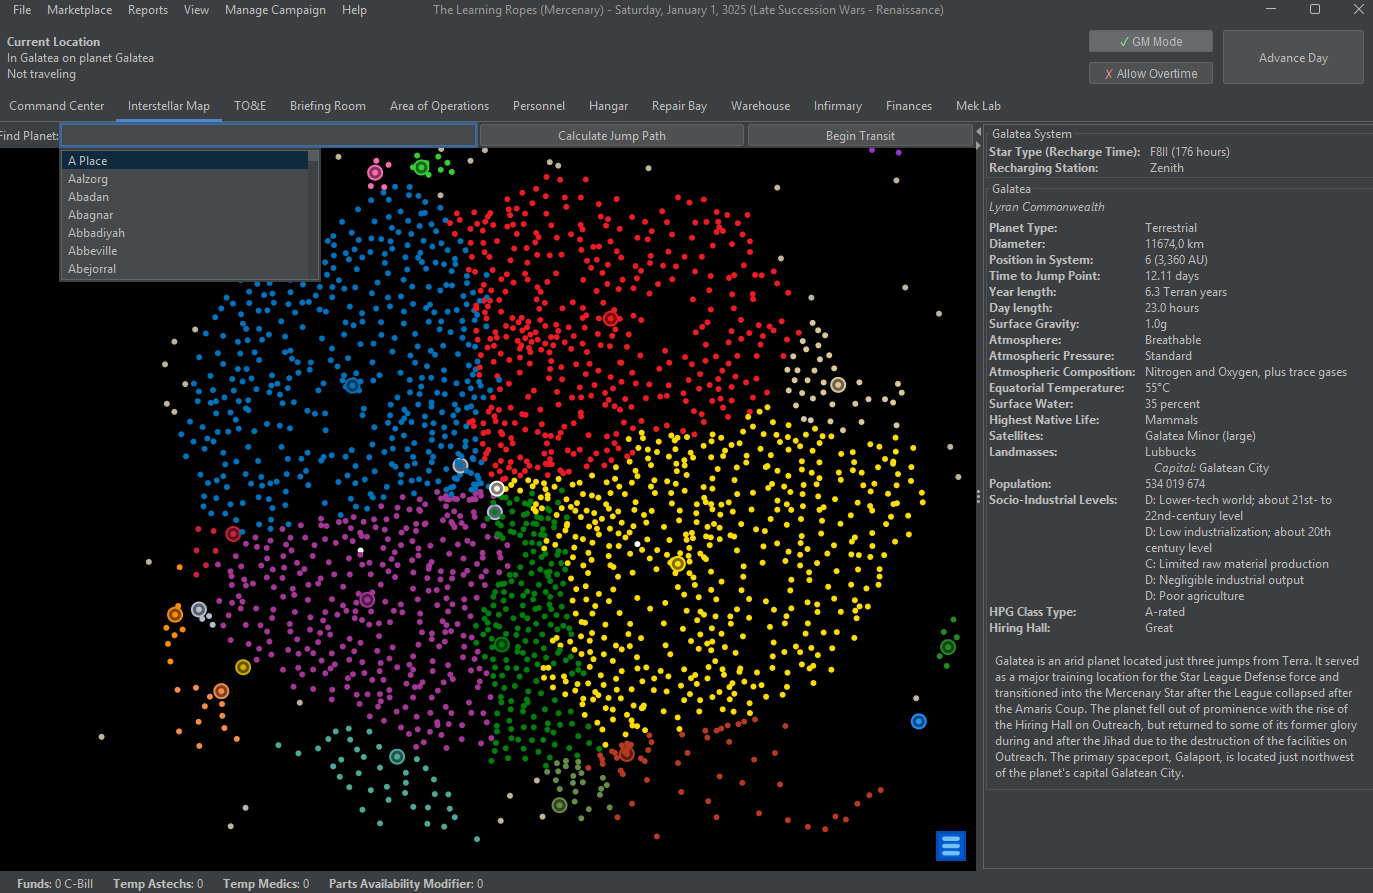
We will start with finding our new homebase. By default (in v. 0.50.05 at least) new units start in Galatea, a major merc hub. But TLR are historically Canopus-based mercs, and we would like to start there. To amend our location mishap, we will use two tools: GM mode and Interstellar map.
GM Mode being on, allows us to change plenty of things in MekHQ related to our company – adding units and money, repairing and procuring immediately, editing missions, and so on. It’s used for, well, GMing a campaign without the restrictions of rules, money costs, time limits and so on. We will use GM Mode to set up our company.
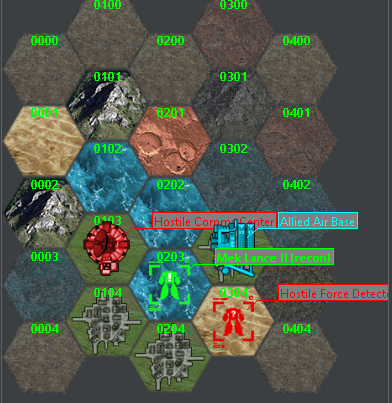
Interstellar map shows the situation going on in the Inner Sphere and Periphery. Capitals and Hiring Halls are circled on the map. There are plenty of filters available using the hamburger menu icon in bottom right. Selecting a star system will give you a detailed readout in the window to the right. This map is used to explore and travel.
Now, we want to choose a home for our company. For that we can click the planet we like – for example a system of Vixen, right click – choose GM tools – move there. Now we’re on Vixen, recently colonized planet with plenty of resorts, businesses, and extensive hunting grounds. We came here to ski and shoot; and shoot we will.
Any Company formation starts with money. CamOps rulebook provides a nice idea how much starting funds companies should have. Here, we have two options, either we play by the ‘rules’ and take a loan from the bank, or we get our starting fund via roleplay reasons.
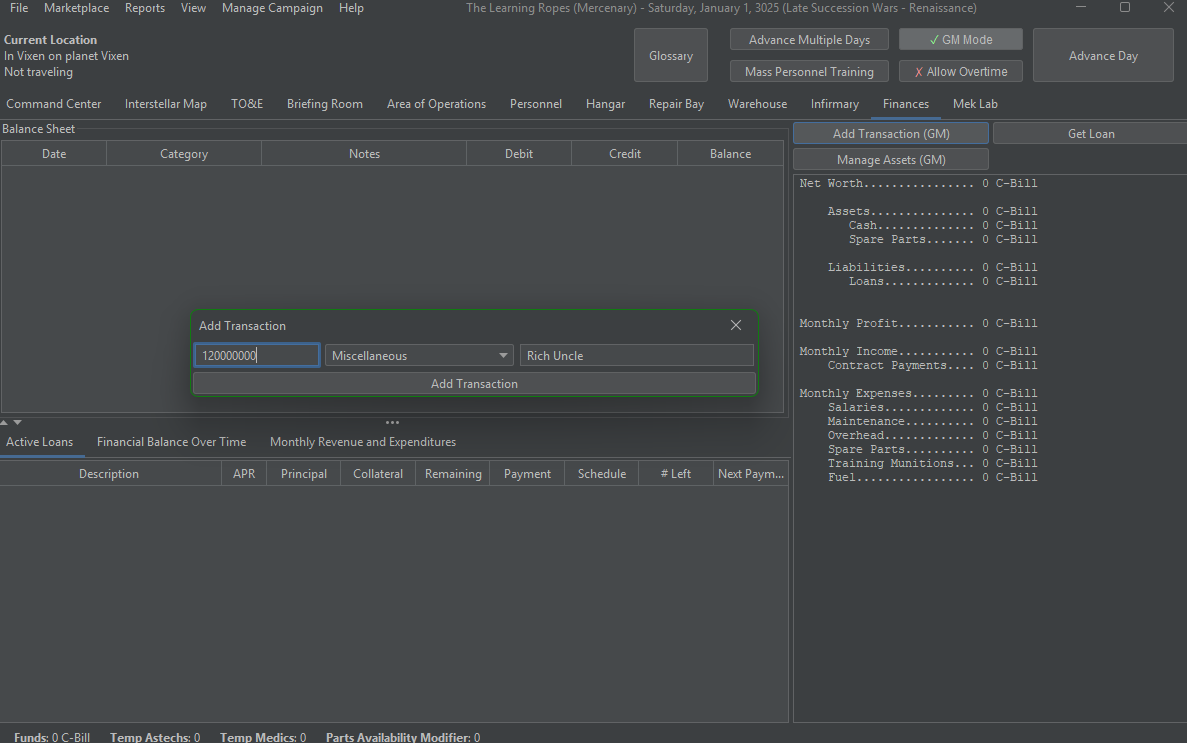
Loans are fun and very reliable for most of us, but in this guide, we will start with some non-dilutive funding from a Rich Uncle. To do this, with GM Mode still on, we go to the Finances tab.
This window normally summarizes the flow of money in the company during its operation and is pretty self-explanatory. Now, we are interested in adding our starting capital using the Add Transactions button and adding some 120 million C-Bills, which will allow us to acquire personnel and units to start out our merc outfit.
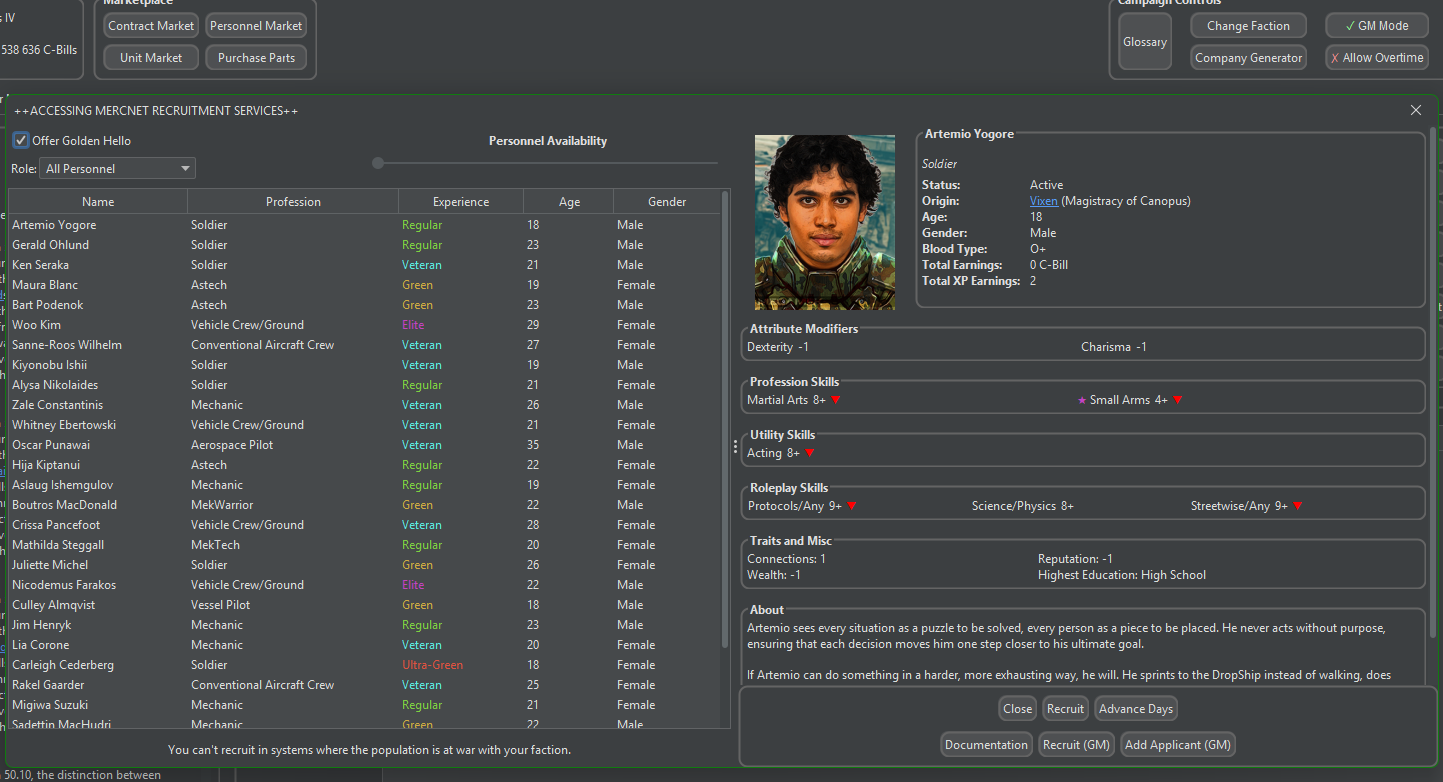
First let’s hire some personnel. The first and main way to do so is the personnel market. It can be accessed on the top of the MHQ window. This represents the hiring pool currently available to you. Here on Canopus IV, plenty of people are for hire: soldiers, mechanics, mekwarriors, etc. Expect that such a list will be sparse in a combat zone.
While I suggest you use this method to acquire personnel during further play for roleplay reasons, our initial company will take forever to hire everyone needed via this way.
Moreover, TLR will be funded by an experienced MekWarrior, a Command Admin, and a doctor. Imagine, those were friends while serving in Canopian forces, and now, with some luck and treasure, they decided to start a merc company. So, we would like to make these characters a bit special, not some randoms from the market. (Although nothing is wrong with that too! Merc companies are often a bunch of random people.)
An alternative method to hire people is found on the toolbar menu item ‘Marketplace’ → Hire. (NB: there is also a ‘bulk hire’ option, which is useful for very big companies.). The menu presents all possible professions. This type of hiring is meant to be a GM tool, as it is very easy to find who you need in this way. The personnel market is more realistic in this regard. We are setting a company up, so using GM tools is very valid though. First, let’s hire (or just add) our MekWarrior commander.
The new window presents many options to customize the character (if you want to). If you like the way they are, you can hire them (with subtraction of funds) or use GM mode to just add them to the force for free.
If you click ‘Edit Statistics’ you can customize the character as much as you would like (and if you would like) – increase/decrease skills, give them a new personality, backstory, etc. (NB: this can be also done at a later time in Personnel tab via Edit Person option) Or you can just randomize everything. We want this MekWarrior to be the commander of the company, so I will spend some time customizing, giving some elevated skills in mek combat, as well as Leadership, Strategy and Tactics. Those are important for the company commander and individual force leaders. Details on that are covered in the documentation and will be explained in the guide where each skill pertains, as well as in a summary in section 4.3.3.
In the same menu (‘Edit Statistics’ or ‘Edit Person’), we can assign roleplaying attributes, skills, and traits. Those are mostly used for roleplay purposes as the name suggests, but some do affect the performance of the character in campaign. These skills are also randomly generated at the character hire, and can be re-generated via right click menu in the personnel tab later (see section Staff and Personnel).
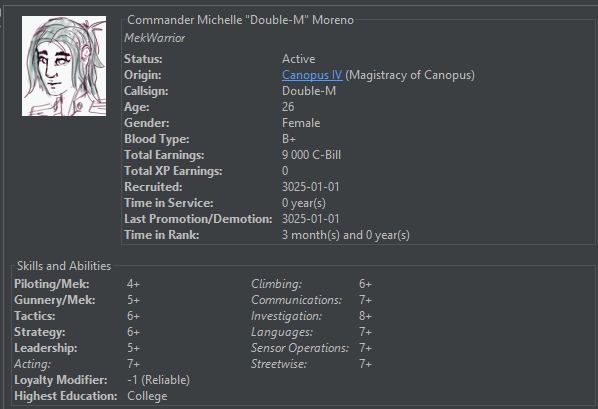
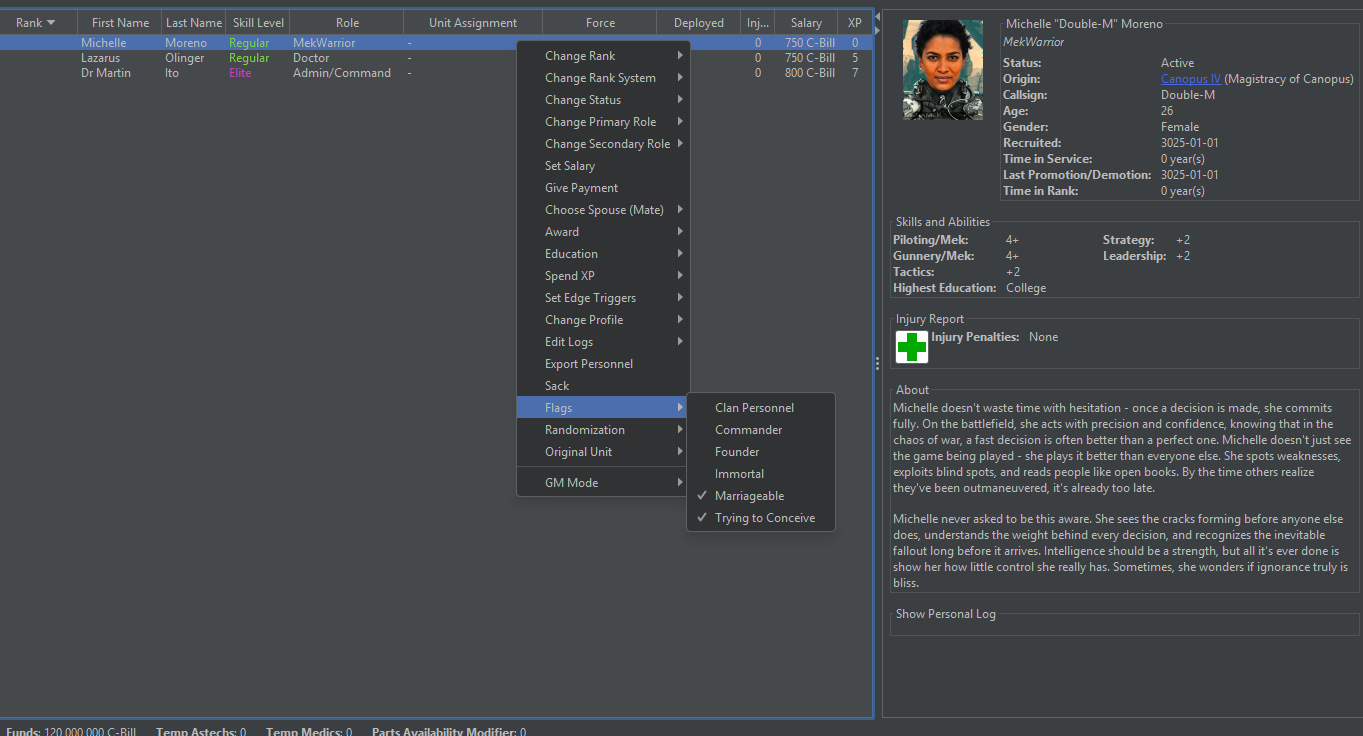
The competences we gave our unit commander, Michelle Moreno, make her a regular MekWarrior with some experience in leading a unit in the form of strategy, tactics, and leadership skills.
Right-click menu ‘Change Profile’ will allow you to provide more fluff information and further customize your characters. There you can change the portrait, add a biography, and assign a callsign. Or randomize all these via right-click → randomization options.
I feel that Michelle will be our ‘main character’, so I will customize not only her skills, but will give her a custom portrait, which I will quickly sketch out (these are placed in user folder, more on that in section 3.2.), add a biography, and assign her a callsign ‘Double-M’, which she likely got from her time in the Magistracy Armed Forces.
Similarly, I will hire (or add via GM Mode) an Admin/Command, and a Doctor, who will be her comrades in the humble beginnings of the merc outfit.
Now I can go to the Personnel tab, and find Michelle, Lazarus (a medical doctor I have added), and Martin (command admin, coincidentally also holding a doctorate), on the list. This tab allows organizing and controlling your personnel. Here, first steps first, I would like to make these three characters founders, and Michelle – the unit commander.
I select her, right click, and in Flags → select Commander. In the tab, selecting all three characters, right-clicking → Flags, I flag all three as founders (this can be done in bulk by shift-click selecting all three). Being a founder of the unit is important for roleplay and employee turnover (they have lower turnover TN, i.e. are less likely to leave/retire). In right-click → Change Rank, I make Michelle Commander in rank as well, and her friends – Majors. Ranks allow you to organize your unit in strict hierarchies but also define some important strategic and tactical aspects (see 4.7. Organization of Forces).
Now we need to decide who else we need to hire. TLR will be a relatively small force (although our budget is quite big), so one doctor should be enough. We still need more admins. The roles of all admins are described in the documentation. Briefly, Command admin is responsible for managing the whole unit and managing reinforcements in deployments. HR admins are responsible for managing people, making sure they are happy in the unit and don’t leave. They also determine Admin Capacity, i.e. how many personnel we can have in the unit without repercussions. Logistics admin makes procurements and resupplies (by default using Negotiation skill). And Transport admin manages everything related to moving personnel and materiel, including support in deployments (more info in section 6 StratCon and the ‘docs’ folder). If you don’t have enough admin capacity, you will experience admin strain, which ultimately leads to the increased likelihood of people wanting to leave your company.
I will now hire a Logistics admin and a Transport admins, both will receive First Ranker rank. (We are following Canopian ranks, yours can be different. So far, we have all the admins required, except HR admin. We will leave it like that to see how admin strain works. Notably, if admin strain gets too severe, you will get a pop-up message.
A predominantly mek force, TLR will need 7 more MekWarriors to complete 2 lances of Meks. So, I hire some random people, disregarding their skill, they will learn or die learning. I give them all rank Volunteer, equivalent to recruit. Some say MekWarriors should be at least corporal, but in our unit, rules are different. However, the most skilled of them will need to lead a lance, so we will promote them to Lance Corporal.
To care for the mechs of these warriors, we need mek techs. Ideally you want a lot of techs, but we will limit ourselves to 1 tech per mek for now, so I hire 8 random mek techs. Also, 2 mechanics for our future vehicles. All these hirings barely touch our budget, but don’t forget, we will need to pay these people salaries. Also, as with the military personnel, a senior ranking tech with leadership skills can be helpful to keep your tech force happy.
If you select a character, you will see that a pane to the right shows all the skills and attributes they have. Purple stars mark their primary skills, i.e. skills they use in their assigned profession. In the case of mekwarriors that’s Gunner/Mek and Piloting/Mek.
Now our roster looks like on the screenshot below. Note two civilians: a spouse of the Lance Corporal, and one of the MekWarriors baby, with professions of Unemployed and Child respectively. (Tip: you can see the whole family tree of a character by right clicking and selecting “show family tree)
This list can be sorted in various ways, I find by rank and/or profession is quite convenient. Dropdown menu on top allows you to choose to show different personnel type, and the most widely used ones are ‘active personnel’ and ‘combat personnel’. However, you can check up on students, people on leave, your KIA and MIA personnel, and much more using that selector.
Education module, if you have it turned on, allows you to have more involvement in the personal development of your characters, instead of a more abstracted approach of just acquiring skills by clicking ‘level up’. It is one of the systems with extensive documentation available in the ‘docs’ folder, so we will be touching on it only briefly using the example of the two civilians that have tagged along the group.
First, if I open the personnel tab, I will find a little toddler Hamengku Pieler, who is only 2 years old. His mom, Stephanie, is a MekWarrior, so maybe he himself would like to grow to be one. But for now, he still needs to grow. That’s why we will send him to Daycare for now. If you right click on him, and navigate to the Education submenu, you will find plenty of options, most of them are self-explanatory. We would like baby Hamengku to stay in the unit though, so we choose Unit Education → Civilian → Unit Creche. Now you will see that he has disappeared from the personnel tab as it is now. If you navigate the personnel type dropdown menu on top and select students, you will see that Hamengku is listed there. If you click on him, the window with details will say that he is in Creche until he is 3 years old.
Our other civilian, Lisa, who is 24 years old, will probably find the Unit Creche quite boring. With her High School level education, she is primed to look for some higher institutions than that. So, using the same right-click menu, we can send her to college. Navigating to Education → Local Academies → Technical College → Advanced BattleMek Technologies we can send her to learn how to be a mek tech. Our company will have to pay 10 000 C-Bill for the education fees. But there, Lisa will learn useful skills and acquire some XP, which is an excellent investment in the future of our unit. After she returns from education, she will still be listed as a civilian, even though she will have some Mek/Tech skills. To make her a mektech, we can right click → Change Primary Profession. This menu should list all the roles for which the character has skills.
You can use the education module to train military personnel, officers, leaders, admin staff, etc. For example, if you have a good candidate MekWarrior who you would like to lead a lance, you can send them to NCO training or to a military academy. You can send soldiers to bootcamp, and techs to tech college. This is a really nice system that makes skill advancements more realistic, and personnel feel more real.
Another use of the personnel tab is to use the XP that your employees have accumulated in their time with the unit. There are plenty of skills and SPAs in Battletech. I assume that you know how the skills work after reading the core Battletech rulebooks, such as TW. SPAs are described in the CamOps rulebook. Both skills (combat, support and roleplay) and SPA can be acquired and improved via XP.
Here, we want to learn how to advance skills and acquire SPAs by spending the XP. This is achieved using the right-click menu on the personnel who have sufficient XP and selecting ‘Spend XP’, then choosing an appropriate way to spend the points. For example, Firtha here can advance her level in Tech/Mek from 10 to 9 by using her accumulated XP.
The same right-click menu is used to acquire new skills as well as the Special Abilities (SPAs). Roleplay wise, I think, acquiring new skills is better done via training or education.
A way to train multiple personnel at the same time can be found in the top right corner of the window → Mass Personnel Training. Here, you can select the current profession of personnel you would like to advance en masse, and the skill you would like to improve. So, we can choose mek tech occupation and then choose the corresponding skill. The list on the right will list everyone who can advance according to these criteria.
You can also choose other criteria such as rank, XP level, etc. to fine-tune how the mass training behaves. This is useful for larger companies, and type of personnel who are usually numerous, e.g. soldiers.
The button just above the character portrait, ‘Quick Train’ will bring up a dialog for a simplified mass training. Here, you can setup how and what you want to advance. Most importantly, quick train is used to advance the lowest skills of the primary profession (marked by a purple star at the character pane), e.g. small arms for soldiers or gunnery/piloting for mekwarriors. This can also be done automatically at the end of the month, if you don’t really want to closely control the skill progression of every character.
Right click menu ‘Spend XP’ also allows acquisition of personnel skills, traits, and attributes as per A Time of War (AToW) rulebook. Those are used mostly for roleplay purposes. Attributes are determined by the initial primary profession and phenotype of the character: Strength, Body, Dexterity, Reflexes, Intelligence, Willpower, Charisma— representing a character’s physical ability, mental resilience, social skill, and luck. Attributes do not affect the gameplay, but in future will (optionally) affect skill target numbers. Skills include, for example, skill at animal handling, knowledge of chemistry, or languages. Traits are another roleplay feature that defines the character in one way or another. They come in positive and negative flavors, e.g. if a person comes from a rich/poor family, or if they are lucky/unlucky. Positive traits use XP when acquired, whereas negative traits give extra XP. The effect of traits is not game-breaking, but some provide an effect on the overall campaign for example ‘Connections’ trait increases Force reputation by 1. Most of the roleplay skills are governed by the character Attributes.
Right clicking a person and selecting ‘Perform Skill Check’ opens up a dialog to roll 2d6 and check against any of the roleplay (or not) skills for you.
Some of the skills are important for the force leaders and are worth describing here, as their behavior is somewhat unique to MekHQ:
Leadership:
Strategy:
Tactics:
Now that The Learning Ropes Company has hired the skeleton crew, we need to procure some machines and equipment to actually carry out our merc work. As usual, there are plenty of ways to do that in MekHQ. Let’s start with units.
The first way to buy units is the Unit Marketplace, available either as a ‘Find Units’ button in the main window of the Command Center tab, or in the dropdown menu Marketplace → Unit market. This market presents a selection of units currently available at the location we are at. It refreshes every month. It is a pretty straightforward system: if you see something you like, you can click and buy (or GM add) it. Note that the prices fluctuate a bit, which is reflected by the percentage of the normal price denoted on the right. Also, black market can swindle you out of the purchase, so be careful with these.
I use the Unit Marketplace when the campaign is already set up and is in play, to emulate the availability of different units on different planets better. While we can equip our company using the unit market by just buying what’s available, I believe that setting up the company should be a bit more lax for this one time.
We can use a procurement dialogue in Marketplace → Purchase Units dropdown menu. This menu is more of a GM tool than procurement option, but that is perfect for starting out. Here, we can search for any unit available in a given year and tech rating (which we have set in the campaign options).
In this menu we can select the unit type we are looking for, weight class, technology base (e.g. experimental or advanced), and we can also search by keywords in the field Filter. We can either buy our units or add them in for free using GM Mode.
As we already have our funds assigned, TLR company will buy 8 meks to fill out our medium mech lance and our recon lance, as well as some support units: a couple trucks and light tanks. The only thing that I will add as a GM is a Leopard dropship. Ideally, our small company should be able to scout, to attack, to procure supplies while on contract, and have minimal capacity for field repairs and transport. Dropship is a luxury for a company, we could always hire one instead (and we will have to, seeing how dinky Leopard’s cargo space is), but for the sake of the guide, we will have one of our own to showcase some functions.
The stuff that we want to buy will be added to the procurement list and will be rolled for according to the rules we set up: for us, every day. You can select everything in this list and use GM mode to procure them immediately via the right click menu, but we’re in no rush, we can wait. Note that if all your admins are busy making procurement rolls, the button on the procurement menu can say “Impossible” instead of a chance to procure the item. Clicking on it will still add the item to the future procurements list.
Note: initial setting up of the unit base can also be done using the Company Generator tool, briefly mentioned in the beginning of the Section 4. But currently, this tool can generate only Mek forces without any support units.
Equipment for the company can be bought in several ways too. First thing we can note is that all the units that we buy arrive already equipped. Meaning, for example, that the locust LCT-1V that we added to the purchase list will arrive at some point having both machine guns installed and all armor in place.
But if we want (and we will need to) to buy extra equipment we can do as follows. Either Dropdown menu Marketplace → Purchase Parts or the Command Center tab button ‘Find Parts’ will open a dialogue window where we can place a purchase order for any part available in our year and tech base. Here, we can filter by part type, and/or type in what we want in the search. You will find the list of parts to be enormous.
We know we will be using armor for sure, so we search for Armor (standard) — that’s what most of our units will be using — and click buy in bulk, where we can specify that we want 10 parts of the stuff (which equals 50 tons in weight).
This menu can be used to find and procure any part that we need, but there is a bit more convenient way for an established company to procure needed parts and equipment in bulk, which we will consider in the next chapter (see autologistics in section Maintenance).
Now, that we have added some medium and light meks to our procurement, together with some support units and equipment, we can let the admins do their work, while we cozy up on Vixen. For this we can click “Advance Day” button at the top right of the MekHQ window. This will, as it says on the tin, advance one day. On every day advancement, several things happen: procurements get rolled for, maintenance and repairs are performed, personnel goes about their business, new possible hires get into view, and so on. All that will be reflected on the left panel of the Command Center tab in the Daily Activity Log.
After some days, our admins have found a couple of meks. And I added in the Leopard using GM Mode, because it’s well outside our budget, and we will consider it as a heritage, which Michelle brought with her from her past life. Now, we will need to learn how to organize proper management and care of the units.
All the units that we have bought (and that we have) are listed in the ‘Hangar’ tab. All the equipment that we buy, and store is listed in the ‘Warehouse’ tab. Warehouse tab also shows the weight of all the items we have, which, as will be discussed in 4.8 Unit overview, can be optionally tracked to affect the company’s cargo total.
You will find that the freshly purchased units also take time to arrive. If you cannot wait to start you can right click them with the GM Mode on, and make them arrive immediately. The same can be done to equipment and parts in the Warehouse using GM Mode. If you have this option enabled in Campaign Options, freshly bought units will also arrive mothballed, more on that in 4.5 Maintenance etc.
If you have this setting turned on in Campaign settings, procured units arrive mothballed, meaning that they do not need any maintenance, they just sit in the boxes on pallets, basically. However, in order to be battle-ready (or useful in their role), we need to activate them. This is done by right clicking a unit and clicking activate. A trained tech will need to spend time doing this, and fortunately we have both the mech techs and some mechanics. After this is done, we need to assign tech to every unit that we have. The assigned individuals will care for the unit every day. Occasionally (each 7 days in combat and 28 days as per default settings) this maintenance will also affect the quality of the unit (keeping it the same, improving, or deteriorating the quality). This can lead to disastrous results, and that is why we have made an adjustment to the maintenance rolls for this campaign to make it a bit easier on us.
Anyway, we can assign individual techs to every unit we now own by right clicking and selecting Assign Person → Tech → … and selecting the appropriate person. Alternatively, you can go to the Personnel tab, find the tech there and by right clicking assign it to a unit via assign to unit → as tech → … and select an appropriate unit.
You will notice that every name now has a number of minutes listed by its side. E.g. Volunteer Zina Salam (480m available minutes). This number represents how many minutes this tech still can reserve for new maintenance tasks (available minutes after all maintenance from all units that character is assigned to). Every person can perform only 480 minutes of work per day (without overtime). For techs it includes both repair and maintenance work, so a tech employed full time in maintenance won’t have much time to repair. That is why it’s important to have plenty of techs if possible.
Notably, techs spend their time on maintenance only on the day of maintenance. The hangar tab shows when the next maintenance is due for each unit. The assigned maintenance time is only spent on that day. Meaning, that on a maintenance-free day, tech has all 480 minutes available.
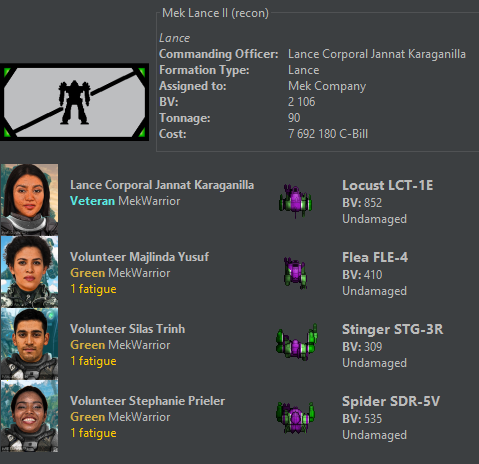
The same approaches (either right clicking a unit in the Hangar or a person in the Personnel tabs and assigning to the unit) can be used to assign our MekWarriors to their mechs. Michelle will command a lance of medium meks and will pilot the Crab, and Lance Corporal Jannat Karaganilla, who will lead the recon lance, will pilot the Locust. All the other MekWarriors will be assigned to other meks.
Now our meks are all crewed by pilots and maintained by techs. You will notice that our vehicles, however, are only using tech crews. And if you remember right, we did not hire any drivers, gunners, or vehicle crew members in the previous chapter. Vehicles need multiple people in their crew, which is described in the Techmanual Rulebook. The total amount is reflected on the right-hand pane when the unit is selected.
All these would need to be hired/added separately, and assigned to the units in question. If you just start a campaign out or wish to do a faster crewing, you can go to right click - GM Mode – add minimum complement. This will add all the required crew automatically.
If we have some extra units that are not needed immediately, we can mothball them and put them in storage. Mothballed units do not undergo maintenance (they are virtually conserved for long term) and makes them occupy cargo space instead of an appropriate bay. Usually, units are mothballed on arrival from markets, or when put away in cold storage, and are also mothballed for long range transport when employer pays transport costs. Mothballing or activating any unit requires 480 minutes of appropriate ‘tech time, so plan for that! In our present force, we are running quite barebones, so no unit will go into storage, every machine will be needed on deployment.
Now that every unit is ready and crewed, I will go to the Personnel tab and assign appropriate ranks for all the new hires. Everyone will be recruit/volunteer, and the most skilled vessel pilot will be lance corporal in command of the Leopard. Please note that the ranks I use in this guide are all chosen not according to the lore, but for convenience. Check out Sarna or the Reference Handbooks for more details how ranks work in BattleTech universe for different units.
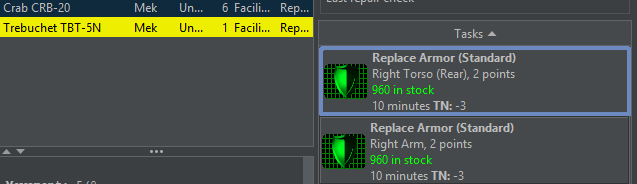
Now that we have all the units we want in place, and all the machines are crewed, we can check if we’re ready for maintenance and losses of integrity. The easiest way to do that is to go to the Command Center tab and click the ‘Parts in Use Report’. This list presents all types of spare parts, mechanisms, weapons, armor, etc. used across our unit. This list also notes the amounts used. Sorting the list by ‘in use’ column should give you a good impression of what are the most needed parts for us. Normally, armor comes first, followed by heat sinks, gyros, and weapons.
Other columns here tell us how much of the stuff we already have, and how much it all weighs. Important column here – Requested Stock Percentage – allows us to set up Autologistics. Basically, your admins will buy that percentage of surplus parts indicated here either by your order or weekly, if specified. To order the corresponding stock, we can click ‘order parts to fill requested stock’ to immediately stock up on these items.
Note that we have set 100% for armor and ammo in our campaign settings, but we can also manually adjust individual positions, as opposed to setting the whole category of items. For example, I will add 20% surplus of heatsinks and medium lasers to be kept on order. All the custom numbers input here can be reset to defaults specified in the campaign options by using a respective button on the bottom too.
Automation of the stockpiling of the selected items is enabled by checking the ‘Add Part Orders to Fill the Requested Stocks Weekly’. Keeping all the mek parts and all the weapons on stock is usually a good strategy for repairs but will bloat your warehouse and risks ruining your early budget. This is important if you play with counting available and used cargo space. However, keeping spares is always good, as procurement and delivery can take up to several months (depending on the campaign settings), and is generally hard to do while behind enemy lines (e.g. on contract). You will learn in battle which parts are worth buying extra, and what can be salvaged from the OpFor. A good example is aerospace armor. If you don’t plan to put your dropship in danger and field no ASF forces, having 50%+ surplus stock of aerospace armor makes no sense, so it can be manually edited to request 0% stock. Armor for your meks and other frontline troops, however, is always needed, and I suggest at least 100% (preferably more) extra stock for it.
Keep in mind that restock and equipment orders take a lot of time to get completed and delivered! Ideally, you would like to sit out 2-3 months in between contracts to catch up on the procurements and restock. This is a general rule for all merc companies.
Meanwhile, we will let all the ordered parts come to us, while we organize the unit further, let’s advance couple days more.
Checking the Command Center – we notice a report highlighted in yellow (we will get to it in more details in section 4.8 Unit overview) – Cargo Summary tells us that we have 118 tons of cargo but only 52 tons of capacity.
While there are no strict penalties for this, cargo rules are mostly for roleplay (and self-imposed challenge) and do not affect gameplay much (as of v.0.50.05). I would like TLR to use their capacities to the fullest and carry their own weight. Maybe we will save on transport costs this way.
To increase our cargo space, we decide to perform a common refit of the Leopard – remove the ASF bays and replace them with cargo. We will use this as one of the examples of unit customization.
To do so, we navigate to the Leopard in the Hangar tab, right click it, and choose Customize → Customize in the MekLab. This will open an instance of MegaMekLab in a separate tab of MekHQ. (NB: while this works well for most applications, if you want to drastically customize a unit, it is highly advised to do that in a separate MegaMekLab instance run using its executable. There, you can save the custom unit, which you can then use as the custom refit option in MekHQ).
If you want to learn about customization of units, I refer you to TechManual Rulebook, which describes all the intricacies of the unit customization and creation. But here, we want to do a minimal change to an existing unit, so absence of knowledge of construction rules does not stop us. We navigate to the ‘Transport Bays’ subtab of the MekLab, find Fighter Bays and remove them. Then we can click ‘Use remaining Tonnage for Cargo’ and click ‘Begin Refit’ on the left.
We will call this Leopard ‘Cargomod’. MML will tell us that it’s a Class A refit, which we will acknowledge. Command Center log will notify us that the refit will take 151 days. We will pretend that our leopard was always like that, and using GM Mode, will complete the refit immediately by right clicking the dropship and choosing Customize → Complete Refit (GM).
Such a refit will leave us with spare parts used for ASF before in the bays (Cubicles, cooling systems, etc). I will find them in the warehouse and remove using GM option. Selling them would be a bit too cheeky.
With this refit our unit can carry up to 352 tons of cargo, which we can populate with more spare parts or mothballed units. Seeing how Leopard can carry only 4 meks, we will still need to pay up transport costs for the rest of the unit, so we are calm about cargo use for now.
As another example, we would like to refit our locust from 1V to 1E model, which TLR consider superior. For that, we can again right click and customize the unit, but this time, we will choose Refit/Customize. This will bring up a menu with a list of all the unit configurations – either canon or the custom units we have created before.
Refit to 1E can be done two ways – either acquiring a refit kit (which can be hard to find and will take time to arrive) or by customizing the unit ourselves. Our techs are confident that it’s a Class D refit and will take less than a month. We will also need to buy a pair of small lasers and a medium one to complete the refit into the full-energy LCT-1E loadout. We can wait.
While chilling on Vixen, we keep our machines operational. For training purposes, you can imagine. Ideally, we should have mothballed everything to keep it safe, but TLR is not a unit like that.
When units are active, they undergo maintenance by the techs assigned to them (see 4.5 Maintenance). In our case, the maintenance cycle was quite successful, you can see that most units remain at their quality level, but some techs even managed to improve the conditions here and there.
However, our Spider-5V has been damaged during maintenance. By some accident the front fell off all the right arm actuators have malfunctioned, and the hand actuator indeed fell off. Now, the unit needs repairs. All the units with any extent of damage, or which are slated for salvage, are listed in the Repair Bay tab.
Here, you can select a unit in the left column, select an individual part that needs repair/replacement in the middle column, and choose a tech who will do the job on the right. Tech responsible for the daily maintenance of the unit is highlighted in green.
Note that parts and equipment that have been damaged (either recovered in this state from combat or have been damaged in maintenance), can be repaired in similar fashion, but via ‘Warehouse’ tab. Sorting by ‘repair details’ column helps with identifying what needs repair.
In our example, you will see that the Arm of the mek cannot be repaired, because other components in the arm need to be worked on first. Upper and Lower Arm actuators are highlighted green meaning that the job can potentially be done right now.
Ms. Weber can perform the repair of the upper arm actuator and would need a roll of 9 or higher to do so. However, if she has time to spare, we can give the job ‘extra time’ by right clicking the component and assigning more time to this task. With extra time, the tech can do the job in 480 mins, with a roll of 6.
Hand actuator of the mek, however, as we say in the military, is FUBAR, and we need a new one. You can order one using the method we described in 4.4 Procurements, or using the “parts acquisition” button a conveniently placed nearby.
However, all this will be in vain, since all these repaired parts are attached to a bad shoulder, which was damaged too! Thankfully there is a message for such cases.
To alleviate this issue, we have to right-click on the Spider and change repair to salvage. Then, we will navigate to the right arm of the mek and carefully try to salvage all the components of the right arm, including armor and the damaged actuators, and the shoulder itself will need to be scrapped. Only then, after the procurement of new parts, can we now repair the unit completely starting with the new arm and fixing all the components within.
Sounds complicated? Because it is. Luckily, there is a way to automate the whole process. You can click the Mass repair/salvage button, which will bring you a menu where you can customize conditions how mass repair will work. Most notably, on the bottom, you will find a list of what type of works can be automated, e.g. replacement of armor, repair of actuators, etc.
Here, two options called Preferred TN and Max TN set up which tasks can be done automatically by your techs.
Preferred TN means what kind of roll is acceptable for techs to make without your input. Techs will try to reach this number with the help of extra time (if the task is harder than the setting) or with rush jobs (if the task is too easy), if respective options are ticked. For example, if preferred TN for ‘repair actuators’ would be set to 6, Ms Weber would automatically take more time and try to repair the actuator (i.e. a task with TN of 8 can be made TN 6 if a tech spends 3x time on it).
Max TN, on the other hand, signifies the maximum difficulty of the task that is allowed to be automated. E.g. if Max TN is set at 8, anything requiring a roll of 9 or more would not even be attempted without the commander's input.
I would recommend turning rush job off, as tech time is usually not as crucial as ease of the task. Also, setting relatively preferred and max TN for non-essential parts, such as ammo and armor, makes repairs much more fluid.
If you save these settings as the default (using the button on the bottom of the window), the mass repair/salvage will run daily, provided you have turned it on. Command Center tab window will report if you have units that are not being worked on, in case the automatic repair/salvage assignment will miss them for any reason.
You can read more on maintenance and repairs in the CamOps book.
Medical care is straightforward. If you have some personnel who got any form of injury, you can assign them to a doctor in the ‘Infirmary’ tab. This will increase the speed at which the personnel recover. Usually, hard battles generate plenty of injuries. You can read documentation about ‘Advanced medicine’ in the ‘docs’ folder.
Some injuries do not heal without medical intervention at all. Most serious injuries, while not healed, impose penalties on the character’s skills. Serious trauma can lead to loss of limbs and organs, sometimes precluding character from operating in their previous capacity. Lost limbs, however, can be replaced by cybernetic prostheses, provided you have (time and money) resources to do so. All this applies if you have advanced medicine options turned on in campaign options.
Doctors have limited number of patients they can care for, which defaults to 25. If you have more patients than the number of hospital beds you will get a nag dialogue about that before you proceed. MASH units are also needed for specialist care, and can provide a limited number of operation theaters. Those can be rented from the employer, if you do not like to carry these around with your company. If you do not like to manage this aspect of the company, you can turn these off in campaign options.
If enabled in File → MekHQ → New Day options, assignments of the patients to doctors can be done automatically every day with Optimize Medical Assignments option.
Now the time has come to structure 'The Learning Ropes' as an actual force. To do so, we will use the TO&E (table of organization and equipment) tab.
Here, The Learning Ropes already exists as a top-level entity. What we need to do is to add sub-units to the hierarchy: combat and support forces. This is done by right clicking and selecting ‘add new force’ and giving it a name. Think of them kind of like folders, in which your units are organized. As with folders, double-clicking on them opens and collapses the selected level.
We will add 5 for the moment: three mek lances grouped within another upper-level force called mek company’, a force for the convoy, and one for the dropship.
Right-clicking and selecting ‘force icon’ allows us to create layered icons for each one. You can shift-select several icon parts to make complex designs.
Forces created in this fashion can be populated by right clicking and selecting ‘add unit’ followed by selecting a corresponding unit from our unassigned machines. Keep in mind that the units need to be fully crewed to be available for addition to the Force. Commander for each force is selected according to rank by default, but you can do it manually by right clicking and choosing ‘select commander’. Commander’s skills in tactics and leadership will affect the strategic and tactical performance of the corresponding force (described in more details further, sections 5 and 6).
Other options here include individual camo for each force, adding a description, adding a tech who would cater for the whole force, and so on.
One of the most important choices in the TO&E is selection of a force type by right clicking an appropriate formation/force. There are four types:
Those are any forces that you intend to use in battle. These will be your combat forces, lances, ASF wings, and other tactical formations. E.g. our mek lances are standard forces.
These forces are here to cater to other forces, MASH units, mobile kitchens, and anything you do not want to be in direct combat are support forces. E.g. our dropship is a support force. (Note, if you have ‘use player dropships option checked in Campaign Options, dropships can get into a combat situation scenario even if they are assigned as support force!)
Convoys are forces used to transport goods while on deployment. You can imagine there are rarely shops on the frontline. Most often your employer will help you out with some resources, but not delivery. Refer to convoy logistics system docs in the ‘docs’ folder for more info. To contribute to actual convoys (ferrying supplies), a unit in this force needs to have a cargo hold. Plenty of standard issue trucks and cargo vehicles have them, but refitting (see section 4.5) a combat unit with cargo space also works. In our guide, force of flatbed trucks and scorpion tanks form a convoy.
Security forces are assigned to guard prisoners and PoWs. Those are usually infantry squads (any combat unit can help you retain prisoners, but infantry is better at it). Refer to prisoner system docs in the ‘docs’ folder for more info. If you don’t have security forces but got some prisoners — break outs and rebellions are likely (this applies only if you set Prisoners capture style to ‘MekHQ’ in Campaign Options). Security services, as medical ones, can also be hired from the employer while on contract, if you don’t want to form your own security detachment.
Salvage forces are typically not deployed to a scenario, but arrive after it is concluded. These are meks, tow-trucks, and mek-recovery vehicles. CamOps book goes into more details how this force should work. Briefly, having empty hands and a lot of cargo helps a lot in the matters of grabbing the loot after battle.
One of the right-click options for forces and individual units here is assignment of transport for the units within the force. These Transport Assignments are used to designate transport that should be used by the units when deployed to battle, e.g. infantry riding in APC or a mek in a dropship mekbay. Units assigned in this way will automatically load into assigned transport (and deploy loaded in the following MegaMek scenario), when deployed in battle. This plays an important role in getting to the site of combat in time, as the speed of the transported units would not affect the speed of the whole force. It makes sense, as for example squads of battle armor riding on an OmniMek are faster than when using their own locomotion.
There are three types of transport assignments
Ship transport assignments represent what transports a unit for interplanetary travel, and therefore what units are inside a transport when the transport is intercepted and all the associated consequences. This option does not interact with campaign transport requirements.
Tactical transport assignments represent short term transport used by the units to get into battle. While units can still be loaded into bays like ship transport assignments, units can also be loaded onto transports that are only suitable for local travel, like Battle Armor handholds, infantry compartments, or cargo used to haul infantry.
Tow transport assignments are used to assign trailers to tractors. Throughout the suite, “tractor” is the generic term used for the lead vehicle doing the pulling, while “trailer” refers to the units being pulled. E.g. an artillery cannon being tugged by a tank, or a railcar attached to the locomotive in a train. To be towed, units need to be appropriately equipped, for example with tow hitches.
As you can imagine, TO&E content and its organization are paramount to how the game will play. StratCon (your automatic GM) will make missions based on these forces, your opponents will be selected according to the units you have here. TO&E can be rearranged at almost any time within the campaign. Naturally, as the company grows, so does TO&E.
Information about your unit at a glance, as well as daily updates to the universe and your place in it, are located in the Command Center tab.
Here, on the left you will find the Daily Activity Log. This window will report all what’s happening in the universe and within your unit — news, repairs, injuries, gains and losses, salaries, market opportunities, and much more. Usually those are self-explanatory, and most of the time they are hyperlinks making detailed info available at a click.
Just below the unit logo (if any), you will find the Procurement Information window. The list here will show what is actively being sought after by your admins. To the left of the list, you will find all the buttons we already discussed in previous sections — purchasing units and parts, parts needed and in use, mass repair/salvage.
Below this, in the status bar of the window, you will find info on your monetary situation and temporary staff.
Middle of the page is occupied by the summary of your unit, current objectives list (which includes your projected financial status), and a menu of different reports.
The summary shows, among other things, the reputation of your unit. Reputation is affected by a number of things, including the skills of the commander, equipment of your unit, admins, transport, and most importantly — your successes as a merc. You can read detailed explanations on how Reputation is calculated in the CamOps rulebook. More details on our specific unit’s reputation can be brought by the report on the right. The report gives you nice pointers to what can be improved. For us right now, no successes in contracts is obvious as we’re totally new. However, the report notes that we do not have enough admins, meaning our unit can be under admin strain. To alleviate this, we will hire a dedicated HR officer now. We’re also low on mechanics for our vehicles, which gives us a small negative score, but we will see if we can manage without hiring more.
Faction Standing and Diplomacy reports will tell you what other factions think of your company and what is the political climate in the current state is, respectively. While one is important for your force personally, the second one helps you in choosing right conflicts in the universe.
Other statistics here are quite self-explanatory. You will also find available transport capacity (bays for various types units) and cargo summary. Notably, all cargo- (and dropship-, jumpship-) related limitations are optional, player self-imposed challenge. This does not affect the gameplay very much, and all types of transport can be hired in an abstract way when we commence interstellar travel (see 5.2 Travels). But if you would like to roleplay a self-sufficient force, you can try to keep these numbers controlled. For example, if your force has a Union dropship, only 12 meks can ride unmothballed, since this craft has only 12 bays for meks. The same goes for your warehouse goods (see 4.4. Procurements) and cargo space available in your dropships. You can check more details on those by clicking Cargo Capacity and/or Transport report button on the right.
Facilities include kitchens, hospital beds, MAS units, and prisoner capacity. Kitchens are provided by support units with field kitchens, like a Sherpa truck or a custom truck with a kitchen. Kitchens help improve morale and decrease the level of fatigue your forces experience in deployment. Notably, large craft (like DropShips) have their own kitchens (which are omitted in the loadout), so their personnel are not counted towards the kitchen requirements. Hospital beds are provided by every doctor and limit amount of personnel that can undergo treatment at a time. (See Section Repairs) The number of prisoners that you can hold without serious implications is defined by the size of the security force that you employ (See Section Organization).
Notably, on contract, most of the facilities can be rented from the employer. Soif you don’t want to lug around a security force, a staffed MASH unit and so on, you can get them for a price in wartime.
Note that all this info updates every Monday!
After reading the mentioned reports, TLR decides to hire a dedicated HR officer (or two), an Admin/Transport, and a squad of infantrymen to act as security force (which needs to be purchased as a unit, given ranks, added to TO&E and designated as security force. Using all the procedures we already learned!).
To progress in our story, we need to progress in time. This can be done one day at a time by clicking the corresponding button in the top-right. Every day will bring new events, and the daily log window will be refreshed. Every month your personnel will acquire vocational XP and markets will get updated. Historical events of the BattleTech universe will also take place with the progressing time, which you will learn about in form on news posted in Daily Log.
For a larger scale of advancement, Advance Multiple Days button can be used. Using this menu, swaths of time ranging from weeks to years can be advanced at a time. MekHQ still calculates and simulates events per day basis, so these advancements can take some time to resolve. Moreover, important events, such as Employee Turnover, arrival at the destination, unit being without tech, etc, will interrupt advancement and give the player the possibility to intervene and stop the progress of time to deal with the issue at hand.
New contracts and market opportunities usually arise on the 1st of every new month. So now that The Learning Ropes is organized, has personnel and equipment, the company will stay on Vixen until next month, actively trying to find a contract to get hired.
New contracts appear in the contract market, which can be accessed either via the hyperlink in the daily log, or through dropdown menu ‘marketplace’ → ‘contract market’. Let’s find our very first employment.
Tip: all the tans of the main MekHQ window can be dragged to rearrange and separate – you can have a nice multi window setup if you wish!
In this part of the guide, we will learn how to get hired, what are the details of the contract work, and how StratCon works on the general level to GM the contract for you.
All contracts available this month can be found in Marketplace → Contract Market. Depending on the Reputation of your unit, and on your location, number of contracts can vary wildly. If there are none at the present, you can either wait another month or generate some new contracts using the ‘Generate (GM)’ button, if you have GM Mode active.
The list will show you some very important info about the contracts that you can potentially take on.
Employer and Enemy are self-explanatory. This is your future boss and OpFor.
Mission type. This field designates the overall goal and the feel of the contract, CamOps book outlines these to some degree, and there is also more documentation in the ‘docs’ folder of MHQ. Most of the time though, the designation is quite clear: raid, garrison, pirate hunting, etc.
Transit time determines how many days away the contract’s location is. The window to the right also has location as a hyperlink, if you would like to see where exactly this is.
The contract length is contract duration in months. Note that this can change while the contract is active for a variety of reasons. Some contracts are always quite short, while others tend to be long.
Next columns detail the contract terms in percentage: transport terms, salvage rights, straight support, battle loss compensation. Transport terms define how much your future employer will cover the transport costs to move to the destination system and back. Salvage rights are how much of the battle salvage you get to keep (or exchange directly to C-bills, if specified). Straight support and Battle loss compensation are mutually exclusive and tell you if the employer will support either your running costs or just the casualties/loss of materiel, respectively.
Estimated Profit column calculates assumed profit with only the above parameters considered. Note that even if it’s negative, it does not mean that the contract is bad. Quite likely salvage recovered in battle would be more valuable than the losses of unit operations.
MRBC Fee and Signing Bonus (on top of the table) are mostly roleplay stuff, but if you would like to follow the lore as a merc company, we usually pay up 25% fee in advance and rarely receive a signing bonus.
If you click on any of the contracts, the window to the right will show more details.
TLR are a unit born in periphery and thus harbor an intense animosity towards pirates. Seeing that there is a pirate hunting contract, even at a projected loss, a consensus is formed to pursue this opportunity.
The details of the contract mostly duplicate the info found in the overview. However, some important nuances are found only here.
The Challenge Estimate shows how hard the contract will be. 2.5 skulls means that the OpFor is mostly on par with our forces and the contract conditions are supportive of our cause. 5 Skulls means OpFor is well trained and well equipped. 1 Skull means that the contract is well below our level. Those are defined mostly by the following:
Ally Experience & Equipment and Enemy Experience & Equipment reflect how well the corresponding forces are trained and geared, respectively. Experience ranges from Green to Elite (just as for your roster), and the Equipment score ranges from F (worst) to A (best). These scores are indirectly factored into challenge estimate, but it’s always good to be on lookout. Fighting an elite regiment using pristine machines is always a challenge.
The info block just below duplicates the info we already discussed in 5.1. However, now there are ‘Renegotiate’ buttons near each field. This will allow us to try to get a better deal out of our employer. Success in this task is tied to the skills of your admin staff (listed in parenthesis). With every admin type (logistic, transport, command) being responsible for a respective aspect of the contract.
The only negotiable point that we haven’t discussed yet is Command Rights. These determine how our unit will interact with the employer on the deployment. They range from Independent to Integrated, depending on several conditions. For example, more experienced merc units are given more independence usually. Mouseover pop up hints explain well what the differences between them are. But briefly, integrated command makes your unit part of the deployed military, and the employer will decide how and when to deploy your units. House command gives you more liberty, but strategic decisions (for example winning conditions) are decided by employer. Liaison command offers a bit more strategic freedom but will assign a liaison officer to make sure you are carrying out your duty well. Independent command gives you almost total freedom in the deployment on all levels both strategic and tactical, but victory conditions are your own responsibility.
Required Combat Forces delineates how many combat forces (see 4.7) you need to successfully deploy in this contract. These usually mean at least lances (4 units) for the Inner Sphere employers, and anything less will be considered understrength and not count (more on that in 5.3). You can deploy a whole company, but ideally those are the smallest force, because, as you will see in Section 6. These will need to perform a specific function on the battlefield. Here, in our example, it’s 1, meaning one lance is mandated by the employer to be deployed and 1 also should be enough. Not meeting the required combat force requirement will make the employer not happy, and we will lose Campaign Victory Points weekly (more on that in 6.8).
The rest of the window shows the details on the financial aspect of the contract. You can use this info for your negotiations to improve your conditions.
The Learning Ropes have negotiated better transportation coverage and support, but the employer has cut the salvage rights. We think this is acceptable and accept the contract. Let’s clean out some pirates from the backwater world of Thamel.
Accepting the contract will bring in some important info from our admin officers. First, we will learn if the employer foresees any convoy work and how our convoy’s cargo capacity compares to the projected needs. Again, this is highly optional, but a very useful way of using Supply Points gained during the mission (see 6.1 for more).
Then, our transport admin will ask if we would like to mothball all the units. Transport costs (which are partly or fully covered by the employer) are calculated assuming all the units travel as cargo, i.e. mothballed. So, this proposal from the admin is very welcome in most cases. Exceptions are rare. For example, if you need to repair a unit on route – it needs to stay active and not mothballed. Our total cargo will go over our cargo capacity when all the units are mothballed, but the employer pays for that anyway.
Then, the same admin will explain to us how man days it takes to take us to the system/planet of interest. They will also propose calculating the route to the place and commence movement through the stars. If you decline – you will need to do all the work on calculating the route yourself, so there is no reason to disagree. Also, most contracts have starting dates calculated to coincide with your fastest arrival. We don’t want to be in the breach of contract from the very beginning, right? Note that the start date can be way off for some contracts and will adjust on the way there. No contract starts before the date of your fastest arrival.
Notably, this part of MekHQ abstracts hiring JumpShips and DropShips when travelling. If you have your own means of interstellar and interplanetary transportation – you (or your employer) will pay less for the transport. But the maintenance and its cost will be mostly on you. This is up to you to decide and is mostly based on the experience you want. Is your force on a retainer contract with a Great House and transport is always there? Are you playing more of a pirate force? What is a pirate without a ship... Do you trust a hired transport to move all the tons clantech salvage cargo, or you carry your own spoils?
Now that everything is in order, and we are en route to the planet where the pirates need to be hunted, we can check how the progress in the contract is tracked. This is done in the Briefing Room tab.
Here, on top left you will see mostly GM tools, like adding a new mission (contract) manually, add scenario (battle) etc. Also, dropdown menu on the left allows select between accepted contracts – either several accepted ones or look through the past ones. Notably, ‘Edit Mission’ button would allow you to modify the contract (GM) or choose different camo for allies and enemies and add notes on the contract. We will add some fluff text to remember our first contract here.
The info in this window mostly reflects the contract conditions upon signing but also shows you some info that will progress with the contract itself. Notably, the estimated difficulty can change, enemy morale will hopefully fall, and total salvage will reflect reality (how much we are allowed and how much we grabbed).
Just below this window, you will find a table that will contain scenarios (battles) generated by StratCon. More on that later (see 6. ).
Advancing some time forward (month by month) we will slowly travel closer and closer to Thamel. You can check the travel in the Interstellar map. Double clicking on the system will open the diagram with the planets, where you will see our small dropship approaching the planet. Meanwhile we will get couple of questions from the unit organization, namely employee turnover dialogue. This time, no one is leaving us, because we are fresh and have plenty of HR officers to make everyone feel at home.
It’s hard to miss our first day at the job, even when advancing by months, because we will get a nag from our Command Admin Martin that we are deploying less troops than the employer wants. Let’s see what he means.
At this point, we are already on Thamel and that should coincide with the contract start date (most of the time). Meaning, we should deploy troops according to the employers’ requirements. In our case, Independents, who oversee this pirate hunting op, wanted one combat force deployed. This can be done (and verified) in the little window on the bottom right of the Briefing Room.
You will find all your combat forces listed below. Note again (as we discussed in 4.7. Organization) that only standard forces are considered combat forces and can be assigned to duties here. Support forces, security forces, convoys are non-combat forces and cannot be used to fulfil battle criteria for contracts and will never be used in scenario generation (with exception of convoys, which can be intercepted by the enemy, thus generating a combat scenario).
The deployment requirements table mentions that total deployed forces should be 1, and we have now deployed 0. Moreover, the next columns designate which type of deployment it should be. Here, we are required to deploy one Frontline force.
There are six main designations for a force, and all of these are explained in detail in the documentation in the ‘docs’ folder. But we can mention them briefly here anyway:
Keep in mind that even if the force is assigned the right assignment, but it is understrength, for example, it may not be considered complete and may not fulfil the employer’s requirement.
In our example, we will assign our medium mek (combat) lance as Frontline, and our light mek (Recon) lance as Patrol.
Now we are all set to put some work into this contract. To check the more detailed objectives and the theater of operation, we can head to the Area of Operations Tab, which is used to interact with all the things StratCon.
This part of the guide is relevant only to the campaigns with the digital GM, which is called StratCon in MekHQ. This system will generate scenarios, battles, and guide you through the contract with various other events and turning points.
(Please note that the most exhaustive information on the StratCon system is in the ‘docs’ folder, and goes into much more details than the present guide)
The Area of Operations (AoE) tab presents a general overview of the strategic situation in the contract.
The most noticeable feature here is a beautiful map of the theater of operations, called a Track. As the battle maps, this map is also composed of hexes, but these ones represent much larger swaths of land. Think of them more as separate regions of interest or localities in the grand scheme of the local zone. The hexes here are numerated and are drawn according to the biomes that they represent.
This map will contain all the strategic objectives, bases, formations, both allied and enemy. In our case, blue symbol on a city hex 0303 represents an allied air base.
Note how most of the track is shaded, meaning these hexes are unscouted (except for the allied base). We do not know yet what is located there. Enemy forces and bases can hide behind the fog of war. This is why patrol/recon/scout formations are that important. Note that the track for this contract is relatively small. In larger and longer, more important contracts, much larger AoE can be present, as well as several tracks per contract.
To the right of the track map, you will find a small reminder of what the mission is all about: its title, brief description of the overall goal, reminder on turning point scenarios and strategic objectives. Turning point scenarios are combat scenarios that are important for the development of the contract. For example, capture of the enemy base, elimination of an enemy officer, etc. Turning point scenarios are also a major factor in enemy morale. Losing or skipping these will lead to OpFor growing bolder and more present on the battlefield. Strategic objectives are presented in the list below. These present the strategic goals that need to be achieved within the scope of the contract to be considered successful, disregarding if you control the deployment yourself (Independent Command) or if your employer uses you as their own force (Integrated Command). More on all these systems can be found in the documentation. But for the most part they are usually self-explanatory. Examples include the following: find and capture/destroy the enemy base, keep allied base intact, keep Victory Points above some number, etc.
Campaign Victory Points. Those are used to determine if the contract is going well. Victory points are assigned for completion of the objectives and some scenarios.
Support Points (SP). These points represent your unit’s capacity for reinforcement and interaction with the allied command. Your Admin/Transport will try to generate new support points at the beginning of the contract and then weekly (with some limitations). They are mainly used for reinforcements. SP represents the help you receive from the employer, e.g. dropship transport or fuel for vehicles. Gameplay wise, they are used to reinforce your forces in combat scenarios, at least 1 SP is used for that, but more can increase the success rate of the reinforcement (see 6.6 for more details). Another use of SP is participation in Mercenary Auctions and negotiating with personnel willing to join your unit. Sometimes a unit will be available for purchase in the field via merc network or a Ronin MekWarrior approaches your command, and negotiating then is done with SP.
Deployment Period. This is the amount of time it takes for the forces to come back to base. For example, if the deployment period is 2 days, a force deployed to a hex on the track (which happens immediately) will take 2 days to be again available for another assignment, repairs, rearming, and so on. It does not matter if deployment to a hex was for a scenario or for recon, deployment period will be the same. Although, salvage and injured personnel (which comes from a resolved battle, see 6.8) are not subject to delays due to the deployment period.
Enemy morale, while not a strategic objective per se, is an important aspect of every mission (and contract). Morale reflects enemy’s ability to resist your and allied advanced effectively. The levels range from "routed" (very low) to "overwhelming" (very high). Routed enemy is as good as gone and means an allied win for most contract types. How morale is calculated is explained well in the ‘docs’ files, but briefly, every battlefield victory and every loss affects how likely the enemy will fail or succeed a roll in improving/declining their morale.
A number of facilities can be present on a track, both allied and enemy. These represent bases, significant infrastructure, and important installations. They affect either you and your allies or OpFor, depending on who owns the base at the moment. The effects vary depending on the nature of the base. For example, Mek/Tank/Air bases can provide reinforcements of the corresponding type to you or OpFor (again, depending on who owns the installation).
These installations are often strategic objectives themselves and sometimes comprise the very goal of the whole contract.
The facilities can be captured and destroyed by deploying forces to them and resolving the resulting battle in a specific way. Facilities are considered captured if all the defenders are eliminated but the static defenses remain mostly intact. Transforming everything to rubble and waste left and right on such a deployment will lead to the facility being inspirational, and thus considered destroyed. Sometimes it’s worth destroying an important facility just to preclude OpFor from having the corresponding advantage. In any way, OpFor having any of these facilities under command makes your life much harder.
The precise effect of a facility on the battlefield, both for your side and for the OpFor, can be found below:
Allied...
Hostile...
Reconnaissance is performed by deploying the forces on the track by right clicking the hex of interest and selecting manage deployment and then assigning a force. Notably, as mentioned in section 5.3, a force assigned as patrol would be much more efficient at this task, revealing not only the hex to which it is deployed (as long as it’s an empty hex that does not lead to a combat scenario), but also surrounding hexes.
By deploying our patrol lance into hex 0102, we have revealed all the surrounding hexes as well. Notably, we have revealed enemy facility, a Comm Center, in hex 0103. This does not generate a combat scenario straight away, but now we do have an option to deploy forces there to generate one. (Note: if Advanced Scouting is turned on, revealing all the surrounding hexes is not guaranteed!)
Also note that the objectives window now reflects that this is indeed the facility that we need to capture for the completion of the contract by mentioning the precise hex coordinates of the Comm Center (0103).
The deployed recon lance will now stay deployed for 1 day, due to the Deployment Period being that long. We can right click on the deployed lance and make them deployed in that hex until further notice. This order is useless for recon, but is quite useful for protecting your own assets on the track. We will wait one more day for the recon lance to return though.
As mentioned before, being resupplied while deployed can be hard. First, the deliveries of the orders take weeks and months to arrive. Especially in the periphery, where we don’t have much choice. For example, an upper arm actuator for a light mek can take a month.
In peacetime operations 32 days may seem OK. We can wait for the part to arrive while the crew gets some R&R. But on deployment this much time is a lot, and most likely the part will arrive when no longer needed. The unit that was waiting for it would be dismantled by the enemy.
Instead, on deployment we rely on employer’s resupply. These come up once in a while in a contract. While the employer can give us a thing or two, they are usually happy to expand the supply if we provide our own means of transportation — convoys (see 4.7).
Here on Thamel, just while we were waiting for the recon lance to come back, our Independent employer proposes to enhance the delivery, provided the total cargo capacity of our convoy matches the size of the enhanced delivery. While running goods through enemy territory is a risky job, it usually results in crucial parts and equipment being at our camp much faster than usual procurement channels.
Convoys’ success depends on the battlefield situation: enemy morale, degree of track control, etc., all affect how safe the passage is. If the convoy is successful, you will receive extra goods. However, be prepared for the convoy interception. The enemy would not miss a chance to preclude you from repairs. In successful intercept attempts, a combat scenario involving your convoy force will be generated. That’s why TLR convoy has some tanks attached to it, to hold some time before fast reacting force can come to the defense of the convoy.
We accept the offer and try to get a ‘Balanced’ option, where diverse parts are included. This brings us almost 300k C-Bills worth of equipment! We are just glad that our guys are back. Documentation on convoys is extensive, and can be found, as always, in the ‘docs’ folder. But the bottom line is that extending employer convoys with yours, even if they are small in cargo capacity, it is almost always worth it.
(NB: if something went wrong with the scenario generation, e.g. you notice excessive enemy force, you can use GM option to right click → chose ‘Regenerate Bot Forces’. This will refresh the whole scenario, hopefully eliminating any issues. Keep in mind, this is a GM tool, not something to re-roll scenarios to your advantage! Sometimes excessive OpFors are generated intentionally. Story-wise, players are not always on top of the strategic situation after all)
In StratCon, the scenarios represent combat opportunities. For example, Allied Command has spotted an opportunity to breach through enemy lines or stop the enemy advancement. You, as the commander, can decide if you want to engage in that combat (unless you’re under Integrated Command where employer decides for you, see section 5.1). The way StratCon generates scenarios on a track is not meant for you to engage in every single one. You can refuse engagement. More on that later in this chapter. Meanwhile, let’s get our boots on the ground.
Our recon lance was sent to scout out the track around the Hostile Comm Center. Deployment into hex 0203 revealed additional hexes and led to the discovery of an enemy force in hex 0304. Clicking on the red hostile force icon will bring new info into the window to the right. This info will briefly state the nature of the possible encounter, when it is about to start at the latest, and hostile and allied BV – estimating the size of the forces involved on both sides.
Many more details on the generated combat scenario are provided in the Briefing Room tab. First, the generated scenario now starts to populate previously empty table on the bottom of the screen. This table provides a name for each scenario, states if it was resolved or not (and if yes to what result), date when the battle will occur, how many forces are assigned to it, and a hex number on the track.
Selecting the scenario will provide a much more detailed view in the window to the right. The window will list all the forces involved in the scenario, both enemy and allied. This list does not contain our forces before we assign them though. The gray bars with the force names (e.g. Pirate OpFor) are clickable to reveal all the units involved. In this example, the enemy Pirates field a Thug in the first force, and an APC with a motorized infantry platoon being the VIP target. Note that our allies field quite a bit of aircraft — this is because we have an allied air base present on the track! We are not sure why we are needed in this scenario at all, the ASF force should be able to deal with the Pirates here. I guess the employees want some boots on the ground.
In order to check what are the precise objectives of this scenario, we can scroll down. There will be a long description of the mission providing all the details needed to understand the assignment. And towards the end of the text, all the modifiers from the Strategic level (bases, facilities, and such) will be listed: in our case a hostile comm center boosts the pirate forces (that is probably why they field an assault mek!) and an allied air base (which provides us with an allied ASF lance).
After that, the primary goals of the scenario will be stated, followed by amounts of scenario victory points (SVP) tied to them. SVP are used to establish if the scenario was a success, a draw, or fail. In this example we have only one goal – destroy the pirate VIP, and thus failing to do so will lead to a failure, and success – to overall success. Some scenarios are more complex though, and have several goals, that’s where SVPs come into play. If the overall SVP after the battle resolution is positive, it is considered success.
In this window you will also find conditions of the scenario, such as map size and type, light conditions, weather conditions, and planetary conditions. Some of these conditions, indicated by a checkbox, can be rerolled a limited number of times. The number of rerolls is determined by the tactics skill of the commander of the unit deployed. [NB: all these parameters, including map, can be changed manually when the scenario passes into MegaMek for the actual battle setup].
Sometimes the scenario briefing text mentions which force is required to be fielded to the scenario. Most often this is tied directly to the events unfolding in the StratCon track. For example, if your recon lance has landed in the same hex with the enemy force, provoking a rapid response. This will likely generate a combat scenario, where your recon lance needs to escape the hostile interception. Due to their role, recon lances on patrol do trigger quite a bit of scenarios but note that such behavior is not exclusive to them.
Ideally, before deployment, we would like to check on our troops. If we go to TO&E and select our recon lance, we will find that most pilots are now affected by fatigue. This is due to the fact that we have deployed them more than once a week. Fatigue, if enabled in campaign options (see section 3.1), negatively affects morale and performance of personnel. It will go away if they are given time to recover. They will also recover faster if we have some Field Kitchens (see 4.8) at our disposal. Hence, as the scenario does not specify which lance is needed for its playthrough, we will assign our medium lance to deal with the pirate VIP and its escort.
To do so, we go to the AoE tab, find the red hostile force marker, right-click it and choose ‘manage deployment’. Here, as in case of deployment into an empty hex, we will be given a list of all available forces. We choose our combat lance (assigned to Frontline duty) and click confirm.
This will bring up Scenario Setup Wizard. This window will re-iterate all the important parts of the scenario, such as the goal, BV of the teams, etc. Also, depending on the deployed unit assignment and the commander’s skills, this window will allow us to bring in reinforcements (limited by the force commander’s leadership skill), deploy minefields and infantry (if assigned frontline), and so on. These types of reinforcements do not use support points but are quite limited. In this scenario we will not do any of that and will commit our combat lance straight away.
Going to the Briefing Room and advancing days until the scenario date occurs, we will see that the scenario window to the right now has our lance listed as deployed, and the “Start Game” button on top is now active.
If the commander of the committed force has good (or any at all) leadership skills, you can reinforce the deployed force with some extra units (with total BV defined by the Leadership skill of the force commander). Alternatively, you can order another force to reinforce the one you commit to the scenario.
Just for the sake of this guide, we can try to reinforce Lance I with our recon lance. This is done by right-clicking the same hex where the scenario is designated, and following the same sequence of menus as usual, deploying a second lance. MekHQ will realize that this is a reinforcement, if a force was already assigned to the scenario. If we commit another force here, a detailed breakdown of the roll needed to reinforce will be shown. Keep in mind that reinforcements of this kind use up your Support Points. You can also use more than 1 SP to boost your chances of reinforcement. If your roll is successful, the reinforcing force will join the battle.
Keep in mind that they won’t join the fray at the same time. The turn on which the reinforcements arrive is determined by the speed of the slowest unit in that force. That’s quite logical, your giant stompy assault meks will take quite a bit of time to arrive to the battlefield, as compared to the swift aerospace forces. This fact makes reinforcement a real strategic choice, making reinforcement with a fast unit like a recon lance quite a feasible option. A big company might use a fast aerodyne DropShip (like a Leopard) as a delivery transport to quickly bring the meks to the field. Reinforcing force will need to have the DropShip in question to be assigned to it in TOE. This will make the DropShip a potential target for interception, AA fire, and combat insertion resistance, but nothing is more heroic than a combat drop!
The transport type drop-down menu allows you to more precisely specify the way the reinforcements arrive on the battlefield. Those work exactly like the transport assignments in the TO&E (see 4.7.3 for more details). These assignments affect the force’s speed, and are paramount to reinforcements arriving in time. So, if you forgot to assign a transport for a force that can benefit from it (e.g. a lance of assault meks can take more than 10 rounds to arrive, but loaded into an Leopard, just two), you can select an appropriate option here to automatically load units into available transport.
In case of an unsuccessful reinforcement roll, the designated reinforcing force won’t be able to participate in the scenario. Moreover, if further tactical decisions are not well made, the reinforcing lance can be intercepted by the enemy on approach, generating another combat scenario. Unlike the general deployment on AoE, such scenarios must include the unit that failed to reinforce, and in fact, the Briefing Room will already reflect that.
In our attempt, Lance II was indeed unsuccessful to help their comrades and were intercepted by a pair of enemy meks. Allied aircraft, however, are still there to intercept the interceptors so to say. This is a rare commitment from an employer.
Now we have two scenarios to play out and resolve.
When scenarios are ready to be played out, i.e. forces are assigned and the start date has arrived, there are several ways to resolve them.
Pressing ‘Start Game’ will open an instance of MegaMek and will load up all the units participating in the scenario, define the teams, deployment zones, weather and planetary conditions, etc. This will allow the player to play out the scenario according to the BattleTech TW rules implemented by the MegaMek suite, together with optional rules selected in 3.3 Configuring Battle Rules.
Conditions and map can be generated/selected/edited in the ‘Select Map’ Tab of MegaMek lobby window. Rules and options that were set up in 3.3. can be now accessed through the ‘Game Options’ button. For example, the turn on which the battle should stop can be set there in ‘Victory Conditions’ tab.
The lobby screen will also show all the units in play, unless you have Double Blind ruleset on. Also, the turn on which the units will arrive (as defined by Reinforcements 6.6) is also noted here.
This guide does not cover MegaMek play, apart from some client config and options tips in section 7. It is assumed that the player is familiar with BattleTech and can play out MegaMek games.
After the scenario is played out in MegaMek instance, the player will need to resolve the scenario to find the consequences of the battle. This is covered further in 6.8 Resolution.
The button ‘Resolve Manually’ on the right will allow us to complete the scenario immediately. This option will skip all the combat and simulation entirely and will allow us to input the outcome of the battle by hand, as if it happened (we will get there in 6.8 Resolution). This option is mostly considered a GM tool and is often used for scenarios that are quite evident in their outcome.
(NB: Autoresolve feature is extremely well documented in the ‘docs’ folder as “ACAR & PACAR - Abstract Combat Auto Resolve”. This guide won’t go into the details of the internal machinery of the method)
Another method to resolve scenarios with minimal input from the player is Auto Resolve. Clicking on this button will bring up two further options: PACAR and ACAR. Both options aim to play out the battle without human involvement, but the methods differ in concept.
ACAR stands for Abstract Combat Auto Resolution. Briefly, this is a system that will allow us to resolve the battle using a set of simplified (but still quite complex!) calculations and simulations with regards to how the combat proceeds. The result will determine not only which side is winning, but also which units are lost, extent of the damage, etc. Exactly like a human-played combat will do, but much faster and with zero input. This type of simulation runs quite fast and, when done, will show a report on how battle went, together with most rolls, movements etc. This, however, heavily abstracts combat, and results in scenario resolution that is quite far from a narrative event. I recommend using this resolution, again, when the scenario has an obvious outcome, and you don’t want to bother with resolving it in any other way.
PACAR stands for Princess Automated Combat Resolution, with Princess being the AI that usually plays the OpFor in the games against computer in MegaMek. The concept of this method to resolve scenarios is to run the game with the full ruleset, as if the player would play out the scenario themselves. However, in PACAR both the player force and the OpFor are played by AI Princess. This level of simulation takes more time than ACAR but simulates the whole battle down to the finest rule.
The scenario is played out exactly as it would have been played out in MegaMek, but instead of direct control of the units, the player has a more general, almost strategic (at least top level tactical) level of command of the force. The simulation can be paused at any moment, player can give commands to the allied forces, such as keep formation, focus target, retreat and so on. Meanwhile, the stylized battlefield (that uses minimap graphics) will show the progress of the battle and reflect all the decisions made by the AI.
Such simulation has exactly the same level of resolution details as a manually played out game, since PACAR does indeed play out the game. The battle results still need to be decided quasi-manually (see 6.8. Re) after any scenario ending.
Another way to deal with a scenario is to not deploy any force or deploy a force but not initiate battle. This is done by advancing a day on a scenario date. In this case, we will receive a dialog to confirm our decision. Info about which scenarios will be forfeited will also be provided.
Withdrawal from a scenario in such a way is usually free, expect every scenario you refuse to engage in counts as a defeat for the purposes of enemy morale. Moreover, withdrawal from Turning Point and Crisis scenarios will cost 1 Campaign Victory Point, and bear even more significant effect on enemy morale.
→
Some strategic decisions in this regard are also obvious. If the goal of the enemy was to capture an allied facility, and we have ignored/refused engagement, it is highly likely that the enemy will succeed in capturing said objective.
A good commander should always assess the situation. Sometimes, not participating in the scenario is the only sane choice. Consider when your forces really need to recover. Keep in mind that Turning Point scenarios are much more important than just a random skirmish with the enemy, and it’s better to stay prepared for a critical battle.
After the scenario is played out, the player will need to answer a series of questions — some related to the technical part of the suite, some to gameplay, some to the narrative.
The first question is usually if you want to save a record of all units. This generates a MUL file containing everything that is on the field and the status of every unit. This is generally useful if you would like to re-create the scenario, or you want to keep track of damaged units for future scenarios that you setup yourself. Generally, these files are used for GM reasons and are not that useful for general StratCon play.
Next question is whether we want a GIF of the minimap of the battle. Those are very fun. They show how the battle progressed, including tracks of movement and fire lines. It’s interesting to observe a speed-up of a big battle in this form.
The next question pertains to battlefield control. The pop-up dialog will note who is supposed to control the battlefield in the present scenario. Keep in mind that even if the scenario says that the player always controls the field, it does not make much sense if all your units retreated. In the present version (0.50.05), this decision is on player, although with a helpful hint.
Next window will lead us through the scenario resolution effects. Much of these can be tweaked by the player for a narrative choice or for correct outcome. For example, sometimes a crippled enemy unit will be marked as escaped, which can be changed manually.
First tab ‘Your Units’. This tab will show you a list of your units that have participated in the scenario and their current status: damage, loss, etc. If this scenario is part of a bigger engagement, then check marks can be assigned to the units which will continue to the next part of the assignment. E.g. if we successfully defeat the forces that intercept our reinforcements, the reinforcing lance (or its part) can continue on to reinforce and join the battle where it was headed.
Next tab ‘Your personnel’ reflects all the characters involved in the scenario, shows if they suffered any hits, are MIA or KIA.
‘Salvage’ tab will show all the units that can be salvaged from the OpFor, as well as the total salvage we are allowed and the current value. We can mark here if the enemy unit is to be salvaged, sold, or if it escaped the battle. The latter option will be automatically checked if the unit retreated from the battlefield.
‘Captured personnel’ tab shows enemy personnel involved in the scenario, their health status, if they survived (KIA unchecked), were taken as prisoners by your unit, or escaped (none checked).
‘Assign kills’ tab allows you to write down which of your pilots downed which enemy unit. MekHQ through MegaMek keeps good track of this statistic, but sometimes you would like to correct it manually. For example, ejections don’t count as kills (as its not the damage that disabled the unit per se) and you may want to rectify this.
‘Costs and Payouts’ tab is used if there is loot (parts or cash) or a cost associated with the scenario. E.g. if the scenario deals with the convoys being intercepted.
‘Objective Status’ tab lists all the objectives that were set up by scenario. Usually those are well checked automatically, but some may need to be manually adjusted. These checked positions define if you have won or lost the scenario, some of them define if you get any CVP or SP from the resolution. It’s always good to carefully read the objective before the mission and carefully verify the completion on this screen too.
‘Preview’ tab will give you a general overview of the resolution. Most importantly on the very top you will find the dropdown menu for the final resolution: Victory – Draw – Defeat and everything in between. Make sure to choose what is right! Sometimes victory is pyrrhic, sometimes defeat is marginal.
Winning or losing a scenario can sometimes entail gaining or losing Campaign Victory Points (CVP). This is mostly related to scenarios designated as Turning points — important events that turn the tide of the battle, affect the OpFor (and/or us) significantly, and are overall meaningful for the contract. Winning a turning point scenario will award a CVP, while losing it will subtract one.
Crisis scenarios represent sudden developments that need your immediate attention. Those deal with events outside of your strategic control, e.g. your supply convoy was intercepted, or a prisoner has escaped. Winning such a scenario does not produce any CVP; while failing it will lead to a loss of CVP. Narrative-wise, such a loss can represent loss of vital supplies or intel to the enemy.
After successfully fending off the intercepting force, our patrol lance has returned safe to base, deciding not to reinforce Lance I, in case the pirates decide to attack our allies in our absence.
Lance I, led by Michelle, has successfully engaged the enemy VIP Raúl Vélez and his assault mek entourage. This officer, more of a warlord if you ask our crew, is now down, pulverized by our fire and the strafing runs of allied aircraft.
As per scenario rules, our side now controls the battlefield, and we are free to salvage. The amount of salvage is defined by contract norms, but we also need to get the loot out of the battlezone. TLR never hired or purchased specialized mek recovery vehicles or a team of salvagers, so we will have to do with our own myomeric robotized hands. We are asked now which force can be assigned as salvage team. We need a team with most weight carrying capacity and most hand actuators. If we were smarter – we would buy special vehicles to assign for this task. Now we can rag only one mek out. More about salvage is described in CamOps book.
Now back to base, repairs need to be performed: some armor on the Crab needs to be replaced, LRM launchers of the Trebuchet need to be rearmed (See section 4.6 for details how it’s done); unfortunately, infirmary is not empty after the engagement: our MekWarriors have suffered some severe injuries after the run down with the enemy, fortunately we have an experienced doc in the company (see section 4.6). (NB: even if you don’t notice the injuries, you will get a nag dialogue that you have untreated personnel).
Apart from bad news, we have some good ones. Honors are due, and some of our personnel will receive their first awards. This is where the autoawards system comes in, checking if sufficient criteria have been fulfilled. In our case, we are ready to pin some ribbons on the uniforms of our comrades who saw combat for the first time in their career, and, with a note of sadness, we will have to also pin some Purple Hearts on field jackets of pilots who got injured in combat. The medals award extra XP (as set up in 3.1.2).
After both scenarios are resolved, we can check the AoE tab. And while the CVP amount did not move, as we did not participate in any turning point scenarios, we can see that one of the conditions of the contract has been fulfilled: engaging hostile forces on the Track. The Learning Ropes is on the right track.
From now on we can continue advancing the time, deploying forces onto the track (e.g. to capture the pirate comm center), response to the threats that appear, and ultimately break the enemy morale and rake up some CVP to fulfill the contract.
The gameplay loop consists of trying to keep your forces in combat-ready condition, personnel happy, and keep committing to combat in the contract to fulfill the contract conditions and bring enemy morale down (until they surrender). Deploying combat forces, repairing and rearming after, trying to score some salvage (hopefully, repairable pieces of tech) to expand the unit, while trying to not get bankrupt at the same time.
At some point, the contract will end with us being successful or not. This can occur at the contract end date or if the enemy is routed, for example. At this moment you will get a popup message stating that the contract needs resolution. As with battles, the resolution of contracts is sometimes up to a player to decide: if that was a complete victory, just a partial success, or some circumstances led us to breach the contract. Here, again, MekHQ presents an excellent storytelling tool, which you should utilize to its fullest.
Outcome of the contract is chosen between Success and Failure, with Partial Success being an option if not all the objectives were achieved. Contract Breach implies breach from the employee side – so use it if you bail before completion for example.
End of contract usually brings another instance of Personnel Turnover and Auto Awards dialogs, if contract fills the requirements of any of the awards (like participating in a war).
With all the details covered here, you should be able to create your first company and start your first campaign.
Good luck, Commander.
Toolbar menu View → Client Settings brings the main options to configure look and feel of MegaMek client. Some useful options that I tune are
Shortcuts are well documented in the respective client config tab (Key Binds). I will mention a few that I use all the time.
Chat box can be opened by pressing ‘Enter’. Some useful commands that can be used in the chat box are:
I have spent quite a bit of hours writing this guide, and even more talking about Battletech and MekHQ on the official discord. Mostly out of my sheer enthusiasm for the BattleTech, my love for the Megamek suite, and the excellent community surrounding both. I truly believe that the software in question is one of the most powerful tools in the hands of the BattleTech player and GM (after the books of course). These tools can be used to craft not only an entertaining gaming experience, but a full narrative, story, fiction for a custom or a historical unit. Some games take a couple years to resolve and follow companies that burn (and burn out) bright. Some campaigns are generational, where parents retire to see their offspring pilot their ancestral meks in combat against new foes. MHQ allows you to play out all of that, as long as you understand that while the digital GM will roll your rolls and assign your missions, the best narrative is still written by humans.
I would like to thank everyone involved in the BattleTech community for keeping the universe alive and contributing to its expansion in various forms. The people who contribute their free time to improve and keep running the MegaMek suite are some of the best examples of human creativity, perseverance, enthusiasm, and collaboration. Developers, testers, players, everyone is doing an excellent job, and I am honored to be a little part of the process.
All programs in MegaMek suite are open source and distributed under the GPL. All rights to Battletech and all associated trademarks, intellectual property, etc. belong to Catalyst Gamelabs/Topps.
Original draft of the manual – by cooshoo.
MHQ New Player Guide